Disclaimer: This article is for educational and informational purposes only. It does not constitute financial or investment advice. Trading forex and CFDs carries significant risk of loss. Past performance of any strategy — including backtests — does not guarantee future results. Never trade with money you cannot afford to lose.
What Is This Strategy?
Zero Lag Trend Reclaim is a trend-following pullback strategy built around the Zero-Lag Exponential Moving Average (ZLEMA), a de-lagged baseline popularised by John Ehlers and Patrick Mulloy. A standard exponential moving average (EMA) — a smoothed average of price that reacts faster to recent bars — always trails price by a fixed amount because it is looking backward. ZLEMA reduces most of that delay by adding an error-correction term: instead of smoothing raw closing prices, it smooths a "de-lagged" input equal to 2 × Close − Close[lag], where the lag is roughly half the chosen period. The result is a responsive trend line that hugs price closely without the choppiness of price itself.
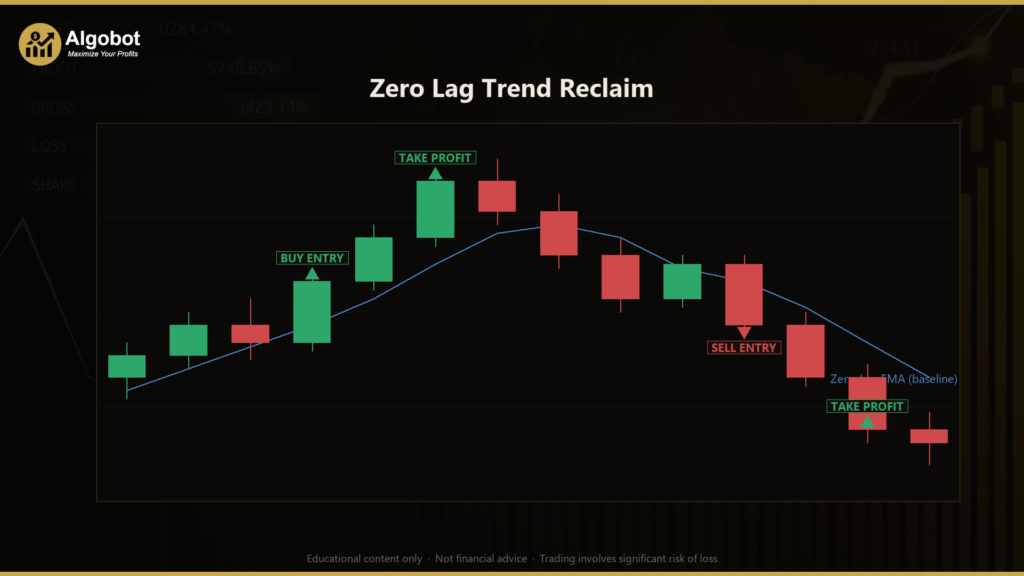
The core idea this strategy studies is simple and widely observed: in a genuine trend, price does not move in a straight line. It repeatedly dips just below the ZLEMA and then reclaims it. Rather than chasing a fresh breakout far from the line, Zero Lag Trend Reclaim waits for that shallow pullback and buys (or sells) the moment price closes back on the correct side of the baseline. Because the entry sits right next to the ZLEMA, the protective stop — placed just beyond the pullback extreme — can be kept naturally tight.
This strategy is best suited to traders who want to learn how a de-lagged moving average, a slope-based regime filter, and structural stop placement fit together in a disciplined, rules-based system. It is a study in trend-with-pullback entries, not a shortcut. It works on a single timeframe and computes both ZLEMA and Average True Range (ATR) by hand from raw open-high-low-close data, making it a clean example for anyone learning how these mechanics operate under the hood.
How It Works
The strategy only evaluates structure once per newly closed bar, while risk management runs on every tick. Here is what it does step by step.
Regime filter (no counter-trend trades):
- The strategy measures how far the ZLEMA has risen or fallen over the last
SlopeLookbackbars and divides that move by the current ATR, producing an ATR-normalised slope. - It only considers long setups when this normalised slope is at or above
+SlopeThreshold, and only short setups when it is at or below−SlopeThreshold. A flat or ambiguous slope means no trade is taken.
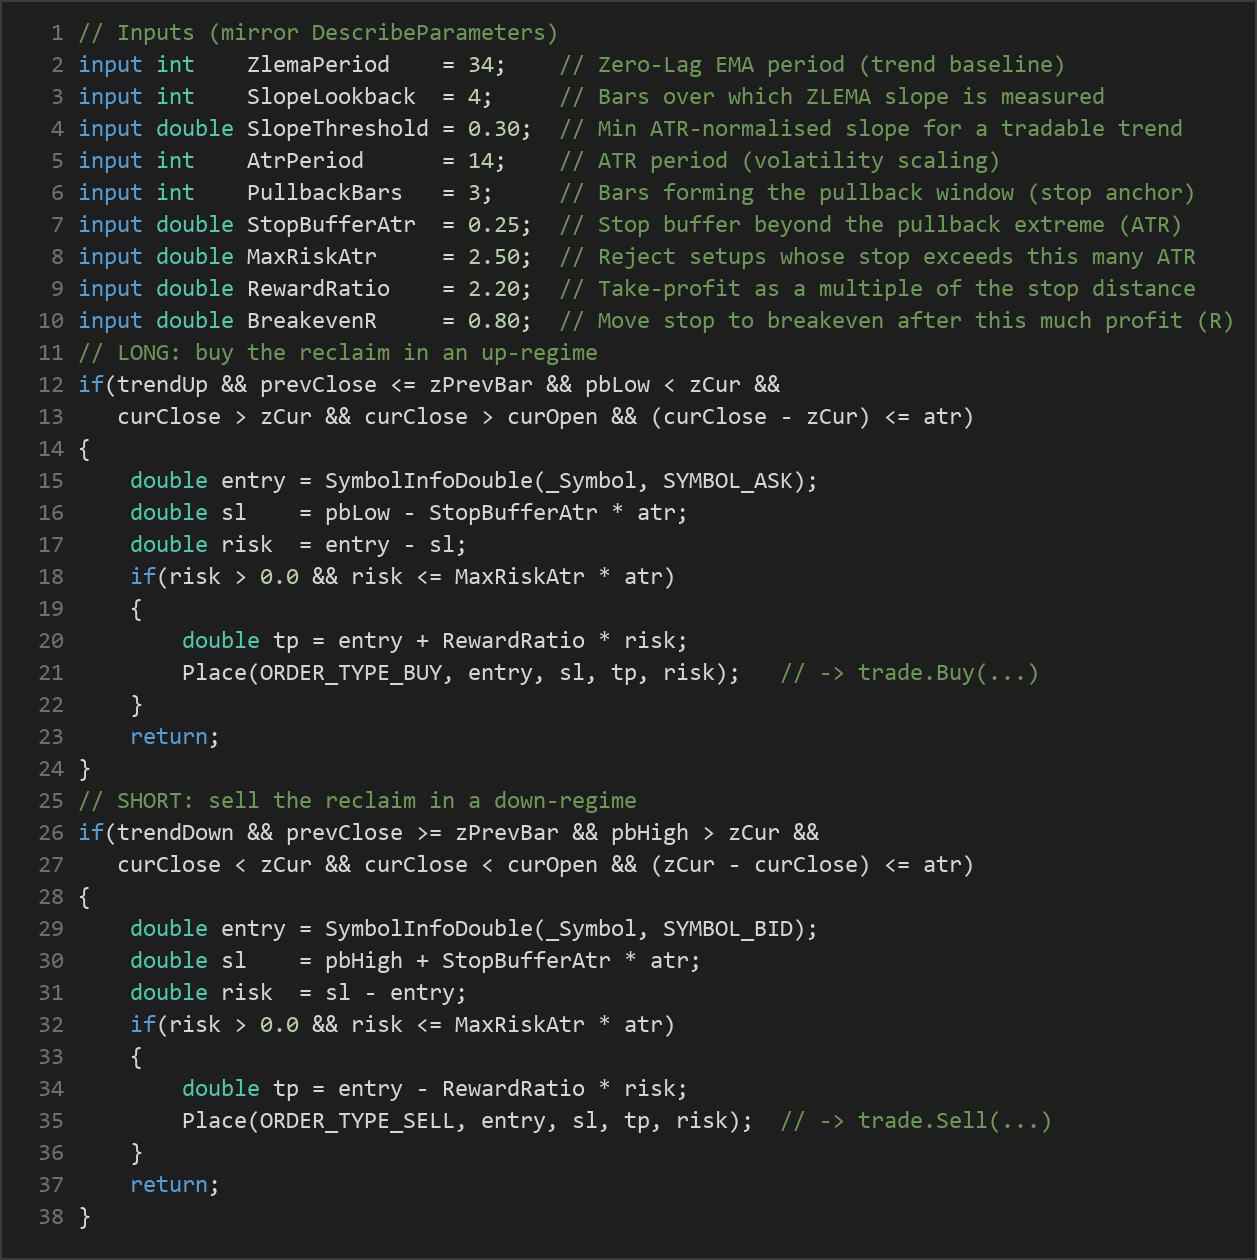
Long entry — buying the reclaim in an uptrend. The strategy signals a long only when all of the following are true:
- The regime is confirmed up (normalised slope ≥ threshold).
- The prior bar closed at or below the ZLEMA — evidence of a genuine dip.
- The recent pullback window actually pierced below the line (the lowest low dipped under the ZLEMA).
- The just-closed bar closed back above the ZLEMA with a bullish body (close above open).
- The reclaim is not overextended: the close is within one ATR of the line, so entry hugs the baseline for a tight stop.
Short entry — selling the reclaim in a downtrend. This is the mirror image: a confirmed down-regime, the prior bar sitting at or above the line, the pullback poking above it, and the just-closed bar closing back below the ZLEMA with a bearish body, again within one ATR of the line.
Stop-loss logic:
- The stop is placed just beyond the pullback extreme — the lowest low (long) or highest high (short) of the pullback window — buffered by
StopBufferAtr × ATR. - If that structural stop distance would exceed
MaxRiskAtr × ATR, the setup is rejected entirely. This keeps per-trade risk bounded and comparable across symbols and timeframes.
Take-profit logic:
- The target is set at
RewardRatiomultiplied by the structural stop distance, giving a fixed reward-to-risk relationship on every trade.
Breakeven lock:
- Once price runs
BreakevenR × riskin the trade's favour, the stop is pulled up to the entry price. From that point a winning trade can no longer turn into a loss — this is the mechanism the strategy uses to keep drawdown small. - Only one position per magic number is allowed at a time, so exposure is never stacked.

Strategy Parameters
| Parameter | Default | Min | Max | Description |
|---|---|---|---|---|
| ZlemaPeriod | 34 | 12 | 80 | Period of the Zero-Lag EMA that forms the trend baseline. |
| SlopeLookback | 4 | 2 | 15 | Number of bars over which the ZLEMA's slope (trend strength) is measured. |
| SlopeThreshold | 0.30 | 0.05 | 1.50 | Minimum ATR-normalised ZLEMA slope required to confirm a tradable trend. |
| AtrPeriod | 14 | 5 | 40 | ATR period used for volatility scaling of the slope gate, stop buffer and risk cap. |
| PullbackBars | 3 | 1 | 8 | How many recent bars form the pullback window whose extreme anchors the stop. |
| StopBufferAtr | 0.25 | 0.00 | 1.00 | Extra stop buffer beyond the pullback extreme, in ATR units. |
| MaxRiskAtr | 2.50 | 1.00 | 5.00 | Rejects setups whose structural stop distance exceeds this many ATR. |
| RewardRatio | 2.20 | 0.80 | 4.00 | Take-profit distance as a multiple of the structural stop distance. |
| BreakevenR | 0.80 | 0.20 | 2.00 | Moves the stop to breakeven once price runs this multiple of risk in favour. |
| Lots | 0.10 | 0.01 | 1.00 | Fixed position size in lots. |
| Magic | 4711 | 0 | 9,999,999 | Magic number tag identifying this strategy's positions. |
Recommended Chart Settings
Zero Lag Trend Reclaim was designed to run on a single, self-contained timeframe — every calculation uses the chart's own timeframe at test time, so the same logic adapts to whatever chart you attach it to. It tends to express itself most clearly on a trending FX major or a metal such as EURUSD or XAUUSD on the H1 (1-hour) timeframe, where pullback-and-reclaim behaviour around a moving-average baseline is common.
That said, the strategy is timeframe-agnostic by construction. You can study it on higher timeframes for fewer, larger swings or on lower ones for more frequent signals. Keep in mind that behaviour will vary substantially across different symbols, sessions and market conditions, and that no single set of chart settings performs the same way in every environment. Always evaluate the strategy on the specific instrument and timeframe you intend to study before drawing conclusions.
How to Install on MetaTrader 5
- Download the
.ex5file from the link below. - Copy it to your MT5
MQL5\Expertsfolder. - Restart MetaTrader 5 or refresh the Navigator panel.
- Drag the EA onto a chart matching the recommended symbol and timeframe.
- Configure the input parameters and enable Algo Trading.
What to Consider Before Using This EA
Strengths of the approach. By entering on a reclaim of the ZLEMA rather than a distant breakout, the strategy keeps its entry close to the baseline and its stop structurally tight. The ATR-normalised slope filter is a genuine attempt to avoid trading against the prevailing direction, and the breakeven lock is a sensible mechanism for protecting open profit. Computing ZLEMA and ATR directly from OHLC also makes the logic transparent and easy to audit as a learning exercise.
Known limitations. Like all moving-average systems, ZLEMA reduces lag but cannot eliminate it — sharp reversals can leave the baseline pointing the wrong way for several bars. A strict regime filter that avoids counter-trend trades will, by design, skip many bars and can sit idle during choppy, directionless markets. Requiring a pullback and a same-direction close and a non-overextended entry means qualifying setups are relatively rare, so signal frequency may be low.
Where it may underperform. Range-bound or whipsaw conditions are the natural enemy of any trend-follower. In sideways markets the ZLEMA slope may repeatedly cross the threshold and back, producing false regimes and stopped-out trades. Sudden gaps or high-impact news can also blow through structural stops. Because the strategy takes only one position at a time, it will miss additional opportunities while a trade is open. Treat it as a framework to study and stress-test, not a finished solution.
Risk Management Tips
Sound risk management matters far more than any single entry rule. Whatever you are studying, keep these general principles in mind:
- Risk a small, fixed fraction per trade. Many educational sources suggest never risking more than 1–2% of account equity on any one position. Size your lots so that the distance to your stop equals that fraction, not the other way around.
- Test on a demo account first. Run the strategy in simulation until you understand its behaviour, its trade frequency and its drawdown character before considering any live capital.
- Understand drawdown. Even a well-designed system endures losing streaks. Know the worst peak-to-trough decline you are willing to tolerate and confirm the strategy stays within it during testing.
- Account for costs. Spreads, commissions and slippage all erode results, especially on lower timeframes with more frequent trades.
- Never over-leverage. Leverage magnifies both gains and losses; use it conservatively and never trade with money you cannot afford to lose.
Risk Warning
Trading foreign exchange, CFDs, and other leveraged financial instruments involves substantial risk of loss and is not suitable for all investors. The strategies and tools discussed on this page are provided for educational purposes only and do not constitute financial advice, investment recommendations, or solicitation to trade. Always consult a qualified financial adviser before making trading decisions. Past backtest performance is not indicative of future results.
Downloads
- Expert Advisor: ZeroLagTrendReclaim.ex5 (48 downloads)
- Source Code: ZeroLagTrendReclaim.mq5 (44 downloads)
- Documentation: ZeroLagTrendReclaim.pdf (47 downloads)