
Disclaimer: This article is for educational and informational purposes only. It does not constitute financial or investment advice. Trading forex and CFDs carries significant risk of loss. Past performance of any strategy — including backtests — does not guarantee future results. Never trade with money you cannot afford to lose.
What Is This Strategy?
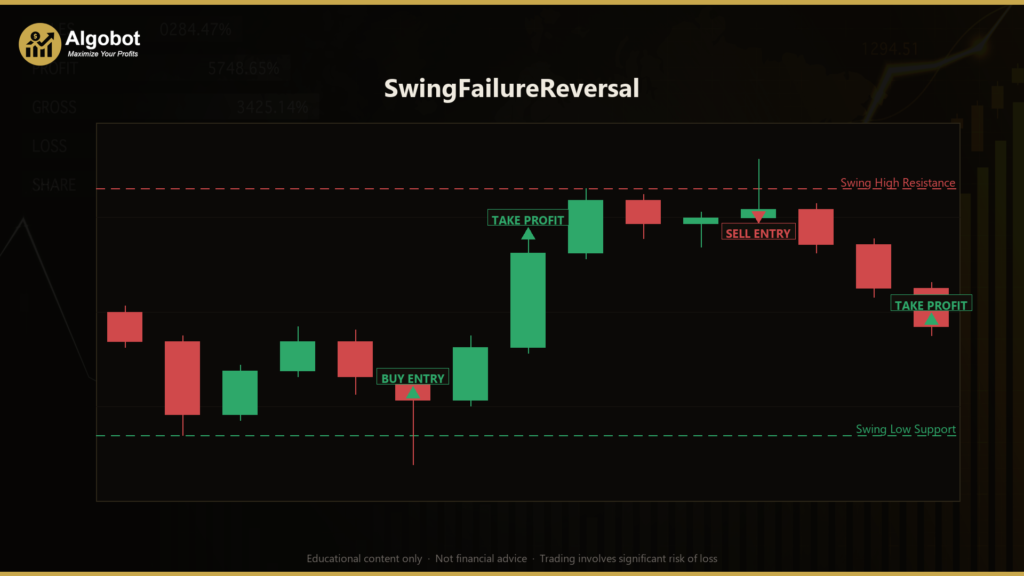
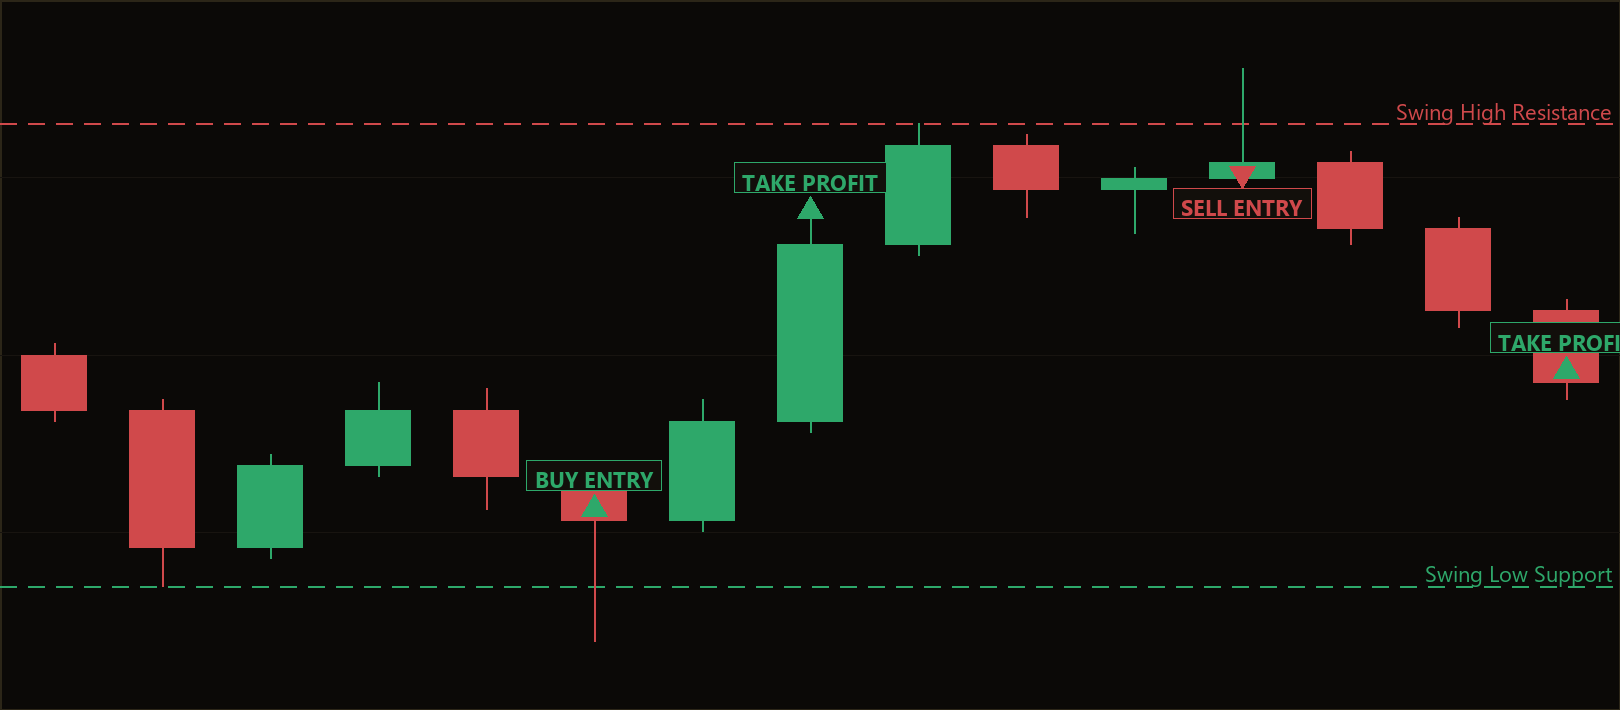
The SwingFailureReversal EA is a pure price-action expert advisor for MetaTrader 5 that trades the swing failure pattern (also called a liquidity sweep or stop-hunt rejection) around horizontal support and resistance levels. Unlike most automated systems, it uses no indicators of any kind — no moving averages, no RSI, no ATR. It reads only raw candles and the swing pivots they form, making it a clean case study in how structure-based, counter-trend trading can be expressed in code.
A swing pivot is simply a local turning point on the chart: a swing high is a bar whose high is the strictest peak over a set number of bars on each side, and a swing low is the mirror image at the bottom. These pivots act as horizontal resistance and support. The strategy waits for price to briefly poke through one of these levels — sweeping the stop orders resting just beyond it — and then close back inside, leaving a long rejection wick. That failed break is the "swing failure" the EA is named for.
This is a reversal / counter-trend swing-trading approach, designed for liquid instruments that produce clean stop-runs, such as gold (XAUUSD) or major forex pairs like GBPUSD, on intraday timeframes like M15 or M30. As a learning tool it suits traders who want to understand how support/resistance, liquidity, and rejection wicks can be defined objectively, rather than discretionary chart-reading. It is best treated as an educational framework for studying price-action logic — not as a shortcut to results.
How It Works
The EA evaluates the market once per newly-closed bar, so it never reacts to incomplete candles. On each closed bar it identifies the most recent confirmed swing pivot and checks whether the bar that just closed represents a failed break of that level.
- The strategy signals a SHORT when resistance holds. It finds the most recent confirmed swing high (resistance). If the just-closed bar's high pokes above that level but its close finishes back below it — and the bar leaves a dominant upper rejection wick — the level is treated as having rejected price. This may indicate that buyers who broke out were trapped, and the EA sells.
- The strategy signals a LONG when support holds. It finds the most recent confirmed swing low (support). If the just-closed bar's low pokes below that level but its close finishes back above it — leaving a dominant lower rejection wick — support is treated as defended, and the EA buys.
- Wick quality filter. A poke alone is not enough. The rejection wick (the portion of the candle beyond its body) must be at least a configurable fraction of the bar's full range. This
MinWickFracfilter demands a genuine pin bar-style rejection and screens out marginal pokes. - Stop-loss logic. The stop is placed just beyond the sweep extreme — above the rejection high for shorts, below the rejection low for longs. The buffer is expressed as a fraction of the signal bar's own range (
StopBufferFrac), so it auto-scales to any symbol or timeframe without needing to know point size. - Take-profit logic. The target is a fixed reward-to-risk multiple (
RewardRatio) of that structural stop distance. With the default 2.0, the take-profit sits twice as far from entry as the stop. - One position at a time. The EA holds only one open position per magic number on the symbol and then lets the structural stop and target manage the exit — there is no trailing or averaging.
Strategy Parameters
| Parameter | Default | Min | Max | Description |
|---|---|---|---|---|
| PivotLeftRight | 3 | 2 | 8 | Number of bars required on each side of a bar for it to qualify as a swing pivot. Higher values demand more significant, less frequent levels. |
| MinWickFrac | 0.40 | 0.10 | 0.70 | Minimum rejection-wick size, as a fraction of the signal bar's full range. Filters out weak pokes and demands a real rejection pin. |
| StopBufferFrac | 0.15 | 0.00 | 1.00 | Extra stop-loss buffer placed beyond the sweep extreme, as a fraction of the bar's range. Larger values give the trade more breathing room. |
| RewardRatio | 2.00 | 1.00 | 5.00 | Take-profit distance as a multiple of the structural stop distance. A value of 2.0 targets twice the risk. |
| Lots | 0.10 | 0.01 | 1.00 | Fixed order volume in lots for each trade. |
| Magic | 6301 | 0 | 9,999,999 | Unique identifier so the EA can track and manage only its own positions. |
Recommended Chart Settings
This strategy was designed for liquid instruments with clean stop-runs, with XAUUSD (gold) and GBPUSD cited as natural candidates, on the M15 or M30 timeframes. These markets tend to produce the sharp pokes-and-rejections the swing failure pattern relies on. Keep in mind that the behaviour of any pattern shifts across instruments, sessions, and volatility regimes — a setting that looks responsive on gold may behave very differently on a quieter pair. Always study how the logic performs on your specific symbol and timeframe before drawing conclusions, and remember that results will vary across different market conditions.
Historical Backtest Results
Note: The figures below are from a historical backtest simulation. Backtests have inherent limitations — they do not account for slippage, requotes, spread widening, or psychological factors. These results should not be interpreted as a prediction of future performance.
No backtest data is available for this strategy at the time of writing. When a historical simulation is run, the key metrics to review — Net Profit, Profit Factor, Sharpe Ratio, Win Rate, Maximum Drawdown %, and Total Trades — should be evaluated together rather than in isolation. A counter-trend system like this one can show a modest win rate while still being studied for its reward-to-risk structure, so pay particular attention to drawdown depth and the number of trades in the sample before reading anything into the figures. Treat any future backtest strictly as a historical simulation, not a forecast.
How to Install on MetaTrader 5
- Download the
.ex5file from the link below. - Copy it to your MT5
MQL5\Expertsfolder. - Restart MetaTrader 5 or refresh the Navigator panel.
- Drag the EA onto a chart matching the recommended symbol and timeframe.
- Configure the input parameters and enable Algo Trading.
What to Consider Before Using This EA
Strengths of this approach. Because the SwingFailureReversal logic is built entirely from candles and pivots, it is transparent and easy to reason about — there are no lagging indicator calculations to second-guess. The swing failure pattern targets a well-documented market behaviour (the failed breakout / liquidity sweep), and the structure-based stop placed beyond the actual sweep extreme is logical rather than arbitrary. Expressing both the stop buffer and target as fractions and multiples means the system adapts to different symbols and timeframes automatically.
Known limitations. Counter-trend strategies that fade breakouts face a recurring challenge: when a level genuinely breaks and a strong trend follows, repeated rejection signals can produce a series of stop-outs. The fixed reward-to-risk target does not adapt to momentum, so trades may be cut short in fast moves or exit just before extended runs. The EA also acts only on closed bars and holds a single position with no re-entry or trailing logic, which keeps it simple but means it cannot adapt mid-trade.
Where it may underperform. Strongly trending or news-driven markets, thin or illiquid symbols, and periods of erratic spread widening can all degrade the pattern's reliability. The swing failure setup works best where there is real liquidity to sweep; in choppy, low-participation conditions, "pokes" may be noise rather than meaningful rejections. View this EA as a structured way to study price-action reversals, not as a finished solution.
Risk Management Tips
Sound risk management matters more than any single entry signal. Consider these general principles as part of your education:
- Risk a small, fixed fraction per trade. Many educational sources suggest risking no more than 1–2% of account equity on any single position, and sizing your lots accordingly rather than using a fixed default everywhere.
- Test on a demo account first. Run the EA on a demo or paper account for an extended period to understand how it behaves across different sessions and conditions before risking real capital.
- Understand drawdown. Every strategy experiences losing streaks. Know the maximum drawdown you are willing to tolerate, and recognise that a structural-stop reversal system can string several losses together when levels break cleanly.
- Account for real-world costs. Spread, slippage, and commission all erode results that look clean in a simulation — factor them in.
- Keep position sizes consistent. Avoid the temptation to increase size after losses to "win it back"; consistent sizing is part of disciplined risk control.
Risk Warning
Trading foreign exchange, CFDs, and other leveraged financial instruments involves substantial risk of loss and is not suitable for all investors. The strategies and tools discussed on this page are provided for educational purposes only and do not constitute financial advice, investment recommendations, or solicitation to trade. Always consult a qualified financial adviser before making trading decisions. Past backtest performance is not indicative of future results.
Downloads
- Expert Advisor: SwingFailureReversal.ex5 (0 downloads)
- Source Code: SwingFailureReversal.mq5 (1 downloads)
- Documentation: SwingFailureReversal.pdf (1 downloads)