
Disclaimer: This article is for educational and informational purposes only. It does not constitute financial or investment advice. Trading forex and CFDs carries significant risk of loss. Past performance of any strategy — including backtests — does not guarantee future results. Never trade with money you cannot afford to lose.
What Is This Strategy?
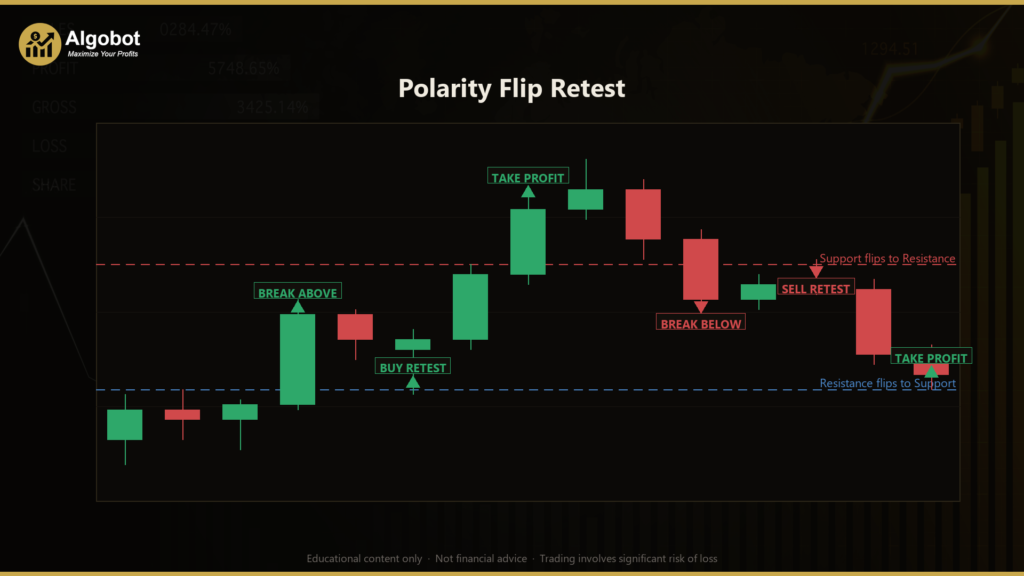
The Polarity Flip Retest is a pure price-action break-and-retest strategy that trades horizontal support and resistance levels — it uses no technical indicators of any kind (no moving averages, no RSI, no ATR). Instead, it reads market structure directly from confirmed swing pivots and waits for a candlestick rejection at a key level before acting. The trading style is trend-continuation swing trading, designed to enter on the pullback after a level breaks rather than chasing the breakout candle itself.
The core idea is "polarity flip," also known as role reversal. When price decisively breaks through a level, that level changes its role: a broken resistance (a ceiling price struggled to rise above) becomes new support (a floor), and a broken support becomes new resistance. Many traders consider the highest-probability entry to be not the break itself, but the first time price returns to "kiss" the flipped level from the other side and rejects it. This strategy only acts when that rejection is confirmed by a reading candle, so a single touch with no reaction is ignored.
As a learning tool, the Polarity Flip Retest is well suited to traders who want to study how market structure, support/resistance, and candlestick patterns combine into a rules-based system. Because every decision is based on visible price levels and bar shapes — not hidden indicator math — it is a transparent strategy for understanding how break-and-retest setups are mechanically defined. It is designed for liquid, trending markets and is intended for study rather than as a profit opportunity.
How It Works
The strategy builds its levels from swing pivots. A bar qualifies as a swing high (resistance) when its high is the strict highest point over a set number of bars on each side; a swing low (support) is the mirror image. A pivot is only used once it is confirmed — meaning enough bars have already printed to its right — so the levels never repaint or shift after the fact.
For a long (buy) setup, the strategy signals through a three-step sequence. A short (sell) setup is the exact mirror image.
- 1. Break — A closed bar closes above the most recent swing-high resistance by at least
BreakBufferFracof the swing range (the distance between resistance and support). That resistance is now considered flipped to support, and the strategy "arms" a retest watch on it that stays valid forExpiryBarsbars. - 2. Retest — Within that window, a closed bar dips back down toward the flipped level (its low comes within
RetestTolFracof the level) yet still closes back above it. This signals that the old resistance may be holding as new support. - 3. Confirm — That same retest bar must be a bullish rejection candle: a bullish body that is either a hammer (a long lower wick at least
ConfirmWickFracof the bar's range, showing lower prices were rejected) or a bullish engulfing of the prior bar. When all three steps line up, the strategy signals a buy to trade the continuation.
The exit logic is structural and free of point-size or ATR calculations — every distance is a fraction of the bar or swing range:
- Stop-loss (long): placed just below the structural extreme — the lower of the flipped level or the retest bar's low — minus
StopBufferFracof the bar's range. For shorts, the stop sits just above the higher of the level or the retest bar's high. - Take-profit: set at a fixed multiple of the stop distance, defined by
RewardRatio. With the default reward ratio of 2.0, the take-profit target sits twice as far from entry as the stop-loss. - One position at a time: the strategy only opens a new trade when the book is flat for its magic number, so it never stacks positions.
Note that retests are processed before new breaks are armed on each bar, which prevents a single bar from both arming a level and firing an entry in the same step.
Strategy Parameters
| Parameter | Default | Min | Max | Description |
|---|---|---|---|---|
| PivotLeftRight | 3 | 2 | 8 | Bars required on each side of a bar for it to qualify as a confirmed swing pivot. Higher values produce fewer, more significant levels. |
| BreakBufferFrac | 0.05 | 0.00 | 0.50 | How far beyond a level a bar must close to count as a real break, as a fraction of the swing range. Larger values filter out marginal breaks. |
| RetestTolFrac | 0.15 | 0.02 | 0.60 | How close the retest must come back to the flipped level, as a fraction of the swing range recorded at the break. |
| ConfirmWickFrac | 0.45 | 0.20 | 0.90 | Minimum rejection-wick length on the confirming candle, as a fraction of its full range (hammer for longs, shooting star for shorts). |
| ExpiryBars | 12 | 2 | 40 | How many bars after the break the retest watch stays valid before it expires unused. |
| StopBufferFrac | 0.10 | 0.00 | 1.00 | Extra stop-loss buffer placed beyond the structural extreme, as a fraction of the bar range. |
| RewardRatio | 2.00 | 1.00 | 6.00 | Take-profit distance as a multiple of the structural stop distance. |
| Lots | 0.10 | 0.01 | 1.00 | Fixed trade volume in lots. |
| Magic | 7401 | 0 | 9,999,999 | Unique identifier so the EA only manages its own positions. |
Recommended Chart Settings
The Polarity Flip Retest was designed for a liquid FX major — for example EURUSD or GBPUSD — on the H1 (1-hour) timeframe. These markets tend to respect horizontal structure and produce clean swing pivots, which suits a break-and-retest approach. The H1 timeframe offers a balance between signal frequency and the reliability of each confirmed level.
Keep in mind that results will vary considerably across different symbols, timeframes, and market conditions. A setting that produces clean levels on one pair during a trending period may behave very differently on another instrument or during choppy, range-bound markets. Always test any configuration on your own data before drawing conclusions.
Historical Backtest Results
Note: The figures below are from a historical backtest simulation. Backtests have inherent limitations — they do not account for slippage, requotes, spread widening, or psychological factors. These results should not be interpreted as a prediction of future performance.
No backtest data is available for the Polarity Flip Retest at this time. When a historical simulation has been run, key metrics — such as net profit, profit factor, win rate, maximum drawdown, and total trades — would be summarized here. Until then, you are encouraged to run your own backtest in the MetaTrader 5 Strategy Tester using quality historical data so you can study how the strategy behaves across different market conditions.
How to Install on MetaTrader 5
- Download the
PolarityFlipRetest.ex5file from the link below. - Copy it to your MT5
MQL5\Expertsfolder. - Restart MetaTrader 5 or refresh the Navigator panel.
- Drag the EA onto a chart matching the recommended symbol and timeframe (e.g. EURUSD H1).
- Configure the input parameters and enable Algo Trading.
What to Consider Before Using This EA
Like any strategy, the Polarity Flip Retest has both strengths and limitations worth understanding before you study it on live or demo markets.
Strengths. Because it uses confirmed, non-repainting swing pivots, the levels it trades are objective and visible on your chart — there is no hidden indicator lag. Waiting for a retest with candlestick confirmation, rather than entering on the breakout candle, is a disciplined approach that can filter out some false breaks. The structural, fraction-based risk model also adapts the stop and target to the size of the move rather than using a fixed pip distance.
Known limitations. Break-and-retest setups are most effective in trending markets that respect structure. In choppy or range-bound conditions, levels may break and immediately fail, producing whipsaws. Not every break is followed by a clean retest, so the strategy can sit idle for long stretches, and a retest that never arrives within ExpiryBars simply expires unused. The candlestick confirmation requirement, while a useful filter, can also cause the strategy to miss otherwise valid retests that lack a textbook rejection candle. As with all break-and-retest systems, performance is sensitive to the choice of pivot lookback and tolerance settings.
Treat this EA as a way to study how structure, polarity flips, and candlestick confirmation interact — not as a finished, hands-off solution.
Risk Management Tips
Sound risk management matters more than any single strategy. As a general educational guideline, many traders aim to risk no more than 1–2% of account equity per trade, sizing their lots so that a stop-loss hit stays within that limit rather than using a fixed lot size blindly. Always begin on a demo account to understand how a strategy behaves before risking real capital. Study the maximum drawdown — the largest peak-to-trough decline — so you know the kind of losing streak a strategy can produce, and ask yourself whether you could tolerate it psychologically. Diversifying across uncorrelated instruments and avoiding over-leverage are further ways to manage exposure. Risk management is about survival first; consistent process matters more than any individual outcome.
Risk Warning
Trading foreign exchange, CFDs, and other leveraged financial instruments involves substantial risk of loss and is not suitable for all investors. The strategies and tools discussed on this page are provided for educational purposes only and do not constitute financial advice, investment recommendations, or solicitation to trade. Always consult a qualified financial adviser before making trading decisions. Past backtest performance is not indicative of future results.
Downloads
- Expert Advisor: PolarityFlipRetest.ex5 (0 downloads)
- Source Code: PolarityFlipRetest.mq5 (0 downloads)
- Documentation: PolarityFlipRetest.pdf (0 downloads)