
Disclaimer: This article is for educational and informational purposes only. It does not constitute financial or investment advice. Trading forex and CFDs carries significant risk of loss. Past performance of any strategy — including backtests — does not guarantee future results. Never trade with money you cannot afford to lose.
What Is This Strategy?
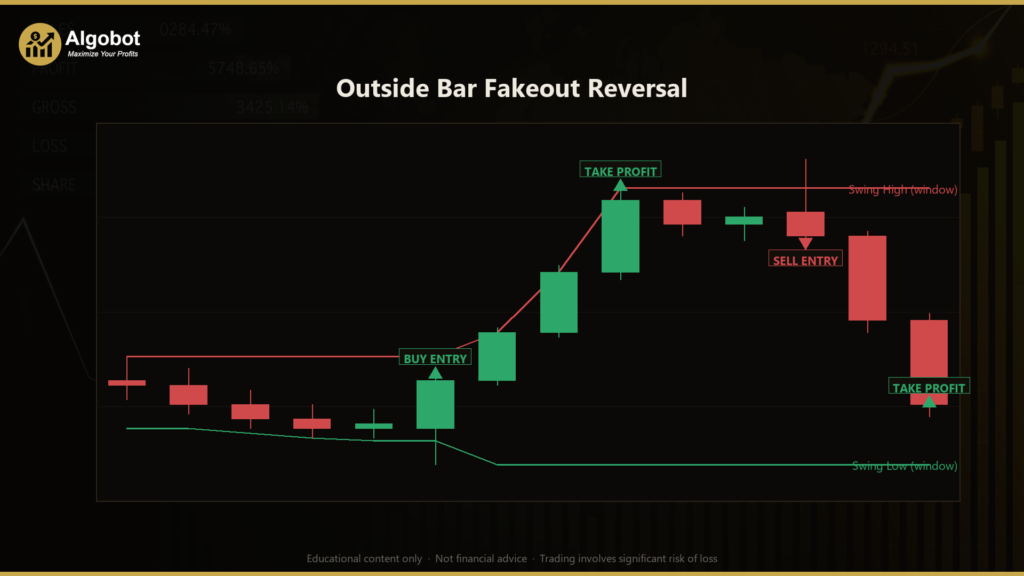
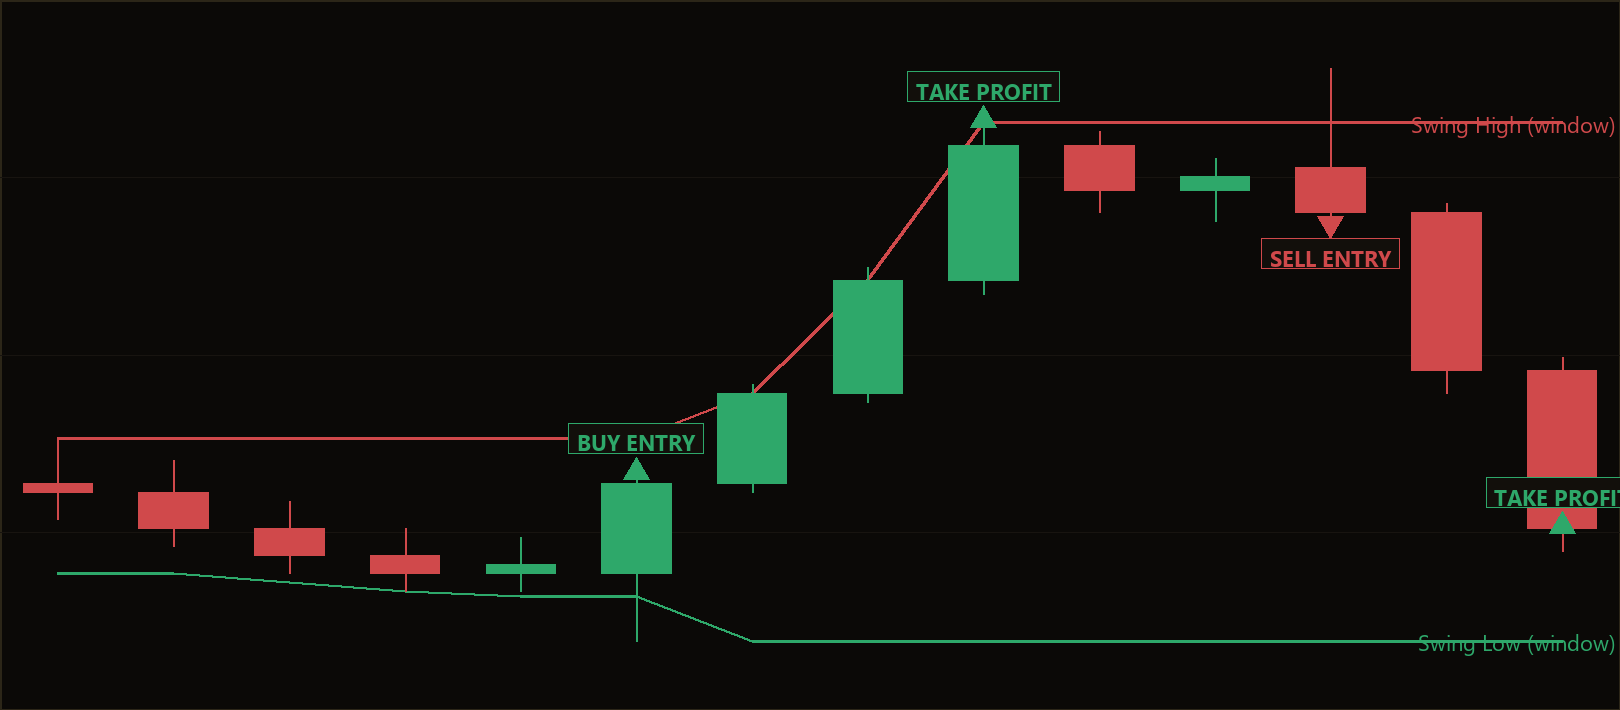
The Outside Bar Fakeout Reversal is a pure price-action reversal strategy built around a single, highly readable candlestick structure: the failed outside bar. An outside bar (sometimes called an engulfing bar) is a candle whose high is above the prior candle's high and whose low is below the prior candle's low — in other words, it completely engulfs the previous bar's range. This strategy uses no traditional indicators at all: no moving averages, no oscillators, no RSI. Every decision is made from raw candle geometry and the candle's position relative to a recent swing window.
The trading style here is counter-trend mean-reversion — specifically, fading failed breakouts at the extremes of a recent price range. The core idea draws on the concept of a liquidity sweep: price often spikes just beyond an obvious old high or low to trigger resting stop orders (the "liquidity" sitting above old highs or below old lows), and then snaps back. When a candle pokes through the highest high of the recent window but closes weakly in the lower part of its own range, the breakout has arguably failed, and traders who bought the breakout are now trapped. The Outside Bar Fakeout Reversal fades that move.
As a learning tool, this strategy is well suited to traders who want to study market structure, false breakouts, and rejection candles without the clutter of lagging indicators. Because it is mechanical and transparent, it is a good teaching example of how a single, well-defined pattern can be turned into a rule-based system. It is designed for liquid instruments such as XAU/USD (gold) or GBP/USD on the M15 or H1 timeframe, but it can run on any liquid symbol and timeframe for study purposes.
How It Works
The strategy evaluates only closed candles, acting once per newly completed bar. The most recently closed candle is the "signal bar," and the candle before it is its "predecessor." Before any signal is considered, the strategy confirms there are enough bars of history and that no position is already open under its magic number (it holds only one trade at a time).
Here is how the strategy signals a trade:
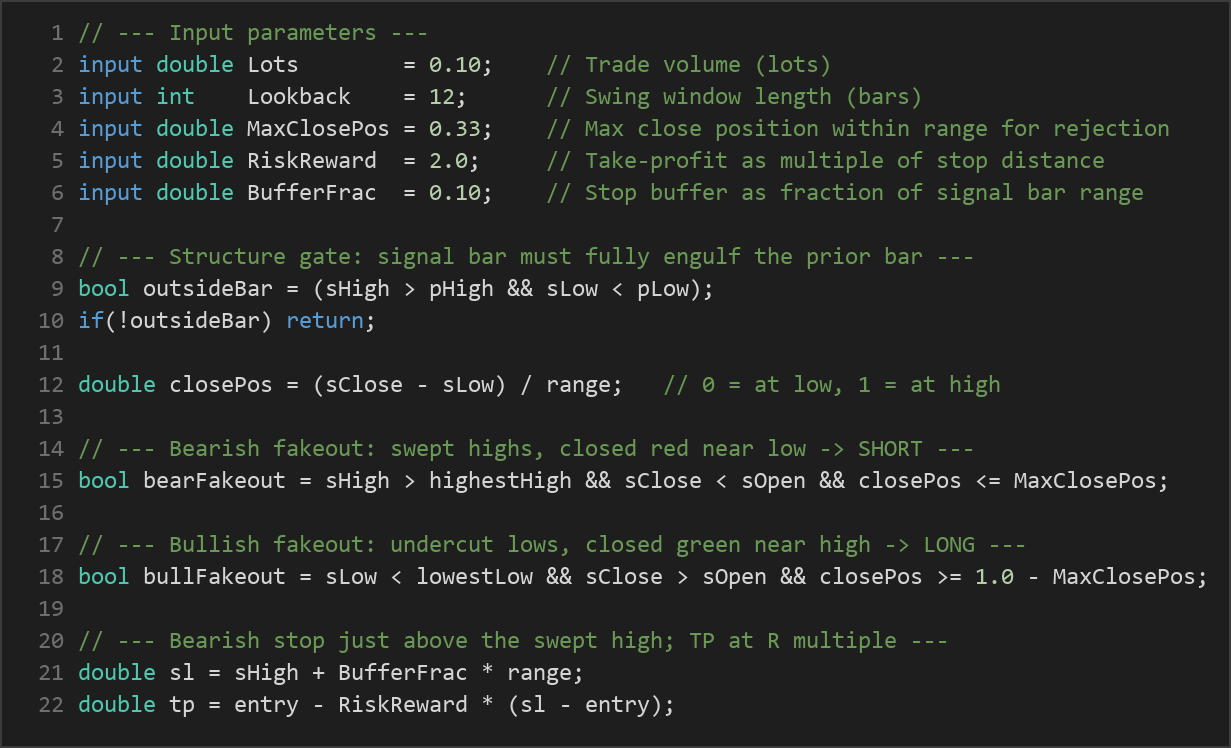
- Structure gate (the outside bar): The signal bar must fully engulf the prior bar — its high must be above the prior high and its low must be below the prior low. If this is not true, no trade is considered.
- Swing window: The strategy scans the window of bars preceding the signal bar (its length set by the
Lookbackparameter) to find the highest high and lowest low. These raw swing extremes define the range edges that price may sweep. - Close position: It measures where the signal candle closed within its own range, where 0 means it closed right at the low and 1 means it closed right at the high. This number is the rejection filter.
Bearish fakeout (the strategy signals a SHORT):
- The signal bar's high pushes above the window's highest high — sweeping buy-side liquidity above old highs.
- The candle closes red (close below open).
- The close lands in the lower portion of the range (close position at or below
MaxClosePos), indicating rejection of the higher prices. - When all three align, the strategy sells, treating the swept high as a trap.
Bullish fakeout (the strategy signals a LONG):
- The signal bar's low pushes below the window's lowest low — sweeping sell-side liquidity below old lows.
- The candle closes green (close above open).
- The close lands in the upper portion of the range (close position at or above
1 − MaxClosePos), indicating rejection of the lower prices. - When all three align, the strategy buys, treating the swept low as a trap.
Stop-loss logic: The stop is placed just beyond the swept wick — above the signal bar's high for a short, or below its low for a long. A buffer (the BufferFrac fraction of the signal bar's range) is added so the stop sits slightly past the exact extreme. This is the price level where the "failed breakout" thesis would be proven wrong.
Take-profit logic: The target is a fixed multiple of the stop distance (the RiskReward parameter). If the stop is, say, 30 pips away and RiskReward is 2.0, the take-profit is placed 60 pips in the trade's favor. This enforces a consistent reward-to-risk profile on every signal.
Strategy Parameters
| Parameter | Default | Min | Max | Description |
|---|---|---|---|---|
| Lots | 0.10 | 0.01 | 1.00 | Trade volume in lots for each position the strategy opens. |
| Lookback | 12 | 4 | 40 | Number of bars in the swing window used to locate the recent highest high and lowest low that price must sweep. |
| MaxClosePos | 0.33 | 0.10 | 0.50 | Maximum close position within the signal bar's range for a valid rejection. Lower values demand a close nearer the opposite extreme (a stronger rejection wick). |
| RiskReward | 2.0 | 1.0 | 5.0 | Take-profit distance expressed as a multiple of the stop-loss distance. |
| BufferFrac | 0.10 | 0.00 | 1.00 | Stop-loss buffer as a fraction of the signal bar's range, placing the stop just past the swept wick. |
Recommended Chart Settings
This strategy was designed with XAU/USD (gold) and GBP/USD in mind, on the M15 or H1 timeframe. These are liquid instruments that tend to produce clean liquidity sweeps and frequent outside-bar structures, which is why they suit the pattern. That said, the logic is generic and will run on any liquid symbol or timeframe you wish to study.
Keep in mind that results will vary considerably across different instruments, timeframes, and market conditions. A setting that produces clean signals on gold during a ranging session may behave very differently on a strongly trending currency pair. Always test any configuration on historical data and a demo account before drawing conclusions.
How to Install on MetaTrader 5
- Download the .ex5 file from the link below
- Copy it to your MT5
MQL5\Expertsfolder - Restart MetaTrader 5 or refresh the Navigator panel
- Drag the EA onto a chart matching the recommended symbol and timeframe
- Configure the input parameters and enable Algo Trading
What to Consider Before Using This EA
The Outside Bar Fakeout Reversal has several genuine strengths as a study tool. It is fully mechanical and transparent — there are no hidden indicator calculations, so every trade can be explained by reading the chart. It enforces a defined risk on each trade, with the stop placed at the logical invalidation point and the target tied to that stop by a fixed multiple. And because it trades a specific, relatively rare structure, it does not overtrade.
There are also important limitations to understand. As a counter-trend approach, this strategy deliberately fades momentum, which means it can struggle badly during strong, persistent trends — a genuine breakout that keeps running will repeatedly hit the stop. The single-pattern focus also means signals can be infrequent, so periods of inactivity are normal and expected. The fixed reward-to-risk target does not adapt to volatility or nearby support and resistance, so a target may sit on the far side of an obstacle that price struggles to clear. Finally, "fakeouts" are only obvious in hindsight; in real time, a sweep that looks like a trap can simply be the first leg of a real move. No pattern wins every time, and this one is no exception.
This EA is best viewed as a framework for studying false breakouts and liquidity sweeps, not as a finished system to deploy unattended. Treat its signals as a starting point for analysis.
Risk Management Tips
Sound risk management matters more than any single strategy. Consider these general principles:
- Risk a small, fixed percentage per trade — many educators suggest never risking more than 1–2% of account equity on any single position. Size your
Lotsaccordingly relative to the stop distance. - Use a demo account first. Trade the strategy in simulation until you fully understand its behavior, its signal frequency, and its drawdown periods before considering any live capital.
- Understand drawdown. Even a well-designed mean-reversion approach will produce losing streaks. Know how many consecutive losses you can tolerate, both financially and psychologically.
- Mind your position sizing across correlated symbols. Running the EA on both XAU/USD and GBP/USD at once can concentrate risk if those markets move together.
- Keep records and review. Logging every trade and reviewing why each signal worked or failed is how the pattern becomes a genuine learning tool.
Never trade with money you cannot afford to lose, and consider seeking guidance from a qualified financial professional before committing real capital.
Risk Warning
Trading foreign exchange, CFDs, and other leveraged financial instruments involves substantial risk of loss and is not suitable for all investors. The strategies and tools discussed on this page are provided for educational purposes only and do not constitute financial advice, investment recommendations, or solicitation to trade. Always consult a qualified financial adviser before making trading decisions. Past backtest performance is not indicative of future results.
Downloads
- Expert Advisor: OutsideBarFakeoutReversal.ex5 (0 downloads)
- Source Code: OutsideBarFakeoutReversal.mq5 (0 downloads)
- Documentation: OutsideBarFakeoutReversal.pdf (0 downloads)