
Disclaimer: This article is for educational and informational purposes only. It does not constitute financial or investment advice. Trading forex and CFDs carries significant risk of loss. Past performance of any strategy – including backtests – does not guarantee future results. Never trade with money you cannot afford to lose.
What Is This Strategy?
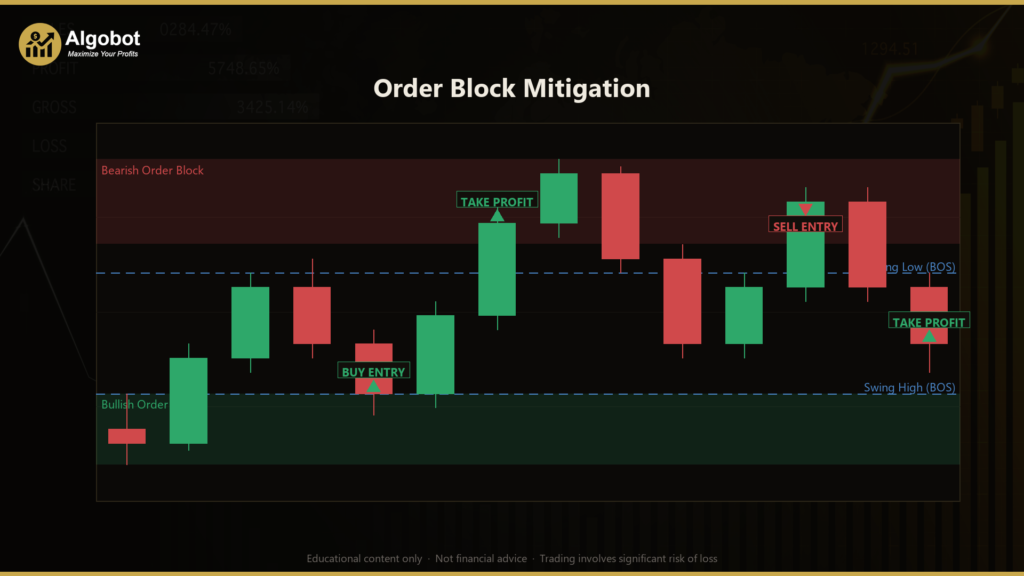
The Order Block Mitigation strategy is a pure price-action system built around the order block — a Smart Money Concepts (SMC) pattern that marks the last opposing candle printed just before an impulsive move that breaks market structure. Unlike most automated systems, it uses no technical indicators at all: there are no moving averages, no oscillators, and no ATR. Everything it does is derived directly from raw candlestick highs, lows, opens, and closes. This makes it a clean teaching example of how institutional-style "order flow" thinking can be translated into mechanical, rule-based logic.
The core idea comes from how large participants are believed to leave unfilled orders behind. When price moves away from a zone impulsively and breaks a prior swing — an event traders call a Break of Structure (BOS) — the last candle pushing in the opposite direction is treated as an "order block." The theory is that some institutional orders were not filled there, so when price later retraces ("mitigates") back into that zone, those resting orders are defended and the prevailing trend tends to resume. The strategy attempts to trade that continuation: buying mitigated bullish order blocks and selling bearish ones.
This EA is best understood as a trend-continuation, structure-based learning tool. It is suited to traders who want to study how Break of Structure, swing detection via fractal pivots, and zone-based entries can be defined precisely in code. It is not framed as a profit opportunity — it is a framework for understanding price-action automation and well-defined risk placement.
How It Works
The strategy acts once per closed candle (it ignores the still-forming bar) and manages a single position at a time. Here is what it does, step by step:
- Structure detection (swing highs and lows). The strategy identifies confirmed swing points using a symmetric fractal pivot. A swing high is a candle whose high is greater than the
Pivotcandles on both its left and right; a swing low is the mirror image. LargerPivotvalues require more surrounding bars and therefore mark more significant, less frequent swings. - Break of Structure (BOS). When the most recent closed candle closes above the last confirmed swing high, the strategy registers a bullish BOS. When it closes below the last confirmed swing low, it registers a bearish BOS. Each swing level is only used once, so the same structure point cannot fire repeatedly.
- Order block creation. Immediately after a BOS, the strategy scans back up to
ObSearchBarscandles to find the last opposing candle before the impulse. For a bullish BOS it looks for the last down candle; for a bearish BOS, the last up candle. That candle's full high-to-low range becomes the order block zone[obLow, obHigh]. - Zone ageing and invalidation. A zone stays active for at most
MaxZoneAgeBarscandles. It is also invalidated early if price closes completely through it (a bullish zone is cancelled if a candle closes below its low; a bearish zone if a candle closes above its high). This keeps the strategy from trading stale or already-broken zones. - Mitigation entry (the trade signal). With no position currently open, the strategy watches for price to retrace into an active zone:
- Bullish entry: the candle's low dips into the zone (
low ≤ obHigh) but its close holds at or above the zone base (close ≥ obLow). The strategy signals a BUY at the ask price. - Bearish entry: the candle's high rallies into the zone (
high ≥ obLow) but its close holds at or below the zone top (close ≤ obHigh). The strategy signals a SELL at the bid price. - Stop-loss logic. Stops are placed just beyond the order block, not via ATR. For a long, the stop sits below the zone low by a buffer equal to
ZoneBufferPct × zone height. For a short, the stop sits above the zone high by the same buffer. This ties risk directly to the structure that justified the trade. - Take-profit logic. The target uses a fixed reward-to-risk multiple. The measured risk (entry to stop distance) is multiplied by
RiskRewardand projected in the trade's direction. With the default of 2.0, the target sits twice as far from entry as the stop.
After a position is opened, its zone is deactivated so the same block is not traded twice, and the strategy waits for the position to close before considering a new entry.

Strategy Parameters
| Parameter | Default | Min | Max | Description |
|---|---|---|---|---|
| Pivot | 3 | 2 | 8 | Fractal pivot half-width. Number of candles required on each side of a swing high/low for it to be confirmed. Higher values mark larger, rarer structure points. |
| ObSearchBars | 10 | 3 | 30 | How many candles back the strategy scans after a Break of Structure to find the last opposing candle (the order block). |
| MaxZoneAgeBars | 30 | 5 | 100 | Maximum age, in candles, before an unused order block zone is invalidated and removed. |
| RiskReward | 2.0 | 1.0 | 6.0 | Fixed reward-to-risk multiple. The take-profit distance is this value times the stop-loss distance. |
| ZoneBufferPct | 0.10 | 0.0 | 1.0 | Stop-loss buffer expressed as a fraction of the zone height, placed beyond the order block. |
| Lots | 0.10 | 0.01 | 1.0 | Fixed trade volume (lot size) per position. |
Recommended Chart Settings
This strategy is symbol- and timeframe-agnostic in code, but as a learning tool it is most instructive on liquid forex majors (for example EUR/USD or GBP/USD) on intraday timeframes such as M15, M30, or H1, where Break of Structure events and order blocks form regularly enough to study. Because the logic is purely structural, it can be applied to other instruments, but behaviour will differ. Results will vary considerably across different symbols, timeframes, and market conditions, and any parameter set that looks balanced on one market may behave very differently on another. Always test a configuration on the specific instrument and timeframe you intend to study before drawing conclusions.
Historical Backtest Results
Note: The figures below are from a historical backtest simulation. Backtests have inherent limitations – they do not account for slippage, requotes, spread widening, or psychological factors. These results should not be interpreted as a prediction of future performance.
No backtest data is available for this strategy at the time of writing. When you run your own historical simulation in the MetaTrader 5 Strategy Tester, you can review key metrics such as Net Profit, Profit Factor, Sharpe Ratio, Win Rate, Maximum Drawdown, and Total Trades. Treat any figures you generate as a historical simulation only, and remember that strong in-sample results frequently fail to repeat on unseen, out-of-sample data.
How to Install on MetaTrader 5
- Download the
OrderBlockMitigation.ex5file from the link below. - Copy it to your MT5
MQL5\Expertsfolder. - Restart MetaTrader 5 or refresh the Navigator panel.
- Drag the EA onto a chart matching the recommended symbol and timeframe.
- Configure the input parameters and enable Algo Trading.
What to Consider Before Using This EA
The strengths of the Order Block Mitigation approach are largely structural. Because every trade is anchored to a confirmed Break of Structure and a defined order block, risk is always measured against a concrete price-action level rather than an arbitrary distance. The fixed reward-to-risk target enforces discipline, and the single-position-at-a-time rule keeps exposure simple and easy to reason about. For learning how SMC concepts can be coded mechanically, it is a transparent example with no hidden indicator dependencies.
The limitations are equally important to understand. Order block trading is inherently discretionary in real desk practice, and reducing it to a fractal pivot plus a "last opposing candle" rule is a simplification — the strategy may mark zones that an experienced trader would dismiss. In ranging or choppy markets, false Breaks of Structure are common, and zones can be mitigated only to fail immediately afterward. The strategy enters at market on the mitigation candle, so during fast moves the actual fill and the assumed entry can differ. It also has no trailing stop or break-even logic: every trade runs to its fixed stop or fixed target. The approach historically performs best when clear directional structure is present and tends to underperform when price lacks momentum or whipsaws across zones.
Risk Management Tips
Regardless of the strategy, sound risk management is what keeps a trading account intact long enough to learn from it. Consider the following principles as education, not advice:
- Risk a small, fixed fraction per trade. Many educators suggest never risking more than 1–2% of account equity on any single position. The
Lotsparameter here is a fixed size, so adjust it to match the stop distance and your account. - Always use a demo account first. Run the EA on a demo or the Strategy Tester until you understand exactly when it enters, exits, and sits out.
- Understand drawdown. Even a strategy with a positive expectancy will experience losing streaks. Know the maximum drawdown you are willing to tolerate before you begin.
- Account for real-world costs. Spread, commission, and slippage all erode results that look clean in a backtest.
- Avoid over-optimization. A parameter set tuned to perfection on past data often fails on new data. Prefer robust, sensible settings over curve-fitted ones.
Risk Warning
Trading foreign exchange, CFDs, and other leveraged financial instruments involves substantial risk of loss and is not suitable for all investors. The strategies and tools discussed on this page are provided for educational purposes only and do not constitute financial advice, investment recommendations, or solicitation to trade. Always consult a qualified financial adviser before making trading decisions. Past backtest performance is not indicative of future results.
Downloads
- Expert Advisor: OrderBlockMitigation.ex5 (0 downloads)
- Source Code: OrderBlockMitigation.mq5 (0 downloads)
- Documentation: OrderBlockMitigation.pdf (0 downloads)