Disclaimer: This article is for educational and informational purposes only. It does not constitute financial or investment advice. Trading forex and CFDs carries significant risk of loss. Past performance of any strategy — including backtests — does not guarantee future results. Never trade with money you cannot afford to lose.
What Is This Strategy?
Momentum Spread Strength Shift is a trend-aligned momentum-inflection strategy that applies a Relative Strength Index (RSI) — a bounded oscillator that measures whether recent changes have been mostly upward or mostly downward — not to price, but to a momentum spread derived from two Exponential Moving Averages (EMAs). Most momentum systems read the rate-of-change of price. This approach takes a step back and reads the rate-of-change of momentum itself, aiming to catch the exact points where momentum stops bleeding away and starts being rebuilt (or vice versa).
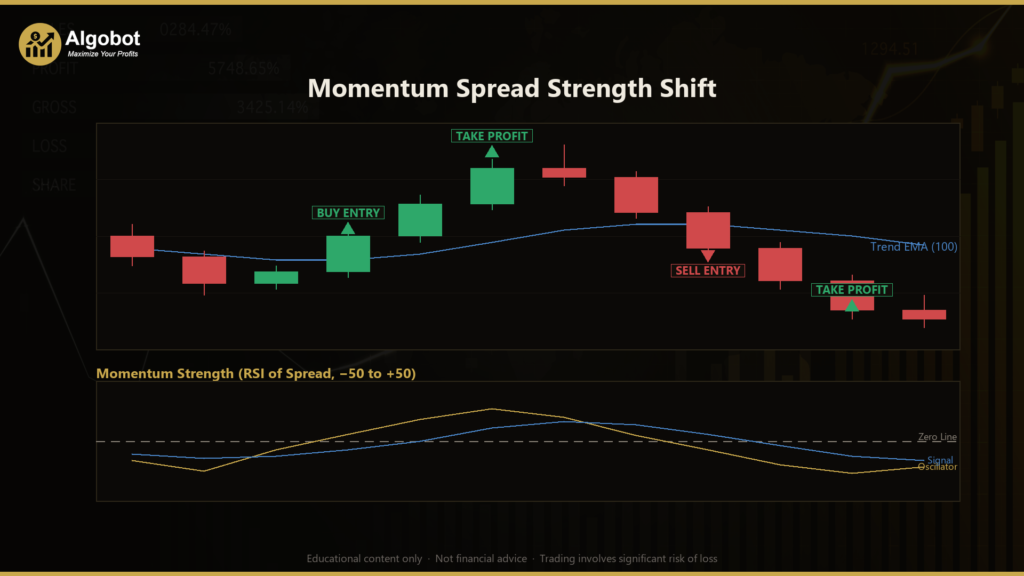
The strategy first constructs a MACD-line-like value on every closed bar: spread = EMA(close, fast) − EMA(close, slow). Because a fresh spread value is recorded once per bar, these values form their own evolving time series. An RSI is then run over that spread series and recentred to zero, producing a smooth oscillator that swings between −50 and +50. When this oscillator crosses the zero line, it signals that the balance of momentum changes has flipped — a subtle shift that often precedes visible price acceleration. Because RSI is self-normalising, the same −50 to +50 scale behaves consistently across very different instruments, whether EUR/USD, gold, or a stock index.
As an educational tool, this strategy suits traders who already understand basic moving averages and oscillators and want to study a more layered, "indicator-of-an-indicator" construction. It is designed for trending or transitioning market conditions, where momentum genuinely inflects and follows through. It is not a high-frequency scalping system, and it is best studied first on a demo account to observe how the layered signal behaves in real time.
How It Works
The strategy evaluates its logic only on closed bars to avoid repainting (signals that change after the fact). The currently forming bar is used solely to detect when a new bar has opened. Here is the full decision chain in plain English:
- Build the momentum spread: On each closed bar, compute
EMA(close, FastLength) − EMA(close, SlowLength)and append it to a running spread series. - Measure the strength of that spread: Run an RSI of length
StrengthPeriodover the spread series and subtract 50, producing the core oscillator (osc) that ranges from −50 to +50. - Confirm with a signal line: Compute an EMA of the oscillator over
SignalPeriodbars. This acts as a smoothing filter, similar to a MACD signal line. - Define the trend backdrop: Compute a slower trend EMA of length
TrendPeriodon price. The most recent close must sit on the correct side of this line.
The strategy signals a long entry when all of the following align:
- The oscillator crosses up through zero (previous value ≤ 0, current value > 0).
- The oscillator is above its signal line (
osc > signal). - The last closed price is above the trend EMA (
Close > TrendEma).
The strategy signals a short entry when the mirror image is true:
- The oscillator crosses down through zero.
- The oscillator is below its signal line.
- The last closed price is below the trend EMA.
Exit and risk logic:
- Stop-loss: Placed at
ATR × SlAtrMultaway from entry. ATR (Average True Range) measures recent volatility, so the stop adapts to how much the market is currently moving. - Take-profit: Placed at
ATR × TpAtrMultaway from entry, giving a volatility-scaled profit target. - Early breakeven lock: Once price has moved
ATR × BreakevenMultin your favour, the stop is pushed to the entry price (plus a tiny buffer) so the trade can no longer turn into a loss. This is checked on every tick for responsiveness. - Opposite-shift exit: If the oscillator flips back across zero against an open position, the trade is closed immediately — cutting losers and protecting profits when momentum reverses.
- One position at a time: The strategy never stacks trades.
- Cooldown: A configurable number of bars (
CooldownBars) must pass between entries to avoid over-trading in choppy conditions.

Strategy Parameters
| Parameter | Default | Min | Max | Description |
|---|---|---|---|---|
| FastLength | 8 | 3 | 20 | Period of the fast EMA used to build the momentum spread. |
| SlowLength | 21 | 10 | 60 | Period of the slow EMA in the spread (forced above FastLength). |
| StrengthPeriod | 14 | 5 | 40 | RSI period applied to the spread series to form the oscillator. |
| SignalPeriod | 5 | 2 | 20 | EMA period of the oscillator, used as a confirmation signal line. |
| TrendPeriod | 100 | 20 | 300 | Period of the slow trend EMA that defines the directional backdrop. |
| AtrPeriod | 14 | 7 | 30 | ATR period used to size stops, targets, and the breakeven trigger. |
| SlAtrMult | 1.3 | 0.6 | 4.0 | Stop-loss distance as a multiple of ATR. |
| TpAtrMult | 2.4 | 1.0 | 6.0 | Take-profit distance as a multiple of ATR. |
| BreakevenMult | 1.0 | 0.2 | 3.0 | Favourable ATR distance before the stop is moved to breakeven. |
| CooldownBars | 2 | 0 | 20 | Minimum number of bars between consecutive entries. |
| Lots | 0.10 | 0.01 | 2.0 | Fixed trade volume in lots. |

Recommended Chart Settings
Momentum Spread Strength Shift is timeframe-agnostic — it uses whatever timeframe the chart is set to at run time and never hardcodes one. That said, layered oscillator systems like this one tend to be studied most comfortably on intraday-to-swing timeframes such as the H1 (1-hour) or H4 (4-hour) charts, where each bar carries enough information for the spread and RSI-of-spread to be meaningful without excessive noise.
For the instrument, major forex pairs such as EUR/USD are a common starting point because of their liquidity and tight spreads, but the self-normalising oscillator was deliberately designed to behave consistently across markets like gold or indices. Remember that results will vary substantially across different symbols, timeframes, and market conditions. Always test on the specific instrument and timeframe you intend to study before drawing any conclusions.
How to Install on MetaTrader 5
- Download the .ex5 file from the link below
- Copy it to your MT5
MQL5\Expertsfolder - Restart MetaTrader 5 or refresh the Navigator panel
- Drag the EA onto a chart matching the recommended symbol and timeframe
- Configure the input parameters and enable Algo Trading
What to Consider Before Using This EA
Strengths of this approach. By reading momentum-of-momentum rather than raw price, the strategy attempts to react to inflection points slightly earlier than a plain moving-average cross. The bounded −50 to +50 oscillator makes signals comparable across instruments, and the triple filter (zero-cross, signal line, and trend EMA) is designed to reduce the number of low-quality entries. The risk framework — ATR-scaled stops, a fast breakeven lock, and an opposite-shift exit — is built to keep individual losses contained and the equity path smoother.
Known limitations. Layering an RSI on top of an EMA spread introduces additional lag; the smoothing that makes signals cleaner also means the oscillator may confirm an inflection after part of the move has already occurred. Like all trend-and-momentum systems, it can struggle in range-bound, sideways markets, where the oscillator may cross zero repeatedly without follow-through — producing a series of small losses often called "whipsaws." The trend EMA and cooldown filters help, but cannot eliminate this behaviour.
Where it may underperform. Expect weaker results during low-volatility consolidations, around major news releases where volatility spikes unpredictably, and in markets that grind slowly without clear momentum shifts. Because ATR drives the stops, unusually tight or unusually wide volatility regimes can also make position sizing feel inconsistent. Treat every parameter as something to study and understand, not a setting to blindly optimise until a backtest looks appealing — over-fitting to past data is one of the most common mistakes in strategy development.
Risk Management Tips
Sound risk management matters more than any single entry signal. Consider these general principles as part of your education:
- Risk a small, fixed fraction per trade. Many educational sources suggest never risking more than 1–2% of account equity on any single position. Adjust the
Lotsparameter so that the ATR-based stop distance corresponds to that fraction — do not simply trade the default lot size on every account. - Understand drawdown. Even a well-constructed strategy will experience losing streaks. Study how deep and how long historical drawdowns can run so you are not surprised when they happen live.
- Start on a demo account. Run the strategy on a demo or simulated account first to observe how the layered oscillator behaves, how often it trades, and how the breakeven and opposite-shift exits trigger in real conditions.
- Use only risk capital. Never allocate money you cannot afford to lose, and never rely on leverage to compensate for an undersized account.
- Keep a trading journal. Record why each trade was taken and how it resolved. Reviewing this over time teaches you far more than any single backtest.
Position sizing, disciplined stops, and emotional consistency typically have a larger impact on long-term outcomes than fine-tuning indicator periods.
Risk Warning
Trading foreign exchange, CFDs, and other leveraged financial instruments involves substantial risk of loss and is not suitable for all investors. The strategies and tools discussed on this page are provided for educational purposes only and do not constitute financial advice, investment recommendations, or solicitation to trade. Always consult a qualified financial adviser before making trading decisions. Past backtest performance is not indicative of future results.
Downloads
- Expert Advisor: MomentumSpreadStrengthShift.ex5 (42 downloads)
- Source Code: MomentumSpreadStrengthShift.mq5 (47 downloads)
- Documentation: MomentumSpreadStrengthShift.pdf (51 downloads)