Disclaimer: This article is for educational and informational purposes only. It does not constitute financial or investment advice. Trading forex and CFDs carries significant risk of loss. Past performance of any strategy — including backtests — does not guarantee future results. Never trade with money you cannot afford to lose.
What Is This Strategy?
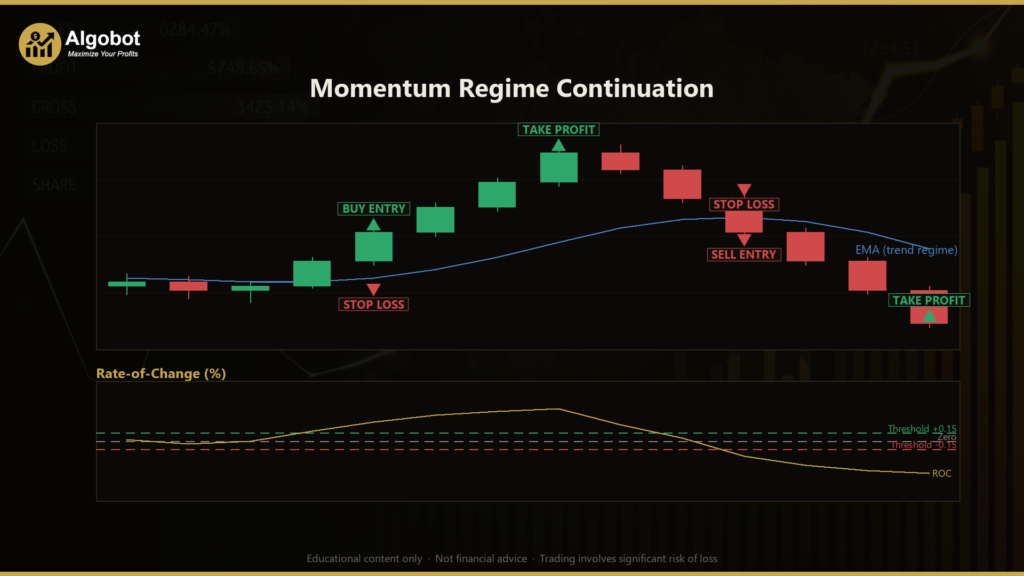
Momentum Regime Continuation is a trend-following expert advisor (EA) built around three classic technical tools working together: an Exponential Moving Average (EMA) to define the market regime, the Rate-of-Change (ROC) momentum oscillator to time entries, and the Average True Range (ATR) to size stops and targets. An EMA is a moving average that weights recent prices more heavily than older ones, making it more responsive to a developing trend. ROC measures how far price has moved over a set number of bars, expressed as a percentage, so it reads the speed of a move rather than its direction alone.
The strategy is designed for trending markets — periods when price is moving persistently in one direction rather than oscillating inside a range. Its core idea is "continuation": instead of trying to predict tops and bottoms, it waits for a trend to already be established and for momentum to still be expanding, then joins the move in the same direction. To reduce the false signals that plague simpler trend systems in choppy conditions, it requires three independent confirmations to agree before any trade is taken.
As a learning tool, this EA is well suited to traders who want to study how multiple confirmations can be layered to filter out noise, and how volatility-based risk (via ATR) adapts stop distances to current market conditions. It is best treated as a study of momentum-continuation logic and disciplined risk handling — not as a shortcut to results. Think of it as a worked example of how a rules-based system is constructed and why each rule exists.
How It Works
The strategy evaluates its entry decision once per newly closed bar, working only on completed price data so signals do not "repaint" as a candle forms. Here is what happens at each stage.
Entry conditions (a long/buy trade signals when all of these agree):
- Trend regime: the closing price is above the EMA, confirming the broader bias is up.
- Rising EMA: the EMA now is higher than the EMA a few bars ago (a lookback of 3 bars), confirming the average itself is sloping upward — not just that price is temporarily above a flat line.
- Momentum trigger: the current ROC reading is greater than the
RocThreshold, showing upward momentum has crossed a meaningful level rather than drifting. - Acceleration: the current ROC is greater than the previous bar's ROC, meaning momentum is still expanding rather than fading.
Short/sell trades use the exact mirror image: price below the EMA, EMA falling, ROC below the negative threshold, and ROC still contracting bar-over-bar.
- One position at a time: the EA holds only a single open position per symbol (tracked by its magic number), so it never stacks multiple trades on the same signal.
Stop-loss logic:
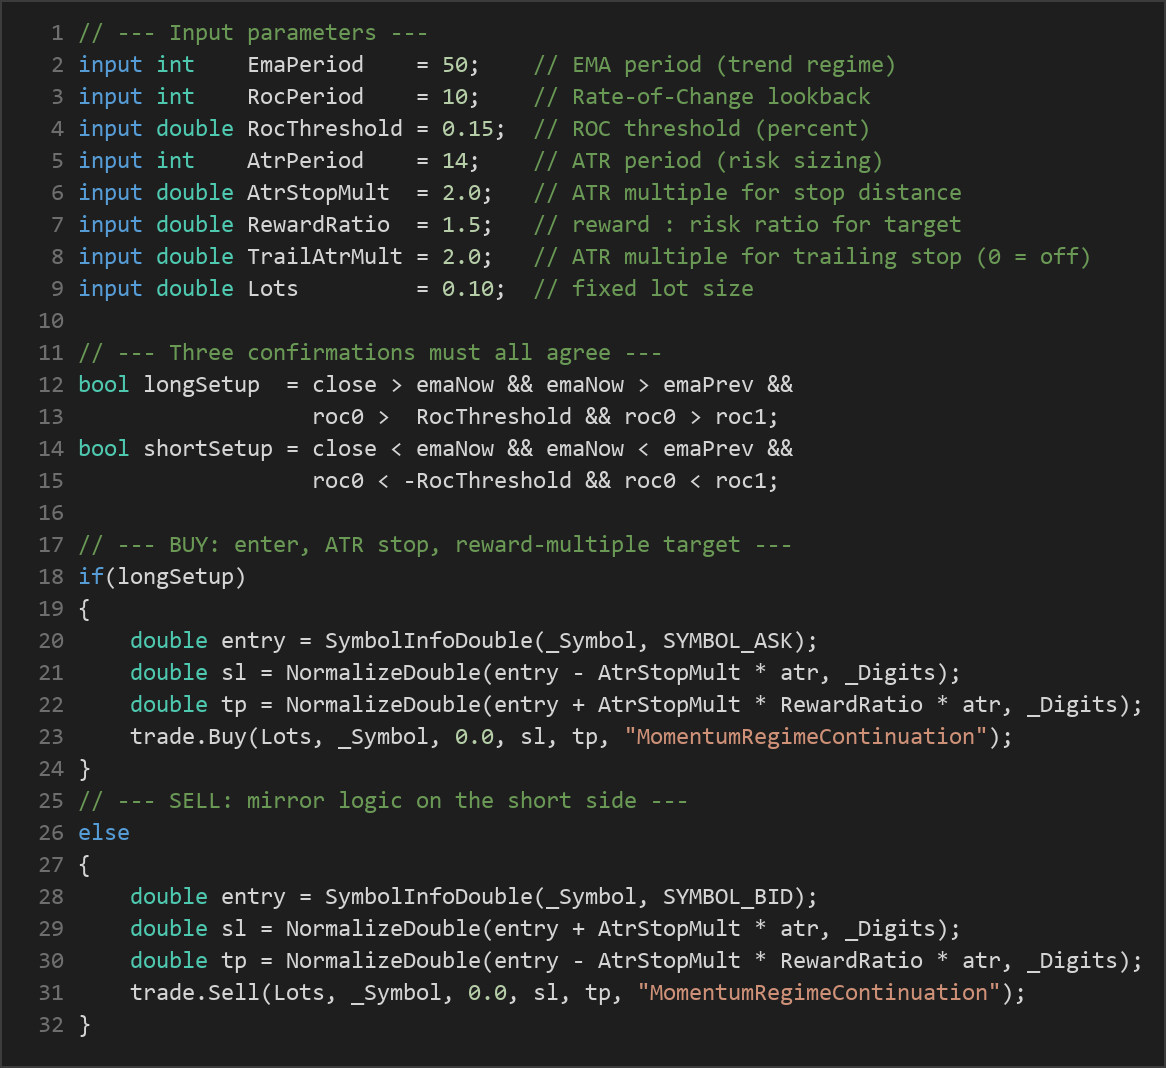
- When a trade opens, the stop-loss is placed at a distance of
AtrStopMult × ATRfrom the entry price. Because ATR reflects recent volatility, the stop automatically widens in fast markets and tightens in calm ones.
Take-profit logic:
- The target is set using the reward-to-risk ratio:
AtrStopMult × RewardRatio × ATRfrom entry. With the default risk multiple of 2.0 and reward ratio of 1.5, the take-profit sits 1.5 times further from entry than the stop.
Trailing-stop management:
- If
TrailAtrMultis greater than zero, the EA runs an ATR trailing stop on every tick. As price moves in the trade's favor, the stop is pulled toward price at a distance ofTrailAtrMult × ATR. Crucially, the trailing stop only ever tightens — it never loosens back away from price — which helps lock in open gains if a trend extends while still protecting against a sudden reversal.
Together these rules mean the strategy signals an entry only when trend, momentum, and acceleration line up, then hands risk control over to volatility-adaptive stops and an optional trailing mechanism.
Strategy Parameters
| Parameter | Default | Min | Max | Description |
|---|---|---|---|---|
| EmaPeriod | 50 | 20 | 200 | Number of bars in the EMA that defines the trend regime. Higher values track slower, longer-term trends; lower values react faster. |
| RocPeriod | 10 | 5 | 30 | Lookback (in bars) for the Rate-of-Change momentum calculation. Shorter periods make ROC more sensitive to recent moves. |
| RocThreshold | 0.15 | 0.05 | 1.00 | Minimum ROC value (in percent) required to trigger a signal. Higher thresholds demand stronger momentum before entering. |
| AtrPeriod | 14 | 7 | 30 | Number of bars used to calculate ATR, which drives stop and target sizing. |
| AtrStopMult | 2.0 | 1.0 | 4.0 | Multiple of ATR used to set the stop-loss distance from entry. Larger values give the trade more room but risk more per trade. |
| RewardRatio | 1.5 | 1.0 | 3.0 | Reward-to-risk ratio for the take-profit. A value of 1.5 places the target 1.5× the stop distance away. |
| TrailAtrMult | 2.0 | 0.0 | 4.0 | Multiple of ATR for the trailing stop. Set to 0 to disable trailing entirely. |
| Lots | 0.10 | 0.01 | 1.0 | Fixed lot size for each trade. Should be adjusted to match your account size and risk tolerance. |
Recommended Chart Settings
Momentum Regime Continuation is symbol- and timeframe-agnostic in code — it operates on whatever chart it is attached to and uses that chart's primary timeframe. That said, momentum-continuation logic with a 50-period EMA tends to be studied most naturally on intraday-to-swing timeframes such as H1 (1-hour) or H4 (4-hour), where trends have room to develop and individual bars carry enough movement for ROC and ATR to be meaningful.
For symbols, liquid instruments with clear trending tendencies — major forex pairs, gold, or index CFDs — are common choices for studying this style. Because the entry filters demand a genuine, accelerating move, the strategy is likely to sit on the sidelines during quiet, range-bound sessions and become active when a market picks a direction. Remember that results will vary considerably across different symbols, timeframes, and market conditions, and any settings you choose should be tested thoroughly before use.
How to Install on MetaTrader 5
- Download the .ex5 file from the link below
- Copy it to your MT5
MQL5\Expertsfolder - Restart MetaTrader 5 or refresh the Navigator panel
- Drag the EA onto a chart matching the recommended symbol and timeframe
- Configure the input parameters and enable Algo Trading
What to Consider Before Using This EA
Strengths of the approach. The triple-confirmation design is the strategy's defining feature. By requiring trend alignment, a momentum threshold, and momentum acceleration simultaneously, it aims to avoid the whipsaws that a single-indicator trend system would suffer in sideways markets. The ATR-based stops and targets are another sound principle: they adapt to the market's current volatility instead of using fixed pip distances that may be too tight in wild conditions or too wide in calm ones. The "only-ever-tightens" trailing stop is a disciplined way to manage a winning trade without giving back open profit carelessly.
Known limitations. Every trend-following system shares a common weakness: it underperforms in choppy, directionless markets. Even with three filters, false starts can occur when a market briefly accelerates and then stalls, and the strategy may take a loss before its stop and trailing logic settle the trade. Because it only holds one position at a time and waits for strong, accelerating momentum, it can also miss slower grinding trends that never trip the ROC threshold. The trailing stop uses the ATR captured at the last signal evaluation, so in rapidly changing volatility the trail distance may lag the current market slightly.
Where it may struggle. Range-bound conditions, low-volatility sessions, and sharp mean-reverting reversals are the environments most likely to challenge this logic. News-driven spikes can also trigger entries that reverse quickly. None of this makes the approach invalid — it simply means the strategy is a specialist tool suited to trending regimes, and understanding when it is out of its element is as important as understanding when it works. Treat it as one lens for studying momentum behavior, not a set-and-forget solution.
Risk Management Tips
Sound risk management matters more than any single entry rule. Consider these general principles as you study this or any strategy:
- Position sizing: Size each trade so that a stop-out costs only a small, predefined fraction of your account. A widely taught guideline is to risk no more than 1–2% of account equity per trade. The fixed
Lotsinput should be adjusted with this in mind rather than left at a default. - Understand your drawdown: Even a well-designed system will string together losing trades. Know the maximum drawdown you are willing to tolerate before you begin, and confirm your position size keeps you inside that limit.
- Practice on a demo account first: Run the EA on a demo or paper account until you understand how it behaves across different market conditions. This costs nothing and teaches how the entries, stops, and trailing logic actually play out.
- Respect leverage: Leverage amplifies both gains and losses. Use it conservatively and never let a single position expose you to an outsized loss.
- Keep records and review: Track how the strategy performs, note the conditions in which it struggles, and use that insight to refine settings or decide when to switch it off.
Risk management is what allows you to survive the inevitable losing periods long enough to study a strategy properly. It is a discipline, not an afterthought.
Risk Warning
Trading foreign exchange, CFDs, and other leveraged financial instruments involves substantial risk of loss and is not suitable for all investors. The strategies and tools discussed on this page are provided for educational purposes only and do not constitute financial advice, investment recommendations, or solicitation to trade. Always consult a qualified financial adviser before making trading decisions. Past backtest performance is not indicative of future results.
Downloads
- Expert Advisor: MomentumRegimeContinuation.ex5 (57 downloads)
- Source Code: MomentumRegimeContinuation.mq5 (56 downloads)
- Documentation: MomentumRegimeContinuation.pdf (69 downloads)