Disclaimer: This article is for educational and informational purposes only. It does not constitute financial or investment advice. Trading forex and CFDs carries significant risk of loss. Past performance of any strategy — including backtests — does not guarantee future results. Never trade with money you cannot afford to lose.
What Is This Strategy?
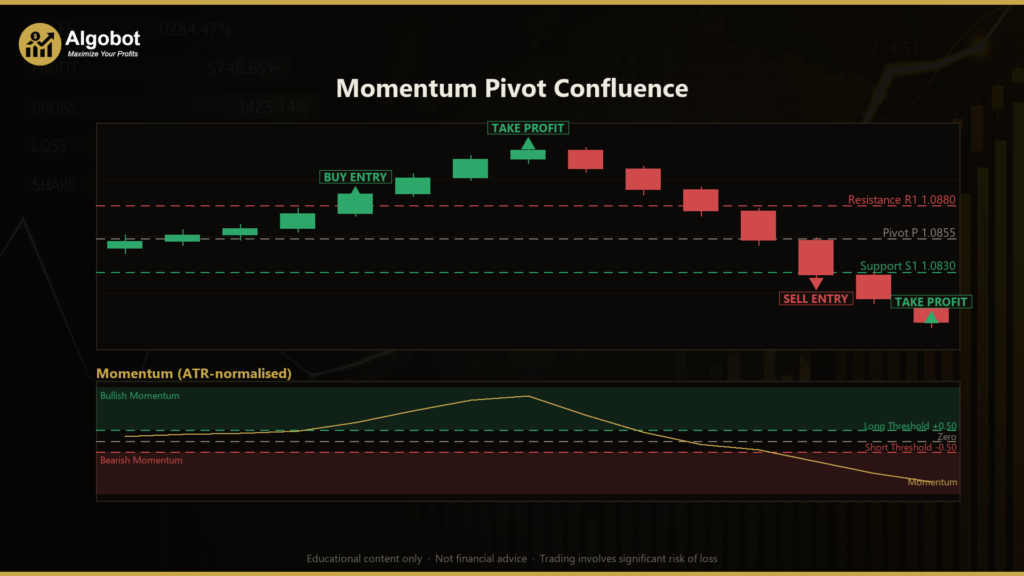
Momentum Pivot Confluence is a breakout strategy that combines pivot points — horizontal support and resistance levels calculated from recent price action — with a momentum filter that measures how forcefully price is moving. A pivot point is a reference level derived from the high, low, and close of a prior period; traders watch it to gauge where price may stall or accelerate. Momentum, in this context, simply measures the distance price has traveled over a fixed number of bars, scaled so it can be compared fairly across different market conditions.
The core idea is confluence: instead of acting on a pivot break alone, the strategy waits for two independent conditions to agree. Price must close beyond a resistance or support pivot, and directional momentum must confirm that the move has genuine conviction behind it. Requiring this second condition is what suppresses the low-conviction "pivot pokes" — brief, shallow breaks that quickly reverse — which historically generate the majority of false breakout signals.
This strategy is best understood as a learning tool for traders who want to study how breakout confirmation works in practice. It is designed for trending or expanding market conditions, where a clean break of a pivot level can lead to a sustained directional move. It will be less comfortable in quiet, range-bound markets where breaks tend to fail. If you are studying how to filter noisy breakout signals, how Average True Range (ATR) can normalize a momentum reading, or how rolling pivots adapt to recent volatility, Momentum Pivot Confluence offers a clear, self-contained example to dissect.
How It Works
The strategy evaluates its rules once per completed bar on the chart timeframe — it does not act on every tick, which keeps signals stable and avoids reacting to intrabar noise. All calculations use bars that have already closed.
Building the pivot levels:
- The strategy looks back over a rolling window of recently completed bars (set by
PivotLookback) that ends just before the signal bar. - From that window it records the highest high, the lowest low, and the closing price of the most recent bar in the window.
- It computes the central pivot P = (High + Low + Close) ÷ 3, the first resistance R1 = (2 × P) − Low, and the first support S1 = (2 × P) − High.
- Because the window rolls forward each bar, these levels continuously adapt to the latest price behavior rather than staying fixed for the whole session.
The momentum confirmation:
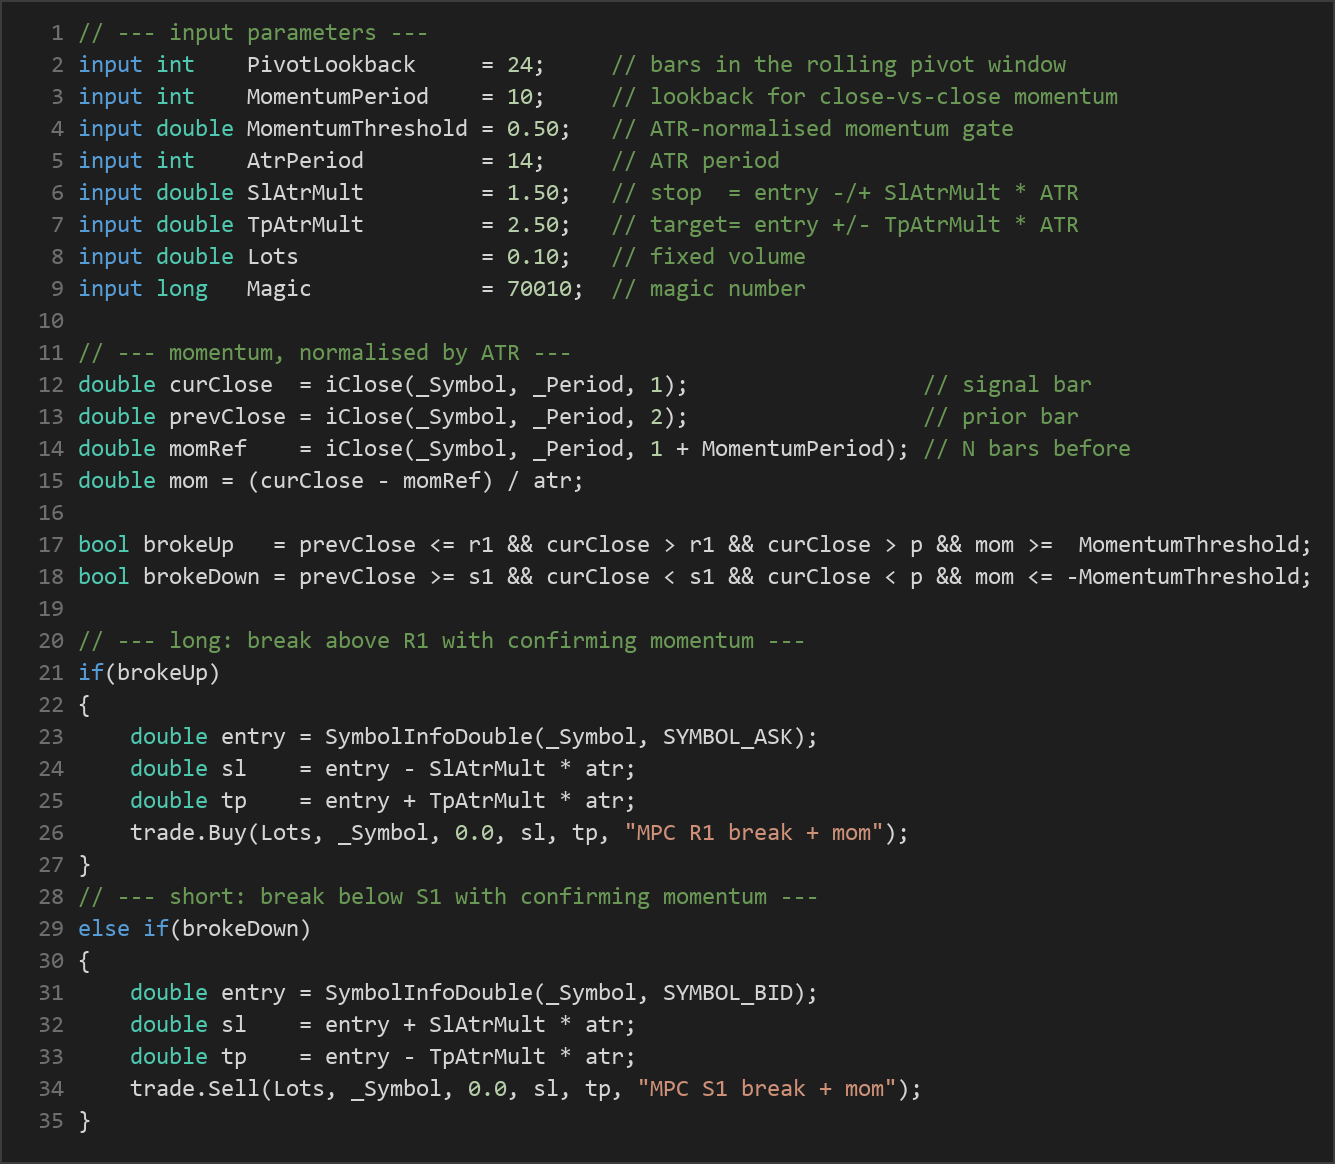
- Momentum is calculated as the current close minus the close from
MomentumPeriodbars ago. - That raw distance is divided by the current ATR value, producing an ATR-normalized momentum reading. Normalizing by ATR lets the same threshold work whether the market is calm or volatile.
- The reading must clear the
MomentumThresholdgate for a signal to qualify.
Entry conditions — the strategy signals a long (buy) when:
- The prior bar closed at or below R1, and the signal bar closed above R1 (a fresh upside break).
- The signal bar also closed above the central pivot P, confirming the break is on the bullish side of the structure.
- Momentum is positive and greater than or equal to
MomentumThreshold.
The strategy signals a short (sell) when the mirror image occurs:
- The prior bar closed at or above S1, and the signal bar closed below S1 (a fresh downside break).
- The signal bar also closed below the central pivot P.
- Momentum is negative and less than or equal to the negative
MomentumThreshold.
Position management, stops, and targets:
- Only one position per magic number is allowed at a time, so the strategy never stacks trades on the same symbol.
- On a buy, the entry is taken at the Ask price; on a sell, at the Bid price.
- The stop-loss is placed
SlAtrMult× ATR away from entry — below entry for longs, above entry for shorts. - The take-profit is placed
TpAtrMult× ATR away from entry — above for longs, below for shorts.
Because both the stop and the target are sized from ATR, the strategy automatically widens its risk and reward when volatility rises and tightens them when the market calms — a way of keeping the trade geometry proportional to current conditions.
Strategy Parameters
| Parameter | Default | Min | Max | Description |
|---|---|---|---|---|
| PivotLookback | 24 | 10 | 96 | Number of completed bars in the rolling window used to project the pivot levels (P, R1, S1). Larger values produce smoother, slower-moving pivots. |
| MomentumPeriod | 10 | 3 | 30 | How many bars back the momentum calculation reaches when measuring the change in closing price. Shorter periods react faster; longer periods are steadier. |
| MomentumThreshold | 0.50 | 0.10 | 2.0 | The ATR-normalized momentum gate a break must clear to qualify as a signal. Higher values demand stronger moves and filter out more weak breaks. |
| AtrPeriod | 14 | 5 | 30 | Period for the Average True Range, used both to normalize momentum and to size the stop and target. |
| SlAtrMult | 1.50 | 0.50 | 4.0 | Stop-loss distance as a multiple of ATR. Larger values give the trade more room but increase risk per trade. |
| TpAtrMult | 2.50 | 0.50 | 6.0 | Take-profit distance as a multiple of ATR. The default sets a reward target wider than the stop. |
| Lots | 0.10 | 0.01 | 1.0 | Fixed trade volume in lots. Should be set to match your account size and risk tolerance. |
Recommended Chart Settings
This strategy reads only the chart it is attached to — it does not consult any higher timeframe — so the timeframe you choose directly shapes the pivots it builds. It is well suited to study on intraday timeframes such as M15, M30, or H1, on liquid instruments like major forex pairs (for example EUR/USD or GBP/USD) where clean, well-defined breakouts are more common. Because the default PivotLookback of 24 spans roughly a day of H1 bars, H1 is a natural starting point for experimentation. Remember that results will vary considerably across different symbols, sessions, and market conditions, and that any setting which looks favorable in one period may behave very differently in another.
How to Install on MetaTrader 5
- Download the .ex5 file from the link below
- Copy it to your MT5
MQL5\Expertsfolder - Restart MetaTrader 5 or refresh the Navigator panel
- Drag the EA onto a chart matching the recommended symbol and timeframe
- Configure the input parameters and enable Algo Trading
What to Consider Before Using This EA
Strengths of this approach. The momentum filter is the strategy's defining feature: by demanding that a pivot break be accompanied by genuine directional thrust, it screens out many of the shallow, indecisive breaks that trap breakout traders. Sizing the stop and target from ATR means the trade's risk and reward stay proportional to current volatility instead of being fixed in pips. The "one position at a time" rule keeps exposure simple and easy to reason about.
Known limitations. Pivot breakout systems are, by design, vulnerable to whipsaws — false breaks that reverse shortly after triggering. In choppy, sideways markets, price can poke through R1 or S1 with just enough momentum to fire a signal and then snap back, hitting the stop. The strategy has no trend filter beyond momentum, so it cannot tell whether the broader backdrop favors the breakout direction. It also exits only at a fixed stop or target; there is no trailing logic to lock in an advancing move, so a trade that runs far in your favor before reversing can still close at the original target or give back gains.
Where it may underperform. Expect more failed signals during low-volatility ranges, around major news releases where spreads widen, and in markets that grind sideways for extended periods. The fixed lot size also means risk is not automatically scaled to account equity — something to address through your own position-sizing discipline.
Risk Management Tips
Sound risk management matters far more than any single entry rule. Consider the following general principles as you study this strategy:
- Risk a small, fixed fraction per trade. Many educators suggest risking no more than 1–2% of account equity on any single position. Use the ATR-based stop distance to work out a lot size that respects that limit, rather than leaving
Lotsat a default that may be too large for your account. - Always test on a demo account first. Run the EA on a demo or in the Strategy Tester long enough to understand how it behaves across different market conditions before considering any live use.
- Understand drawdown. Every strategy experiences losing streaks. Knowing the depth and duration of potential drawdown helps you size positions so that a bad run does not threaten your capital or your composure.
- Account for costs. Spreads, slippage, and commissions all erode breakout strategies in particular, since entries occur at moments of fast movement. Factor realistic costs into any evaluation.
- Never trade money you cannot afford to lose. Treat this EA as a tool for learning how confirmation-based breakout logic works, not as a shortcut around the genuine risks of leveraged trading.
Risk Warning
Trading foreign exchange, CFDs, and other leveraged financial instruments involves substantial risk of loss and is not suitable for all investors. The strategies and tools discussed on this page are provided for educational purposes only and do not constitute financial advice, investment recommendations, or solicitation to trade. Always consult a qualified financial adviser before making trading decisions. Past backtest performance is not indicative of future results.
Downloads
- Expert Advisor: MomentumPivotConfluence.ex5 (61 downloads)
- Source Code: MomentumPivotConfluence.mq5 (60 downloads)
- Documentation: MomentumPivotConfluence.pdf (58 downloads)