
Disclaimer: This article is for educational and informational purposes only. It does not constitute financial or investment advice. Trading forex and CFDs carries significant risk of loss. Past performance of any strategy — including backtests — does not guarantee future results. Never trade with money you cannot afford to lose.
What Is This Strategy?
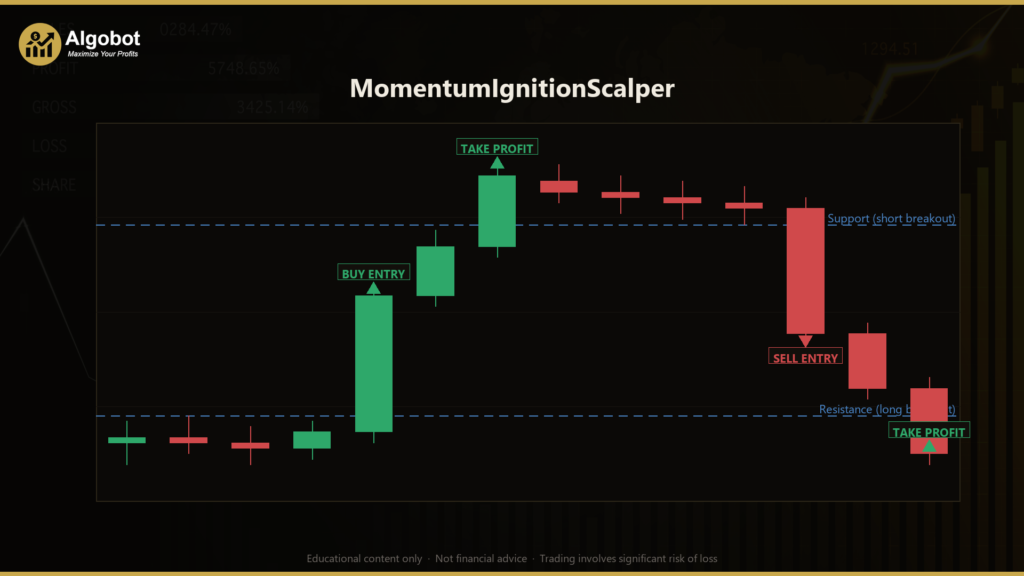
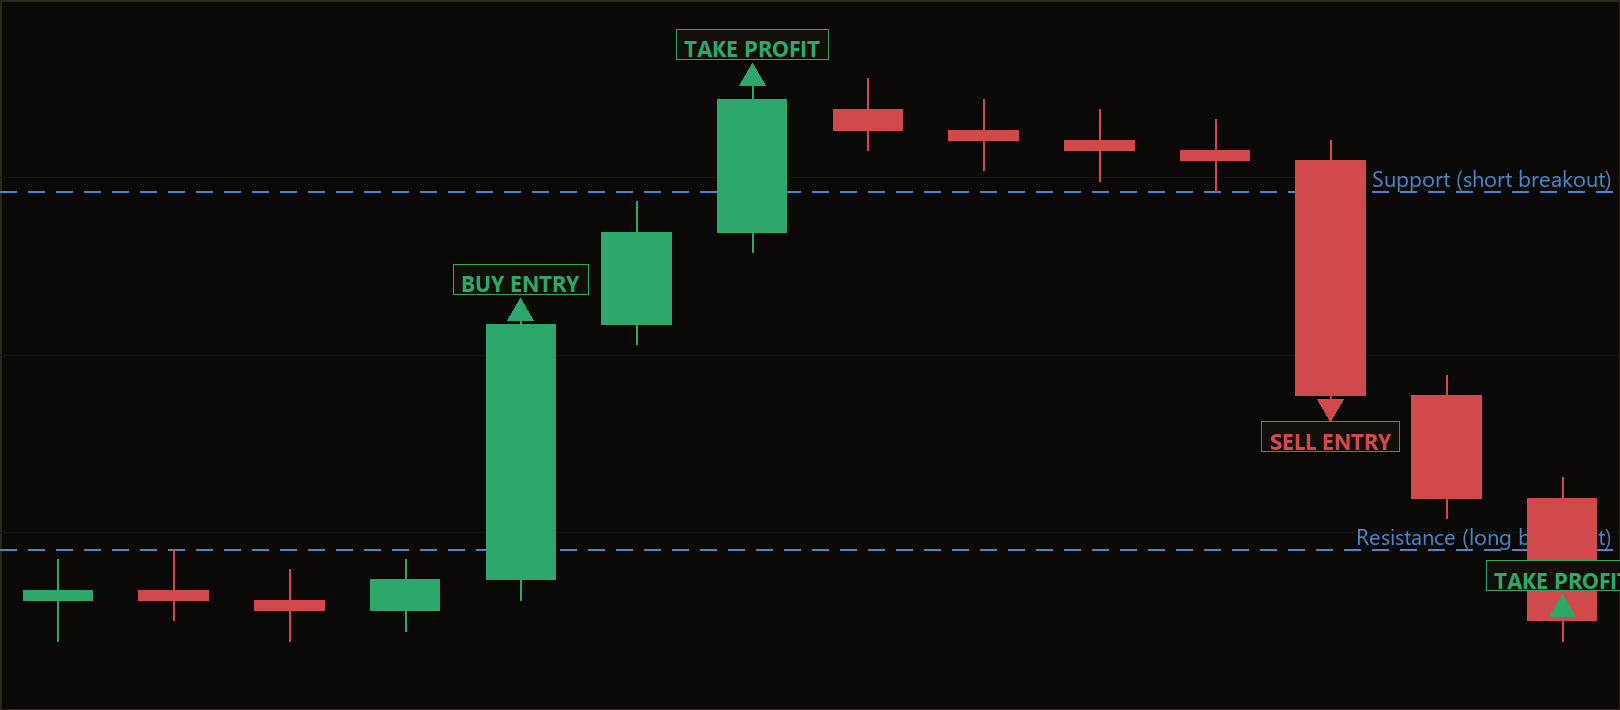
The MomentumIgnitionScalper is a pure price-action momentum scalping Expert Advisor (EA) for MetaTrader 5 that uses no technical indicators at all — no moving averages, no RSI, no ATR. Instead, it reads raw candlestick (price bar) behaviour directly, looking for a single "ignition" candle whose body suddenly dwarfs the recent average and closes hard into its own extreme. "Scalping" here means taking small, fast trades that aim to capture a short burst of movement rather than a long trend.
The core concept is momentum ignition continuation. After a stretch of quiet, evenly sized candles (a brief consolidation), the market occasionally fires off one oversized bar in a single direction. The strategy interprets that bar as the market tipping its hand — a sudden burst of one-sided order flow — and enters in the same direction, expecting the thrust to carry a few more pips before it fades. This is classic M1 (one-minute) scalping behaviour built on the idea that genuine range expansion off a compressed base tends to extend before it mean-reverts.
As a learning tool, this EA is well suited to traders who want to study breakout and continuation patterns without the lag of indicators. Because every condition is derived from raw candles — body size, close location, and a micro break of structure — it is an excellent example for understanding how price action alone can be translated into mechanical, rule-based entries. It is best viewed as a study of momentum mechanics, not as a profit opportunity.
How It Works
The strategy evaluates conditions only once per newly closed bar, then checks for a long or short ignition setup. It holds only one position at a time per magic number and relies on its structural stop and target to exit.
The strategy signals a LONG when all of the following line up:
- Bullish ignition bar: the just-closed candle closes above its open (
close > open). - Oversized body: the candle's body is at least
BurstBodyFactortimes the recent average body, measured over the priorBodyAvgLookbackbars. This filters for a genuine burst rather than normal noise. - Strong close: the candle closes within the top
CloseLocationFracof its own range — demanding conviction, not a fat upper rejection wick. - Micro break of structure: the candle's close pushes above the highest high of the prior
BreakoutLookbackbars, signalling a break to the upside.
The strategy signals a SHORT as the exact mirror image: a bearish ignition bar (close below open) with an oversized body, closing within the bottom CloseLocationFrac of its range, and whose close pushes below the prior BreakoutLookback low.
Stop-loss logic (structural and self-scaling):
- For a long, the stop sits just below the ignition bar's low, offset by
StopBufferFracof that bar's range. - For a short, the stop sits just above the ignition bar's high, offset by the same fraction.
- Because the stop is a fraction of the ignition bar's own range, it adapts automatically to any symbol or timeframe without manual point calculations.
Take-profit logic:
- The target is placed at a fixed reward-to-risk multiple (
RewardRatio) of the structural stop distance. For example, with the default 1.50, the take-profit is set 1.5 times further from entry than the stop.
Trade filters:
- A spread gate skips the trade whenever the current spread (in points) is wider than
MaxSpreadPoints, keeping the scalp realistic. - Only one position per magic number is allowed at a time; the EA waits for the stop or target to close it before looking for the next setup.
Strategy Parameters
| Parameter | Default | Min | Max | Description |
|---|---|---|---|---|
| BodyAvgLookback | 12 | 5 | 40 | Number of prior bars used to define the "recent average body" baseline. |
| BurstBodyFactor | 1.80 | 1.20 | 4.00 | The ignition body must be at least this multiple of the average body to qualify as a burst. |
| BreakoutLookback | 6 | 3 | 20 | Number of prior bars whose high/low the ignition close must break (micro structure). |
| CloseLocationFrac | 0.30 | 0.10 | 0.50 | Close must land within this top (long) or bottom (short) fraction of the bar's range. |
| StopBufferFrac | 0.10 | 0.00 | 1.00 | Stop buffer beyond the ignition bar's opposite extreme, as a fraction of that bar's range. |
| RewardRatio | 1.50 | 0.80 | 4.00 | Take-profit distance as a multiple of the structural stop distance. |
| MaxSpreadPoints | 20 | 1 | 200 | Skip the trade if the current spread (in points) is wider than this value. |
| Lots | 0.10 | 0.01 | 1.00 | Order volume (position size in lots). |
| Magic | 7411 | 0 | 9,999,999 | Magic number used to identify and manage this EA's positions. |
Recommended Chart Settings
This strategy was designed as a momentum and breakout-continuation scalper for a tight-spread, fast-moving pair such as EURUSD on the M1 (one-minute) timeframe. The tight spread and high tick activity of a major pair help the spread gate pass more often and give short bursts room to extend.
Keep in mind that results will vary significantly across different symbols, brokers, and market conditions. A pair with wider spreads, a slower timeframe, or a low-volatility session may produce very different — and often fewer — signals. Always test any change of symbol or timeframe thoroughly before applying it.
Historical Backtest Results
Note: The figures below are from a historical backtest simulation. Backtests have inherent limitations — they do not account for slippage, requotes, spread widening, or psychological factors. These results should not be interpreted as a prediction of future performance.
No backtest data is available for this strategy at the time of writing. Once a historical simulation has been run, key metrics — such as Net Profit, Profit Factor, Sharpe Ratio, Win Rate, Maximum Drawdown, and Total Trades — would be summarised here using only the real figures from that run.
When you do run your own backtest in the MetaTrader 5 Strategy Tester, treat the output as a historical study of how the rules would have behaved over past data, not as a forecast. Pay particular attention to the maximum drawdown and the total number of trades, as a scalping strategy can generate many trades where small costs like spread and commission add up quickly.
How to Install on MetaTrader 5
- Download the .ex5 file from the link below.
- Copy it to your MT5
MQL5\Expertsfolder. - Restart MetaTrader 5 or refresh the Navigator panel.
- Drag the EA onto a chart matching the recommended symbol and timeframe.
- Configure the input parameters and enable Algo Trading.
What to Consider Before Using This EA
Strengths of this approach. Because the MomentumIgnitionScalper uses no indicators, it reacts to price the moment a bar closes, with no smoothing lag. Its risk is fully structural and self-scaling: the stop is anchored to the ignition bar's own range, so it adapts to volatility automatically. The triple confirmation — oversized body, close at the extreme, and a break of recent structure — is a sensible attempt to demand real conviction before committing, and the spread gate adds a layer of realism that many simple EAs ignore.
Known limitations. Momentum-ignition setups are, by nature, reactive — the entry happens after a large bar has already moved, which can mean buying near a short-term high or selling near a short-term low. On the M1 timeframe, "false ignitions" are common: a bar bursts, breaks structure, and then immediately reverses, hitting the stop. Scalping also magnifies the impact of trading costs, since spread and commission are paid on every one of many trades.
Where it may underperform. This style tends to struggle in choppy, range-bound, or news-driven conditions where bursts fail to follow through, and during low-liquidity sessions where spreads widen past the gate and signals dry up. A fixed reward ratio also means the EA does not adapt its target to changing volatility, so a setting that suits a trending session may give back gains in a ranging one. View it as one tool for studying continuation behaviour — not a complete, all-conditions system.
Risk Management Tips
Sound risk management matters far more than any single entry rule. The following general principles apply to any strategy you study:
- Risk a small, fixed fraction per trade. Many educational sources suggest risking no more than 1–2% of account equity on any single position. Size your
Lotsso that the distance to your stop-loss reflects that limit. - Start on a demo account. Run the EA on a demo or simulation account first to understand its behaviour, trade frequency, and drawdown profile before risking any real capital.
- Understand drawdown. Drawdown is the peak-to-trough decline in your account. Even a historically sound strategy can endure long losing streaks; make sure you could tolerate the worst drawdown seen in testing.
- Account for costs. Because this is a scalper, spread and commission accumulate quickly. Factor realistic trading costs into any evaluation.
- Avoid over-optimisation. Tuning parameters until a backtest looks ideal ("curve fitting") rarely survives live conditions. Prefer robust settings that work across a range of values.
Risk Warning
Trading foreign exchange, CFDs, and other leveraged financial instruments involves substantial risk of loss and is not suitable for all investors. The strategies and tools discussed on this page are provided for educational purposes only and do not constitute financial advice, investment recommendations, or solicitation to trade. Always consult a qualified financial adviser before making trading decisions. Past backtest performance is not indicative of future results.
Downloads
- Expert Advisor: MomentumIgnitionScalper.ex5 (1 downloads)
- Source Code: MomentumIgnitionScalper.mq5 (1 downloads)
- Documentation: MomentumIgnitionScalper.pdf (1 downloads)