
Disclaimer: This article is for educational and informational purposes only. It does not constitute financial or investment advice. Trading forex and CFDs carries significant risk of loss. Past performance of any strategy — including backtests — does not guarantee future results. Never trade with money you cannot afford to lose.
What Is This Strategy?
The Median Channel Breakout is a trend-following breakout strategy that builds its price channel from the median of recent highs and lows rather than the single highest high and lowest low used by a classic Donchian channel. A median is the middle value of a sorted set of numbers — it is the textbook "outlier-resistant" statistic, meaning one freak spike barely moves it. That single design choice is what separates this system from ordinary channel breakouts, and it is the idea you will spend most of this article understanding.
The reasoning is straightforward. A Donchian rail is defined by exactly one bar — often a news wick, a stop run, or a thin-liquidity spike. Because price only has to re-touch that lonely extreme to "break out," a large share of Donchian breaks are really just re-tests of an outlier that fail immediately. By replacing the extreme with the median of the last N highs, the upper rail instead represents the typical recent high — the price the market has repeatedly been willing to reach. A close above that rail therefore means price has cleared the bulk of recent highs, which the strategy treats as a cleaner signal of genuine demand rather than a one-off spike.
As a learning tool, the Median Channel Breakout is well suited to traders who want to study how robust statistics can filter noise out of breakout signals, and who are comfortable with trend-following logic that only participates when price and the channel are drifting in the same direction. It is designed with liquid, trending markets in mind — FX majors, gold (XAUUSD), and major indices — and is intended for study on the M15 to H4 timeframes. It is not a scalping tool and it is not designed for tight, rangebound conditions.
How It Works
The strategy evaluates a signal only once per completed bar, then manages any open position on every incoming tick. All calculations come from a single timeframe — the one the chart is running on.
Building the channel (spike-immune rails):
- The upper rail is the median of the last N bar highs; the lower rail is the median of the last N bar lows (N =
ChannelPeriod). - The midline is the average of the two rails.
- The midline's slope is measured as the change in the midline over
SlopeBarsbars, then divided by the current ATR (Average True Range, a standard measure of recent volatility). Dividing by ATR "normalises" the slope so the same gate value works across different symbols and volatility regimes.
Long entry — the strategy signals a long when all three conditions align:
- The channel midline is rising — its ATR-normalised slope is at or above
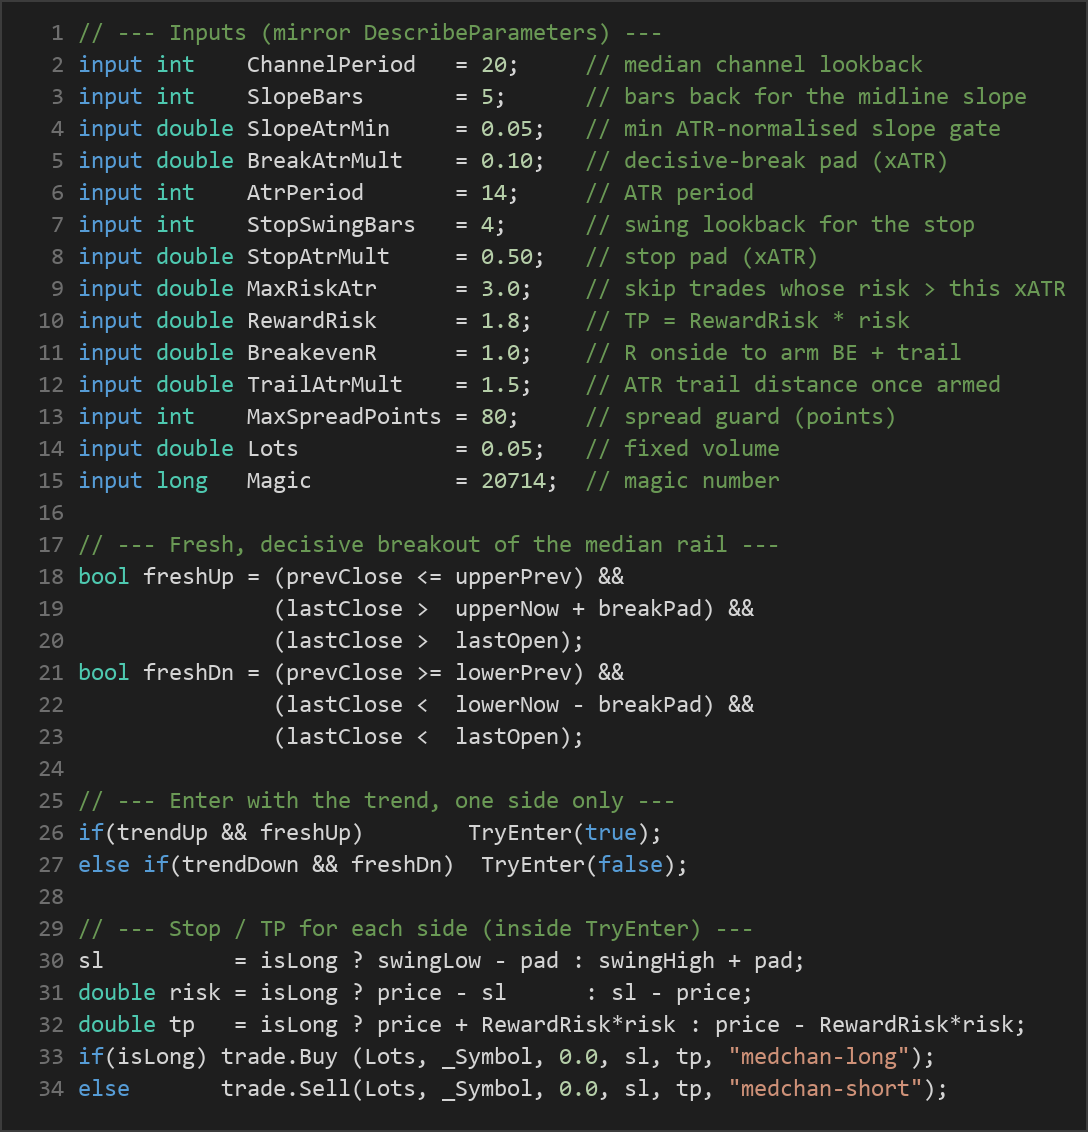
SlopeAtrMin. This ensures breakouts are only taken with the prevailing drift. - The just-closed bar makes a fresh, decisive cross of the upper rail: the previous bar's close was at or below the rail, and the current close is above it by at least
BreakAtrMult× ATR. - The signal bar is bullish (close above open).
Short entry is the exact mirror: the midline is falling, the just-closed bar closes decisively below the lower rail after previously being inside it, and the bar is bearish.
The "fresh cross" requirement (previous bar inside the channel, current bar outside) means only the first breakout bar of each move can trade. Price staying beyond the rail never re-fires the signal — it must dip back inside and cross again to re-arm. This prevents the strategy from repeatedly stacking into a single runaway move.
Stop-loss logic:
- When a trade opens, the stop is placed just beyond the recent swing extreme (the lowest low or highest high over
StopSwingBarsbars), padded byStopAtrMult× ATR. Because entries sit right at the rail, this structural stop tends to be tight. - If the resulting risk (distance from entry to stop) is wider than
MaxRiskAtr× ATR, the trade is skipped entirely. This caps how much any single trade can lose.
Take-profit and trade management:
- The take-profit is placed at
RewardRisk× risk — for example, a reward-to-risk ratio of 1.8 means the target is 1.8 times the initial risk distance. - Once price moves
BreakevenRrisk-multiples in your favour, the stop jumps to break-even and then trails behind price byTrailAtrMult× ATR. The trail is never loosened, only tightened, which is designed to help lock in open profit on extended moves. - Only one position per magic number is allowed at a time, and a spread guard (
MaxSpreadPoints) blocks new entries when trading conditions are poor.

Strategy Parameters
| Parameter | Default | Min | Max | Description |
|---|---|---|---|---|
| ChannelPeriod | 20 | 8 | 60 | Number of bars used for the median-high and median-low channel rails. |
| SlopeBars | 5 | 2 | 20 | How many bars back the midline is measured against to compute its slope. |
| SlopeAtrMin | 0.05 | 0.0 | 0.60 | Minimum ATR-normalised midline slope required to confirm a trend direction. |
| BreakAtrMult | 0.10 | 0.0 | 1.0 | Extra distance (× ATR) beyond the rail the close must clear for a "decisive" break. |
| AtrPeriod | 14 | 5 | 40 | Lookback period for the ATR volatility measure. |
| StopSwingBars | 4 | 2 | 12 | Swing lookback used to anchor the structural stop-loss. |
| StopAtrMult | 0.50 | 0.0 | 2.0 | Padding (× ATR) added beyond the swing extreme for the stop. |
| MaxRiskAtr | 3.0 | 1.0 | 8.0 | Trades whose risk exceeds this multiple of ATR are skipped. |
| RewardRisk | 1.8 | 1.0 | 5.0 | Take-profit distance expressed as a multiple of the trade's risk. |
| BreakevenR | 1.0 | 0.3 | 2.0 | Profit in risk-multiples required before the stop moves to break-even and starts trailing. |
| TrailAtrMult | 1.5 | 0.5 | 4.0 | ATR-based trailing-stop distance once the trail is armed. |
| MaxSpreadPoints | 80 | 5 | 300 | Maximum allowed spread (in points) for a new entry. |
| Lots | 0.05 | 0.01 | 1.0 | Fixed trade volume in lots. |
Recommended Chart Settings
The Median Channel Breakout was designed for liquid, trending markets — FX majors such as EUR/USD and GBP/USD, gold (XAUUSD), and major stock indices. The intended timeframes are M15 through H4, where breakout structure tends to be cleaner and less dominated by micro-noise than on very low timeframes.
Nothing about the symbol or timeframe is hardcoded — the strategy runs on whatever chart it is attached to. Keep in mind that breakout behaviour, volatility, and spread all differ from one instrument and session to another, so results will vary across different market conditions. Any parameter defaults should be treated as a starting point for study, not a finished configuration.
How to Install on MetaTrader 5
- Download the .ex5 file from the link below
- Copy it to your MT5
MQL5\Expertsfolder - Restart MetaTrader 5 or refresh the Navigator panel
- Drag the EA onto a chart matching the recommended symbol and timeframe
- Configure the input parameters and enable Algo Trading
What to Consider Before Using This EA
Strengths of this approach. The core idea — using a median instead of an extreme — is a sound piece of statistical reasoning. Median rails genuinely ignore isolated spikes, so the strategy tends to demand that price clear a cluster of recent highs or lows before it acts. Combined with the slope gate (only trading with the drift), the fresh-cross rule (no re-firing into an extended move), and a tight structural stop with a risk cap, the design is oriented toward fewer but higher-quality signals and controlled per-trade loss.
Known limitations. All breakout systems face the same core challenge: whipsaws in rangebound markets. Even a spike-immune channel will produce losing breaks when a market oscillates sideways without committing to a direction — the median simply reduces how often that happens, it does not eliminate it. The slope gate helps filter chop, but a market that trends slowly and then reverses can still trigger entries near a turning point. Because the strategy only takes the first breakout bar of each move, it can also miss trades if that specific bar fails the "decisive" or "bullish/bearish" filter, even when the larger move plays out.
Where it may underperform. Tight, low-volatility ranges, illiquid symbols with wide or erratic spreads, and choppy news-driven sessions are the conditions least suited to this logic. The spread guard offers some protection, but no filter fully compensates for a market that lacks sustained directional movement. Treat this EA as a framework for studying robust-statistic breakout logic, and always validate its behaviour yourself before drawing conclusions.
Risk Management Tips
Good risk management matters more than any single entry signal. Consider the following general principles as you study this or any strategy:
- Risk a small, fixed fraction per trade. Many educational sources suggest risking no more than 1–2% of account equity on any single position. The
Lotsparameter here is a fixed volume, so make sure you understand what that volume actually risks on your account and instrument before increasing it. - Test on a demo account first. Run the strategy in a risk-free simulated environment across different market conditions until you understand how it behaves in trends, ranges, and volatile sessions.
- Understand drawdown. Even a well-behaved strategy will string together losing trades. Know the maximum drawdown you are willing to tolerate before you begin, not after.
- Respect the risk cap. The
MaxRiskAtrskip rule and the tight structural stop are there to limit single-trade loss — do not disable them lightly. - Never trade money you cannot afford to lose, and keep position sizing aligned with your overall account and goals rather than any single trade's potential.
Risk Warning
Trading foreign exchange, CFDs, and other leveraged financial instruments involves substantial risk of loss and is not suitable for all investors. The strategies and tools discussed on this page are provided for educational purposes only and do not constitute financial advice, investment recommendations, or solicitation to trade. Always consult a qualified financial adviser before making trading decisions. Past backtest performance is not indicative of future results.
Downloads
- Expert Advisor: MedianChannelBreakout.ex5 (43 downloads)
- Source Code: MedianChannelBreakout.mq5 (51 downloads)
- Documentation: MedianChannelBreakout.pdf (49 downloads)