
Disclaimer: This article is for educational and informational purposes only. It does not constitute financial or investment advice. Trading forex and CFDs carries significant risk of loss. Past performance of any strategy — including backtests — does not guarantee future results. Never trade with money you cannot afford to lose.
What Is This Strategy?
The Inside Bar Breakout strategy is a pure price-action, candlestick-pattern trading system for MetaTrader 5. It uses no technical indicators at all — no moving averages, no RSI, no ATR. Instead, it reads raw candle structure and trades the classic two-bar inside bar pattern, a compression formation in which one candle's entire range sits inside the previous candle's range. In plain terms, the market makes a strong push, then pauses and coils tightly, storing energy before its next move.
This is a breakout trading style, which means it aims to enter a trade only when price expands beyond a defined boundary rather than predicting direction in advance. The strategy looks for a "mother bar" (a strong momentum candle with a large body relative to its full range) followed by a tight "inside bar." When that pattern appears, it brackets the mother bar with two resting pending orders — one above and one below — and lets the market itself decide which way to break.
As a learning tool, the Inside Bar Breakout is well suited to traders who want to understand price-action concepts without the complexity of layered indicators. It is designed for momentum-prone instruments and intraday timeframes, where coiled consolidations frequently resolve into directional runs. It is best viewed as a framework for studying how breakout mechanics, bracket orders, and structural stop placement fit together — not as a shortcut to results.
How It Works
The strategy acts once per newly closed bar and reads the two most recently closed candles. Here is what it does, step by step:
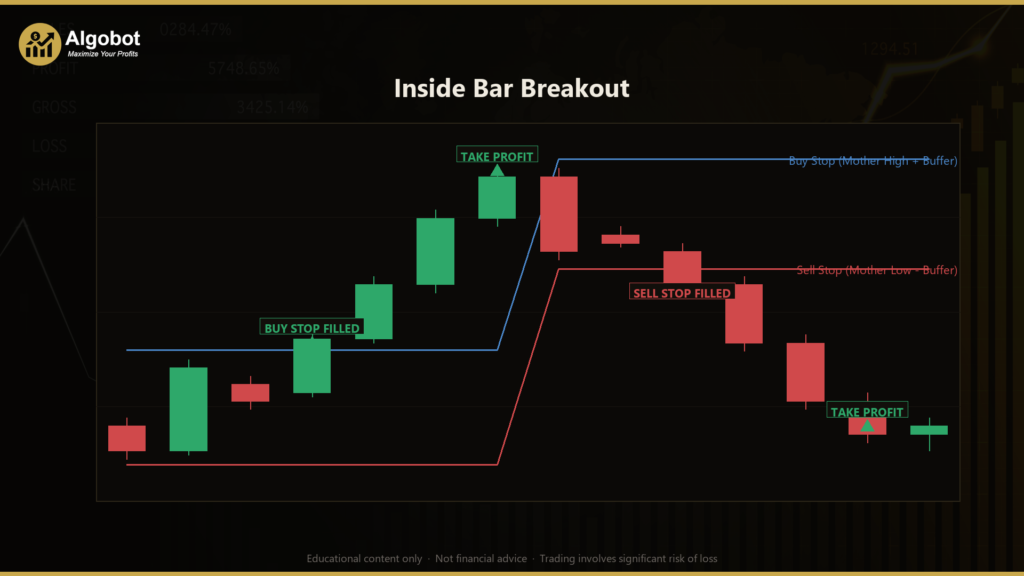
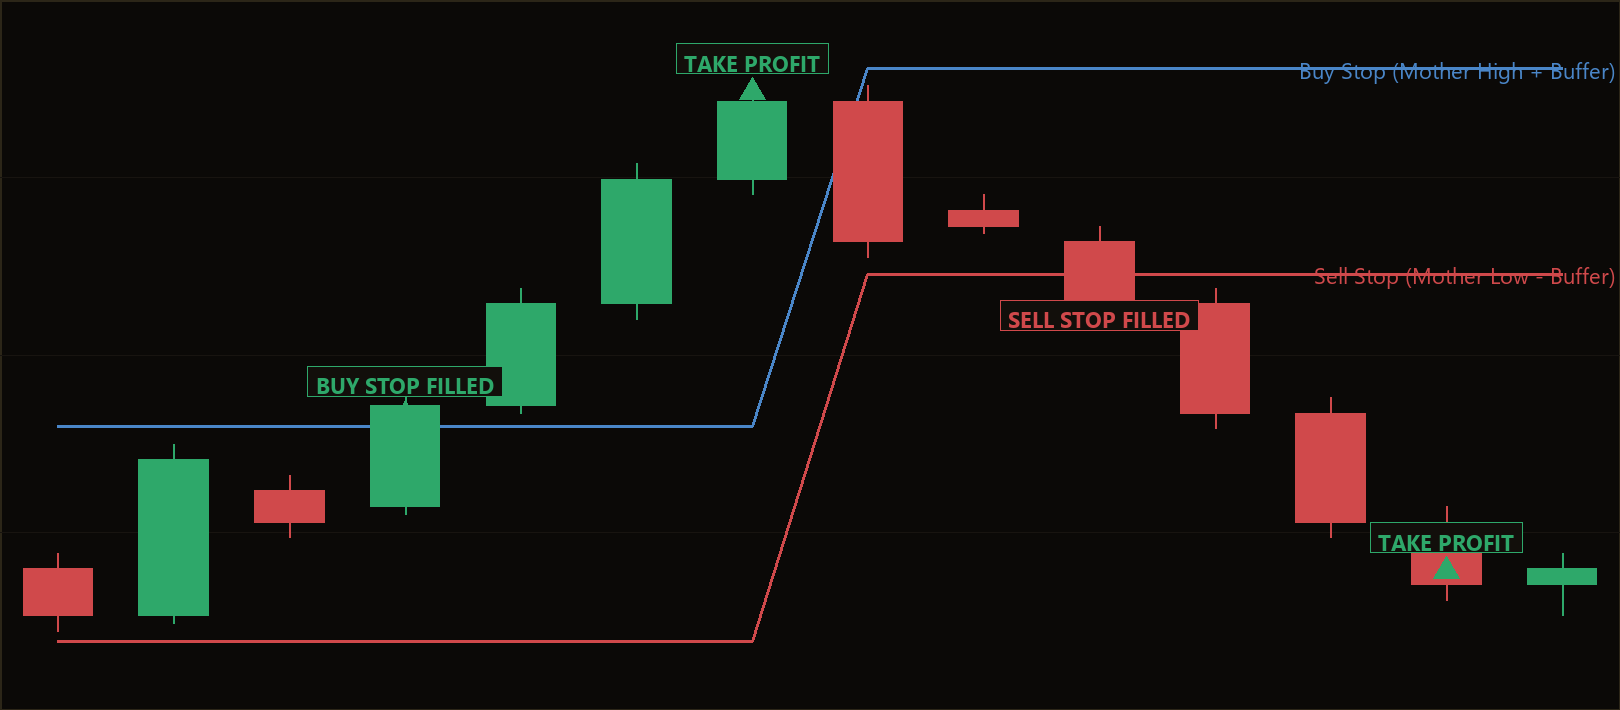
- Pattern detection (the coil): The strategy signals a setup only when two conditions are met. First, the mother bar must be a conviction candle — its body (the distance between open and close) must be at least a minimum fraction of its full high-to-low range, confirming genuine momentum. Second, the inside bar must be fully contained within the mother bar (its high below the mother's high and its low above the mother's low) and must be tight — its range can be no more than a set fraction of the mother bar's range.
- Entry (a true breakout via pending stop orders): When a qualifying inside bar closes, the strategy places an OCO (one-cancels-the-other) pair of pending stop orders rather than entering at market. It sets a Buy Stop a small buffer above the mother bar's high and a Sell Stop the same buffer below the mother bar's low. Whichever side the market expands into triggers first.
- One-cancels-the-other: The moment one order fills and a position opens, the strategy immediately cancels the opposite resting order, so only one direction is ever traded per setup.
- Expiry (no stale brackets): If neither order triggers within the configured number of bars (
ExpiryBars), both pending orders are pulled and the strategy hunts for a fresh coil. This means it only pays for breakouts that actually happen and never stacks a second bracket on top of an old one. - Stop-loss logic: The protective stop sits a buffer beyond the opposite extreme of the mother bar — the far wall of the coil. A filled long is therefore stopped below the mother bar's low, and a filled short is stopped above the mother bar's high. The full risk distance is the mother bar's range plus both buffers.
- Take-profit logic: The target is placed at a fixed reward-to-risk multiple of that structural stop distance. With the default
RewardRatioof 1.5, the strategy signals a take-profit 1.5 times further away than the stop.
Because every distance — the breakout offset, the stop buffer, and the target — is expressed as a fraction of the mother bar's range, the logic scales automatically to any symbol, timeframe, or volatility level without ever needing the instrument's point size.
Strategy Parameters
| Parameter | Default | Min | Max | Description |
|---|---|---|---|---|
| MinMotherBodyFrac | 0.55 | 0.30 | 0.90 | Minimum body-to-range ratio of the mother bar. Higher values demand a stronger, more decisive momentum candle before a setup qualifies. |
| InsideMaxFrac | 0.70 | 0.30 | 1.00 | Maximum range of the inside bar as a fraction of the mother bar's range. Lower values require a tighter, more compressed coil. |
| BufferFrac | 0.10 | 0.00 | 0.50 | Breakout offset and stop buffer beyond the mother bar, as a fraction of its range. Controls how far past the bar price must travel to trigger an entry. |
| RewardRatio | 1.50 | 0.50 | 5.00 | Take-profit distance as a multiple of the structural stop distance. A value of 1.5 targets a reward 1.5× the risk. |
| ExpiryBars | 3 | 1 | 10 | Number of bars after which an un-triggered bracket is cancelled so the strategy can look for a fresh setup. |
| Lots | 0.10 | 0.01 | 1.00 | Trade volume in lots for each order. |
| Magic | 5207 | 0 | 9,999,999 | Unique magic number used to identify and manage this EA's own orders and positions. |
Recommended Chart Settings
The Inside Bar Breakout was designed with momentum-prone instruments in mind, such as XAUUSD (gold) or GBPJPY, on the M15 or H1 timeframe. These conditions tend to produce the kind of thrust-then-coil behavior the pattern relies on, allowing a single compressed bar to resolve into an extended move. As always, results will vary across different symbols, brokers, spreads, and market conditions, so treat these as a starting point for study rather than a fixed recommendation.
Historical Backtest Results
Note: The figures below are from a historical backtest simulation. Backtests have inherent limitations — they do not account for slippage, requotes, spread widening, or psychological factors. These results should not be interpreted as a prediction of future performance.
No backtest data is available for this strategy at the time of writing. When a historical simulation has been run, the key performance metrics — such as net profit, profit factor, Sharpe ratio, win rate, maximum drawdown percentage, and total number of trades — would be reported here. Until then, you are encouraged to run your own backtests in the MetaTrader 5 Strategy Tester across multiple symbols and date ranges to understand how the strategy behaves under different market conditions.
How to Install on MetaTrader 5
- Download the
InsideBarBreakout.ex5file from the link below. - Copy it to your MT5
MQL5\Expertsfolder. - Restart MetaTrader 5 or refresh the Navigator panel.
- Drag the EA onto a chart matching the recommended symbol and timeframe.
- Configure the input parameters and enable Algo Trading.
What to Consider Before Using This EA
The Inside Bar Breakout has several genuine strengths worth understanding. Because it uses pending stop orders, it never chases price — it waits for the market to come to a predefined level, which can reduce emotional, reactive entries. Its OCO bracket means it stays directionally neutral until the market commits, and its structural, range-relative sizing makes the same logic portable across instruments and timeframes. The built-in expiry rule also keeps it disciplined, refusing to leave stale orders sitting on the chart.
At the same time, breakout systems have well-known limitations. The most common is the false breakout, where price briefly pokes past the trigger, fills the order, and then reverses — historically a frequent occurrence in choppy, range-bound markets. Inside bar setups can also be relatively rare on some symbols, meaning long idle stretches with no trades. During low-volatility or sideways conditions, the strategy may underperform because coils fail to resolve into sustained moves. Spread widening around news events can also distort the small buffers used for entries and stops. None of this makes the approach good or bad — it simply means the strategy suits certain market regimes better than others, and understanding that context is part of using it wisely.
Risk Management Tips
Sound risk management matters more than any single strategy. Consider the following general principles as you study this EA:
- Position sizing: Size each trade so that a stop-out costs only a small, predefined slice of your account. A common educational guideline is to risk no more than 1–2% of your balance per trade.
- Test on demo first: Run the strategy on a demo account for an extended period before considering any live use, so you can observe its behavior without financial pressure.
- Understand drawdown: Every strategy experiences losing streaks. Study the maximum drawdown in your own backtests so you know what a normal rough patch looks like and are less likely to abandon a plan at the wrong moment.
- Account for costs: Remember that spreads, commissions, and slippage all affect real outcomes and are not fully captured by a backtest.
- Diversify your study: Avoid relying on a single instrument or timeframe; observing the strategy across several can give a more balanced picture of its character.
Risk Warning
Trading foreign exchange, CFDs, and other leveraged financial instruments involves substantial risk of loss and is not suitable for all investors. The strategies and tools discussed on this page are provided for educational purposes only and do not constitute financial advice, investment recommendations, or solicitation to trade. Always consult a qualified financial adviser before making trading decisions. Past backtest performance is not indicative of future results.
Downloads
- Expert Advisor: InsideBarBreakout.ex5 (2 downloads)
- Source Code: InsideBarBreakout.mq5 (2 downloads)
- Documentation: InsideBarBreakout.pdf (2 downloads)