
Disclaimer: This article is for educational and informational purposes only. It does not constitute financial or investment advice. Trading forex and CFDs carries significant risk of loss. Past performance of any strategy — including backtests — does not guarantee future results. Never trade with money you cannot afford to lose.
What Is This Strategy?
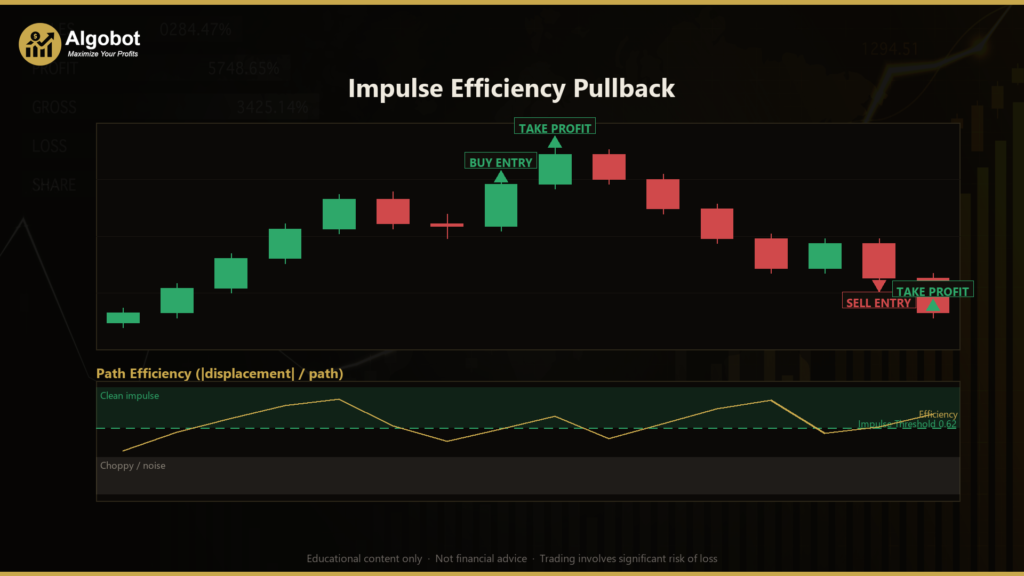
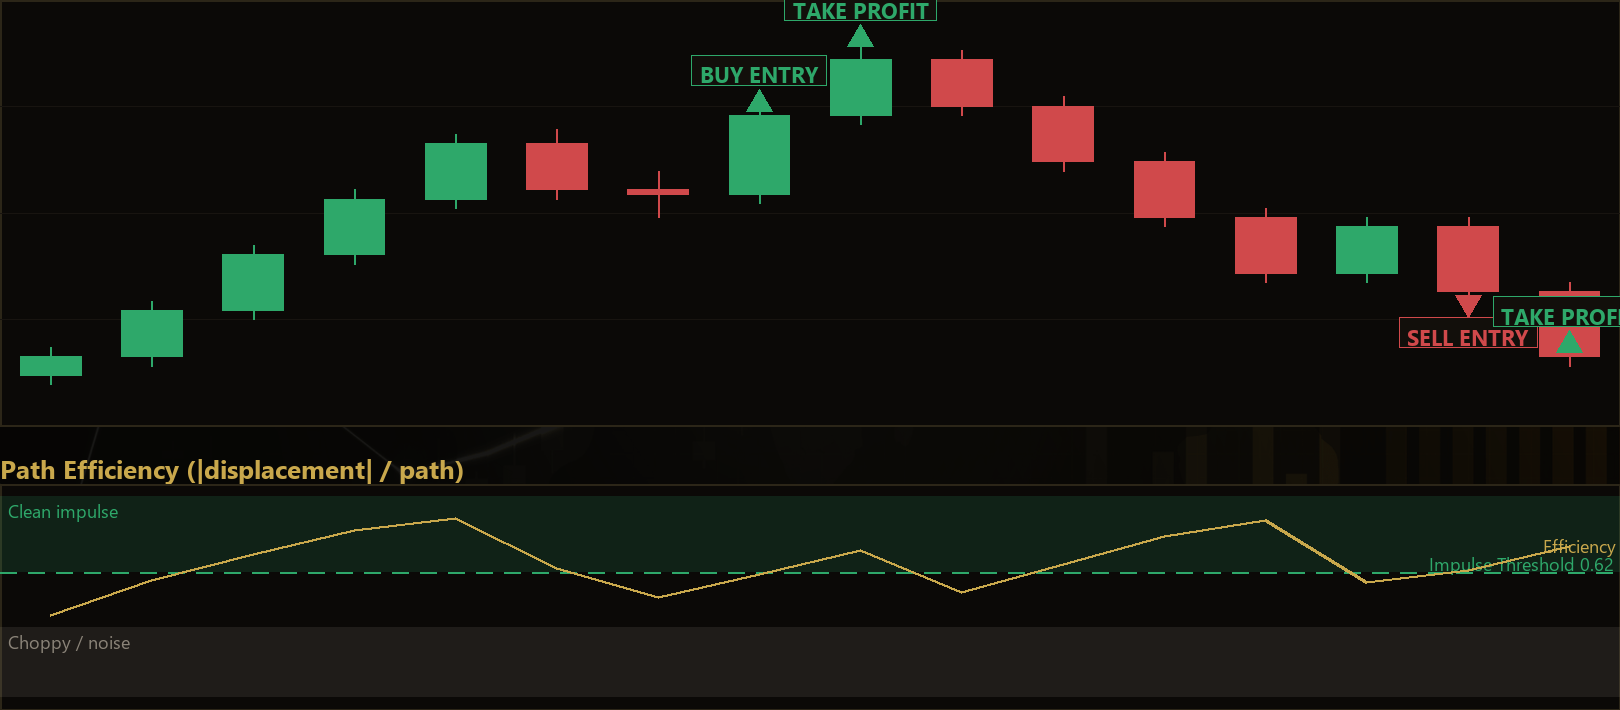
The Impulse Efficiency Pullback is a pure price-action momentum-continuation strategy that uses a hand-built "path efficiency" momentum gauge — not a packaged technical indicator — to identify clean directional thrusts and then trade their continuation after a shallow pause. It belongs to the trend-continuation (or "pullback") family of trading styles, where the aim is to join an existing move after a brief counter-move rather than to predict tops and bottoms. Because it reads raw bar geometry instead of relying on moving averages, oscillators, or ATR, it is a useful case study for traders who want to understand momentum at a structural level.
At the heart of the strategy is a concept called path efficiency. For a window of recently completed bars, the strategy compares the displacement (how far price travelled in net terms from the start of the window to the end) against the path (the total up-and-down distance price actually covered along the way). When these two numbers are close, price moved in a clean, one-directional line — a genuine impulse leg. When the path is far longer than the displacement, price was choppy and going nowhere. This ratio, which always sits between 0 and 1, becomes the trigger for everything that follows.
This strategy is designed for momentum-rich trending conditions — for example, intraday foreign-exchange pairs or stock-index CFDs that produce sustained directional legs. It is best treated as a learning tool for studying how impulse, retracement, and resumption interact, rather than as a turnkey system. Traders who are comfortable reading candlestick structure and who want to see how momentum can be measured from first principles will get the most educational value from it.
How It Works
The strategy operates as a small state machine that processes one completed bar at a time. It only ever evaluates fully closed bars (the forming bar is ignored), which avoids acting on incomplete information mid-bar. The logic moves through three stages:
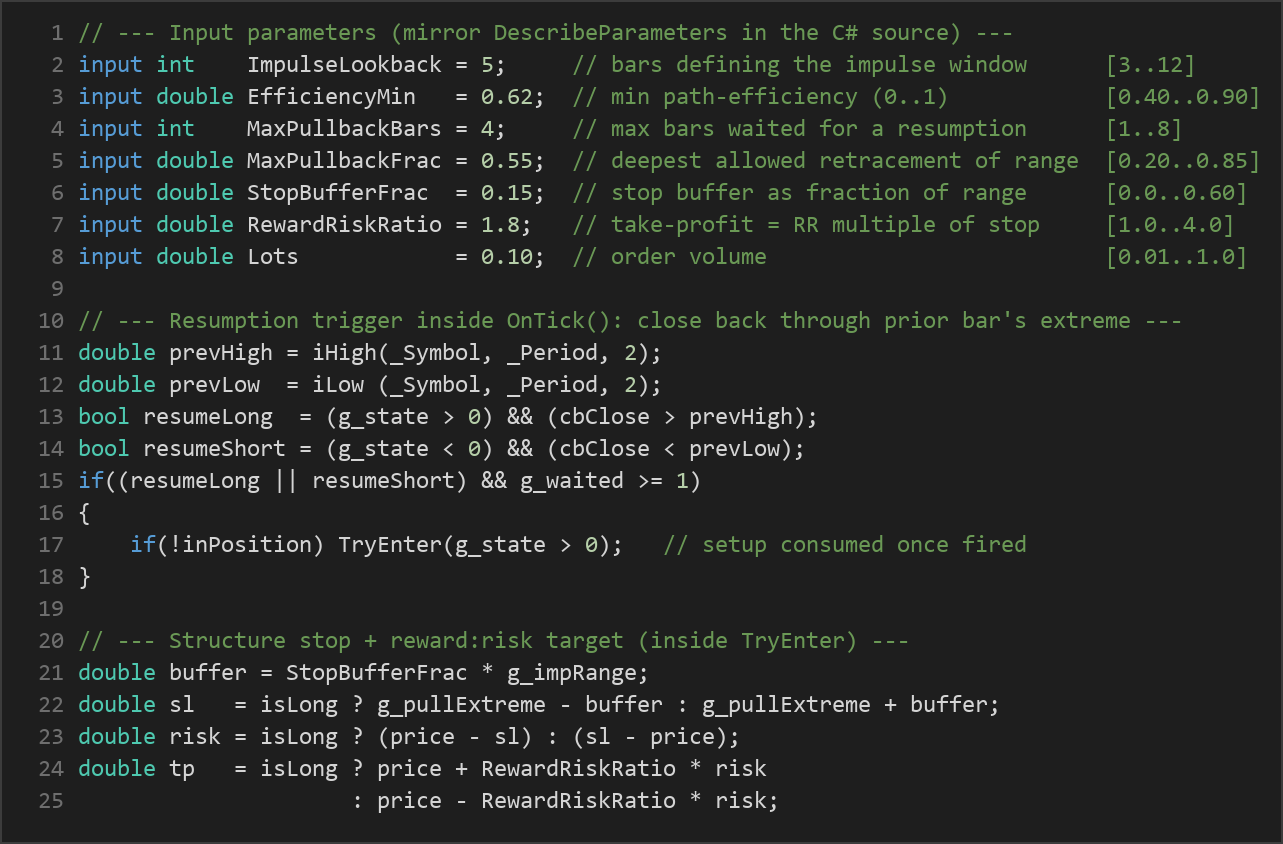
- Stage 1 — Detect an impulse. Over the most recent
ImpulseLookbackcompleted bars, the strategy computes path efficiency as|close[now] − close[N bars ago]| ÷ Σ|close − previous close|. If this value is greater than or equal toEfficiencyMin, the window counts as an impulse. A net upward displacement signals a bullish impulse; a net downward displacement signals a bearish impulse. The strategy then records the highest high and lowest low of that window as the impulse "envelope." - Stage 2 — Wait for a shallow pullback. After an impulse is found, the strategy watches for price to drift back against the move. It tracks the deepest point of that pullback (the lowest low for a bullish setup, the highest high for a bearish one). If the retracement exceeds
MaxPullbackFracof the impulse range, the strategy treats the thrust as failed and abandons the setup — a deep retrace is read as a sign the momentum did not hold. - Stage 3 — Enter on resumption. While the pullback stays shallow, the strategy looks for a resumption bar that closes back through the prior bar's extreme in the original direction. For a long, the strategy signals when a bar closes above the previous bar's high; for a short, when a bar closes below the previous bar's low. The long and short rules are fully symmetric. If no resumption appears within
MaxPullbackBars, the setup is discarded.
The exit logic is taken directly from market structure rather than from any indicator:
- Stop-loss. The stop is placed just beyond the pullback extreme — below it for longs, above it for shorts — with an added buffer equal to
StopBufferFracof the impulse range. If the structure has already been violated such that the computed risk is zero or negative, the trade is skipped entirely. - Take-profit. The target is set at a reward-to-risk multiple of the stop distance, controlled by
RewardRiskRatio. For example, with the default ratio, the target distance is set to 1.8 times the measured stop distance. - Single position discipline. The strategy will not open a new trade while a position with its magic number is already live, and it will not scan for a fresh impulse until it is flat and idle.
Strategy Parameters
| Parameter | Default | Min | Max | Description |
|---|---|---|---|---|
| ImpulseLookback | 5 | 3 | 12 | Number of completed bars that define the impulse measurement window. |
| EfficiencyMin | 0.62 | 0.40 | 0.90 | Minimum path-efficiency value (0–1) required for the window to count as a genuine impulse. Higher values demand cleaner thrusts. |
| MaxPullbackBars | 4 | 1 | 8 | Maximum number of bars the strategy will keep waiting for a resumption before abandoning the setup. |
| MaxPullbackFrac | 0.55 | 0.20 | 0.85 | Deepest allowed retracement of the impulse range before the thrust is treated as failed. |
| StopBufferFrac | 0.15 | 0.0 | 0.60 | Extra stop-loss buffer beyond the pullback extreme, expressed as a fraction of the impulse range. |
| RewardRiskRatio | 1.8 | 1.0 | 4.0 | Take-profit distance as a reward-to-risk multiple of the stop distance. |
| Lots | 0.10 | 0.01 | 1.0 | Order volume (lot size) used for each trade. |
Recommended Chart Settings
The Impulse Efficiency Pullback was designed with momentum-rich intraday trends in mind — for example, EURUSD or a US tech index such as US100 on the M15 to H1 timeframes. That said, the timeframe is never hardcoded: every bar access uses the chart's current period, so the strategy will run on whatever timeframe you attach it to. This makes it flexible for experimentation, but it also means behaviour can change meaningfully from one timeframe or symbol to another. Results will vary across different instruments, sessions, and market conditions, and a clean impulse pattern on one chart may be rare on another. Always test on the specific symbol and timeframe you intend to study before drawing any conclusions.
How to Install on MetaTrader 5
- Download the .ex5 file from the link below
- Copy it to your MT5
MQL5\Expertsfolder - Restart MetaTrader 5 or refresh the Navigator panel
- Drag the EA onto a chart matching the recommended symbol and timeframe
- Configure the input parameters and enable Algo Trading
What to Consider Before Using This EA
Like every approach, the Impulse Efficiency Pullback has strengths and limitations worth understanding before you rely on it for any decision-making.
Strengths. Because it measures momentum directly from raw price geometry, the logic is transparent and free of indicator lag or smoothing artifacts. The path-efficiency filter is a genuinely intuitive way to separate clean trends from chop, and the structure-based stop ties risk to the actual setup rather than an arbitrary fixed distance. The symmetric long/short rules and the single-position discipline keep the behaviour predictable and easy to study.
Known limitations. Trend-continuation systems are, by design, dependent on the market actually trending. In ranging or mean-reverting conditions, impulses may be rare, or — worse — false impulses may be followed by reversals rather than continuations, which can produce a cluster of losing trades. The strategy also acts only on the first qualifying resumption bar and then steps aside, so it may miss extended moves or, conversely, enter just before a stall. The MaxPullbackFrac and EfficiencyMin thresholds are sensitive: set them too loose and you admit noisy setups, too tight and you may see very few signals. Spread, slippage, and commission can also weigh more heavily on lower timeframes where the impulse range is smaller.
The honest takeaway is that this EA is a well-defined, educational example of momentum-continuation logic — not a guarantee of any particular outcome. Treat it as a framework to study and stress-test, not as a finished answer.
Risk Management Tips
Sound risk management matters far more than any single entry rule. Whatever strategy you study, keep these general principles in mind:
- Risk only a small fraction per trade. Many educational sources suggest risking no more than 1–2% of account equity on any single position, so that a string of losses does not threaten your capital.
- Size positions deliberately. The default
Lotsvalue is a starting point only. Position size should reflect your account balance, the stop distance, and your personal risk tolerance — not convenience. - Use a demo account first. Test the strategy in a risk-free demo environment until you understand how it behaves across different sessions and conditions before considering any live use.
- Understand drawdown. Even a logically sound strategy will experience losing streaks and equity drawdowns. Know in advance how much drawdown you are willing to tolerate.
- Keep records and review. Logging your trades and reviewing them helps you understand whether a setup is behaving as expected, and where the strategy's assumptions break down.
Risk Warning
Trading foreign exchange, CFDs, and other leveraged financial instruments involves substantial risk of loss and is not suitable for all investors. The strategies and tools discussed on this page are provided for educational purposes only and do not constitute financial advice, investment recommendations, or solicitation to trade. Always consult a qualified financial adviser before making trading decisions. Past backtest performance is not indicative of future results.
Downloads
- Expert Advisor: ImpulseEfficiencyPullback.ex5 (0 downloads)
- Source Code: ImpulseEfficiencyPullback.mq5 (0 downloads)
- Documentation: ImpulseEfficiencyPullback.pdf (0 downloads)