Disclaimer: This article is for educational and informational purposes only. It does not constitute financial or investment advice. Trading forex and CFDs carries significant risk of loss. Past performance of any strategy — including backtests — does not guarantee future results. Never trade with money you cannot afford to lose.
What Is This Strategy?
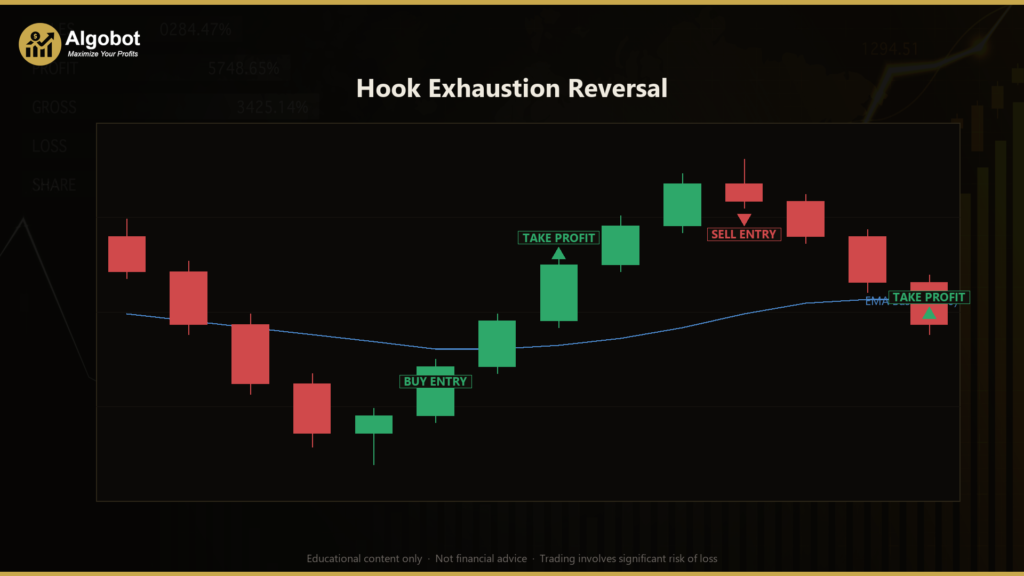
The Hook Exhaustion Reversal is a price-action reversal strategy built around the classic "hook" candlestick pattern, filtered by an ATR (Average True Range) stretch measurement and an EMA (Exponential Moving Average) baseline. Rather than waiting for a dramatic, wide-range reversal candle, it looks for a much quieter footprint: a bar that pushes to a fresh local extreme, closes back the other way, and does so inside a range that is narrower than the bar before it. This combination of a new high or low with a counter close and a shrinking range is the "hook" — a signature that the traders who committed at the extreme may already be trapped.
The strategy is designed for markets that have run too far in one direction and are showing early signs of exhaustion. It measures "too far" objectively: the hook bar's close must sit at least a defined number of ATRs away from a moving-average baseline. Average True Range is a volatility gauge, so this filter effectively asks whether price has stretched an unusual distance from its recent equilibrium before attempting to fade the move. This is a counter-trend, mean-reversion style approach intended for swing timeframes on liquid instruments.
As a learning tool, the Hook Exhaustion Reversal is well suited to traders who want to study how subtle candle geometry, volatility context, and confirmation logic can be combined into a single rule set. It is not a "set and forget" money machine — it is a structured example of how a discretionary price-action idea (the exhaustion hook) can be encoded into precise, testable conditions. Beginners can use it to understand pending-order confirmation and ATR-based risk, while more experienced traders can study its parameters to see how sensitive a reversal system is to its filters.
How It Works
The strategy evaluates one completed bar at a time on your chart's primary timeframe. It only hunts for new setups when it is flat (no open position) and has no confirmation order already resting. Here is what happens step by step:
- Narrow-range filter (the hook body): The just-closed bar's range (high minus low) must be at most
NarrowRatiotimes the previous bar's range. This ensures the candidate bar is genuinely narrower than its predecessor — the quiet loss of momentum that defines a hook. - Bearish hook (fading a top), the strategy signals a potential short when:
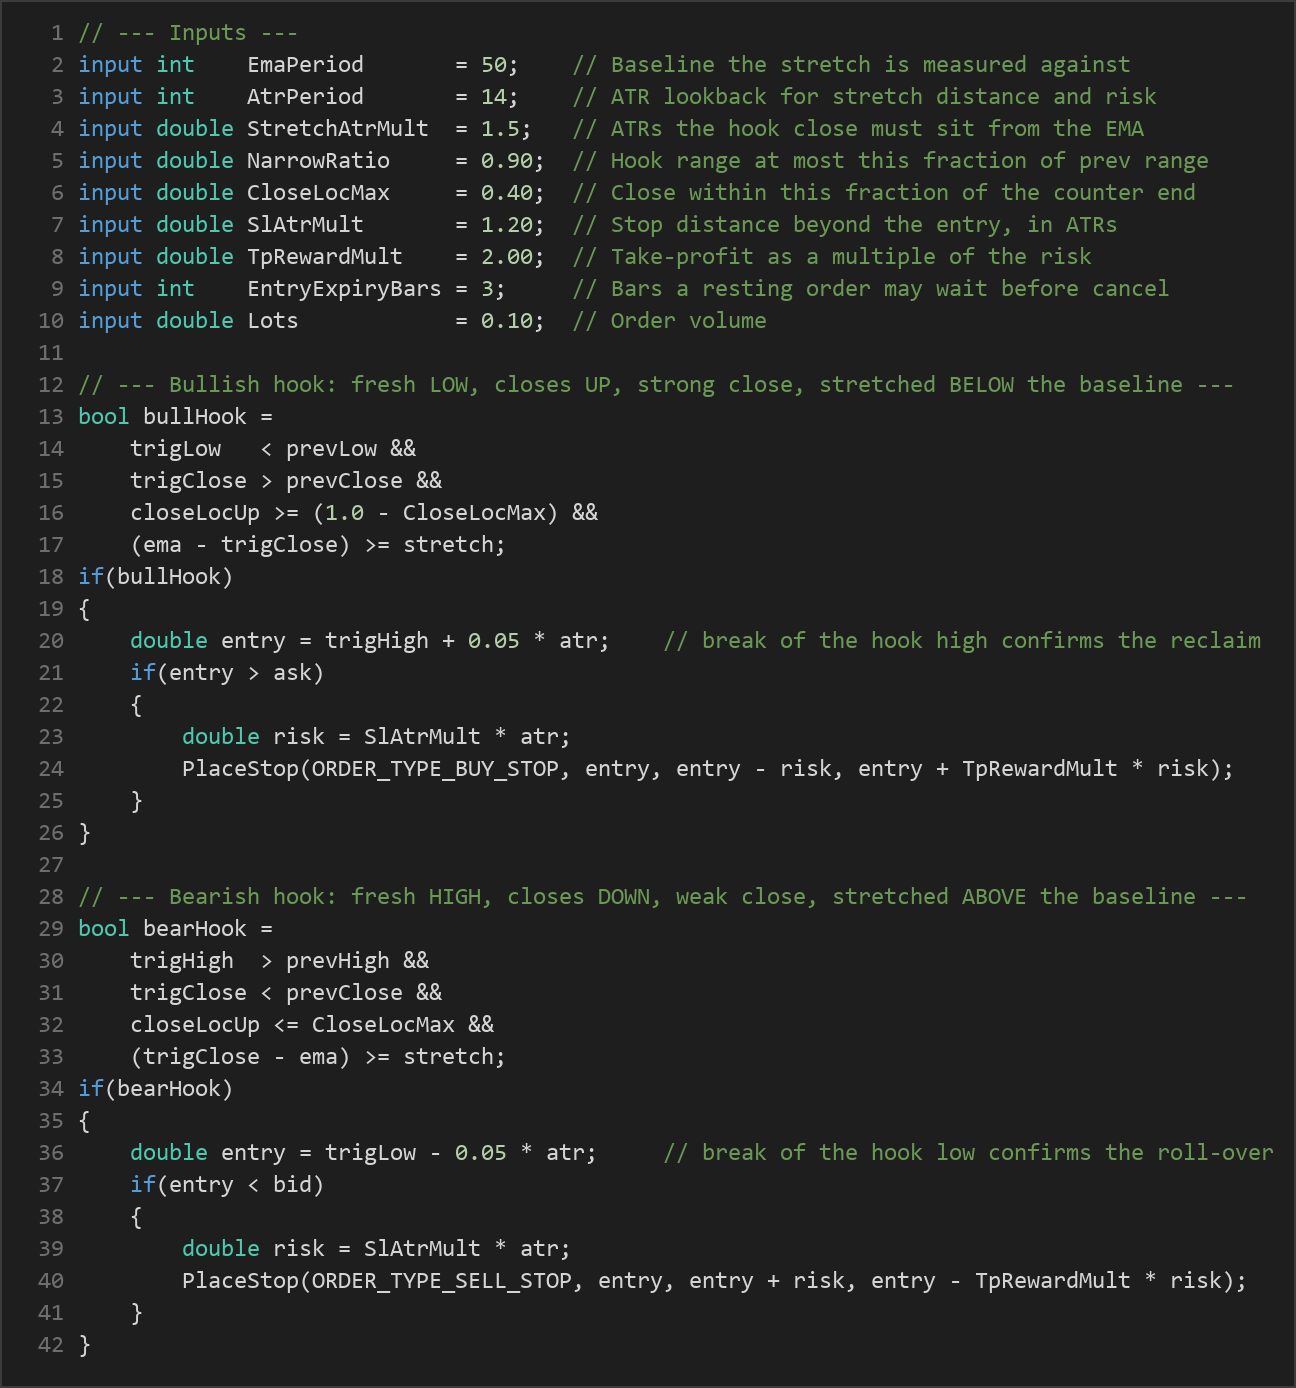
- The bar prints a fresh high above the previous bar's high.
- It closes below the previous bar's close (a counter close).
- That close sits in the lower portion of the bar's own range (within
CloseLocMaxof the low), indicating a weak finish. - The close is stretched at least
StretchAtrMultATRs above the EMA baseline — the exhaustion context. - A SellStop order is then placed just beneath the hook's low. Price must actually break that low to confirm the roll-over before any position opens.
- Bullish hook (fading a base), the strategy signals a potential long when:
- The bar prints a fresh low below the previous bar's low.
- It closes above the previous bar's close.
- That close sits in the upper portion of the bar's own range (within
CloseLocMaxof the high), indicating a strong finish. - The close is stretched at least
StretchAtrMultATRs below the EMA baseline. - A BuyStop order is placed just above the hook's high, so price must break the high to confirm the reclaim.
- Confirmation and expiry: The resting stop order is a filter, not a promise. If price does not trigger the break within
EntryExpiryBarsbars, the order is cancelled. An unconfirmed hook is abandoned rather than chased. - Stop-loss logic: Risk is measured purely in ATR terms. The stop is placed
SlAtrMultATRs beyond the entry price, so the protective distance automatically widens in volatile conditions and tightens in quiet ones. - Take-profit logic: The target is set at
TpRewardMulttimes the risk distance. With the default settings, that produces a 2:1 reward-to-risk framework, meaning the target is twice as far from entry as the stop. - Position management: Only one position (and at most one working order) exists per magic number at a time. Once a trade is live, it manages itself entirely through its ATR stop and target — the strategy does not add to, average, or micromanage an open position.

Strategy Parameters
| Parameter | Default | Min | Max | Description |
|---|---|---|---|---|
| EmaPeriod | 50 | 20 | 200 | Length of the EMA baseline against which the "stretch" distance is measured. |
| AtrPeriod | 14 | 7 | 30 | Lookback for the ATR used in both the stretch filter and risk sizing. |
| StretchAtrMult | 1.5 | 0.5 | 4.0 | How far, in ATRs, the hook close must sit from the EMA to count as exhaustion. |
| NarrowRatio | 0.90 | 0.50 | 1.00 | The hook's range must be at most this fraction of the previous bar's range. |
| CloseLocMax | 0.40 | 0.20 | 0.50 | How close to the counter end of its own range the hook bar must finish. |
| SlAtrMult | 1.20 | 0.50 | 3.00 | Stop-loss distance beyond the breakout entry, in ATRs. |
| TpRewardMult | 2.00 | 0.50 | 5.00 | Take-profit distance as a multiple of the risk (reward:risk ratio). |
| EntryExpiryBars | 3 | 1 | 8 | Number of bars the confirmation stop order may rest before it is cancelled. |
| Lots | 0.10 | 0.01 | 1.0 | Order volume in lots. |
Recommended Chart Settings
This strategy was designed with swing fades in mind on liquid FX pairs and metals — instruments such as XAUUSD (gold) or EURUSD — using the H1 (1-hour) timeframe. Because every calculation is based on OHLC data from the primary timeframe, the logic will run on whatever chart and timeframe you attach it to, but the default parameters were tuned with an hourly swing context in view. Results will vary considerably across different symbols, timeframes, and market conditions, so treat any timeframe other than the intended one as requiring its own independent study and parameter review.
How to Install on MetaTrader 5
- Download the .ex5 file from the link below.
- Copy it to your MT5
MQL5\Expertsfolder. - Restart MetaTrader 5 or refresh the Navigator panel.
- Drag the EA onto a chart matching the recommended symbol and timeframe.
- Configure the input parameters and enable Algo Trading.
What to Consider Before Using This EA
The core strength of the Hook Exhaustion Reversal is that it targets a low-energy footprint that many reversal systems ignore. Wide-bar approaches — outside bars, engulfing candles, and climax bars — all demand an expanding range, which means they tend to fire after the sharpest part of a move is already over. By demanding a narrower bar instead, this strategy attempts to catch the quiet moment momentum rolls over, and its pending-order confirmation avoids acting on a hook that never actually breaks.
That said, every counter-trend method carries inherent limitations, and this one is no exception. Fading an exhausted move means occasionally standing in front of a trend that is not finished — a strongly trending market can print hook after hook while continuing higher or lower, producing a string of losing confirmations. The narrow-range and stretch filters reduce how often this happens, but they cannot eliminate it. The strategy may also underperform during low-volatility, choppy ranges where "fresh extremes" are meaningless noise, and during major news events where price gaps straight through stop levels.
Parameter sensitivity is another consideration. A tighter NarrowRatio or a larger StretchAtrMult makes the setup rarer and more selective; loosening them produces more trades of lower average quality. There is no universally correct setting — the right balance depends on the instrument, the timeframe, and the prevailing regime. Use this EA as a framework for study rather than a finished product, and validate any parameter changes on out-of-sample data before drawing conclusions.
Risk Management Tips
Sound risk management matters far more than any single entry signal. Consider the following general principles as you study this strategy:
- Position sizing: Size each trade so that a full stop-out costs only a small, predefined slice of your account. A common guideline is risking no more than 1–2% of account equity per trade.
- Respect the stop: The ATR-based stop exists to define your risk before you enter. Avoid widening or removing it once a trade is live.
- Test on a demo account first: Run the EA on a demo or simulated account until you understand its behavior across different market conditions, including losing streaks.
- Understand drawdown: Even a well-designed strategy will experience runs of consecutive losses. Study the depth and duration of drawdown so it does not surprise you emotionally or financially.
- Diversify and avoid over-leverage: Concentrating risk in one instrument or using excessive leverage can turn a normal drawdown into an account-ending event.
- Keep expectations grounded: No filter combination removes uncertainty. Treat this system as one educational input among many, not a substitute for your own analysis.
Risk Warning
Trading foreign exchange, CFDs, and other leveraged financial instruments involves substantial risk of loss and is not suitable for all investors. The strategies and tools discussed on this page are provided for educational purposes only and do not constitute financial advice, investment recommendations, or solicitation to trade. Always consult a qualified financial adviser before making trading decisions. Past backtest performance is not indicative of future results.
Downloads
- Expert Advisor: HookExhaustionReversal.ex5 (36 downloads)
- Source Code: HookExhaustionReversal.mq5 (37 downloads)
- Documentation: HookExhaustionReversal.pdf (44 downloads)