Disclaimer: This article is for educational and informational purposes only. It does not constitute financial or investment advice. Trading forex and CFDs carries significant risk of loss. Past performance of any strategy — including backtests — does not guarantee future results. Never trade with money you cannot afford to lose.
What Is This Strategy?
The Gap Anchor Continuation strategy is a pure price-action expert advisor (EA) built around a single chart pattern: the price gap. A gap is a visible "jump" between one candle's close and the next candle's open, where price leaps in one direction without trading the levels in between. Unlike many automated systems, this strategy uses no traditional indicators at all — there is no moving average, RSI, ATR, or oscillator anywhere in its logic. Every decision is made from raw candle geometry: opens, highs, lows, and closes.
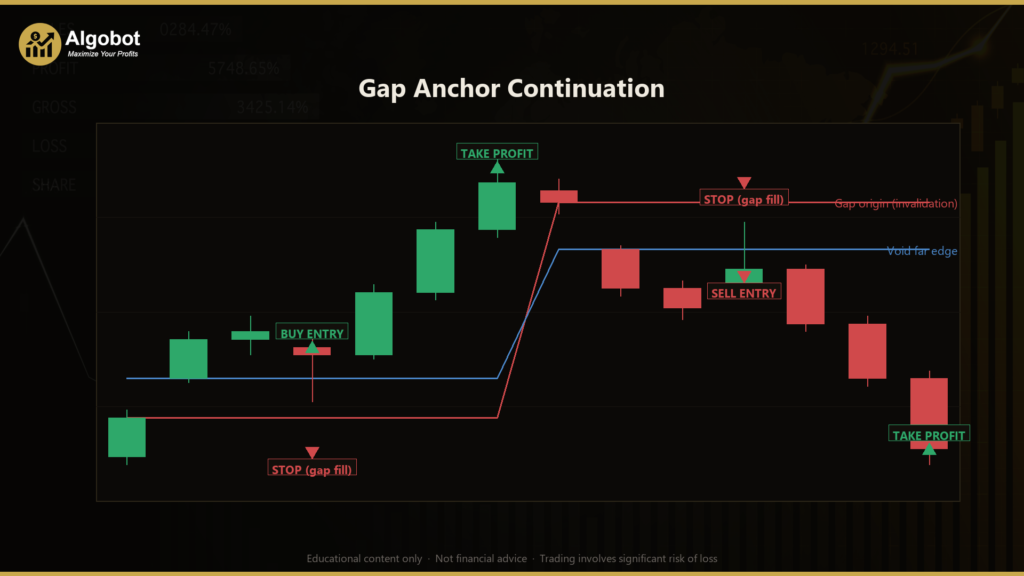
The trading style here is breakout continuation rather than mean reversion. A gap can behave in two opposite ways: it can act as a magnet that price returns to fill, or as a launch pad that price continues away from. The Gap Anchor Continuation strategy is designed for the launch-pad scenario — it looks for a gap that shows one-sided commitment, then trades in the same direction as the gap once the market confirms that commitment. The "anchor" in the name refers to the gap origin, the price level where the gap began, which the strategy treats as a hard invalidation line.
As a learning tool, this EA is well suited to traders who want to study how gaps, voids, and retests behave on a price chart without the noise of lagging indicators. It rewards patience: the strategy does not chase the explosive gap candle itself. Instead it arms a setup and waits for a controlled pullback into the gap before committing. This makes it a useful study of "wait for confirmation" entry discipline, a concept that applies far beyond gaps alone.
How It Works
The strategy runs on completed bars only — it evaluates conditions once per closed candle and never acts mid-bar. Its lifecycle moves through two stages: first it arms on a qualifying gap, then it waits for a defended retest to enter.
Building the volatility yardstick:
- The EA measures the average bar range (high minus low) over a lookback window of recent candles. This inline calculation is its only "volatility" reference and replaces a named indicator like ATR.
- The gap threshold is this average range multiplied by the
GapMultipleparameter, so the gap must be meaningfully large relative to recent candle sizes.
Arming on a qualifying gap (two-bar geometry):
- The strategy compares the prior bar's close with the just-closed bar's open.
- A gap up arms a long setup when the bar opens at least one threshold above the prior close, closes higher than it opened, and keeps its entire low above the prior close (the gap is not immediately filled).
- A gap down arms a short setup with the mirror conditions: opening below the prior close, closing lower than it opened, and keeping its whole high below the prior close.
- The space between the gap origin and the far edge of the gap candle's open is called the void. The origin is the invalidation level; the far edge marks how deep the void runs.
Entering on a defended retest:
- Once armed, the strategy waits for the first pullback bar that dips back into the void.
- For a long, the bar must dip far enough into the void (controlled by
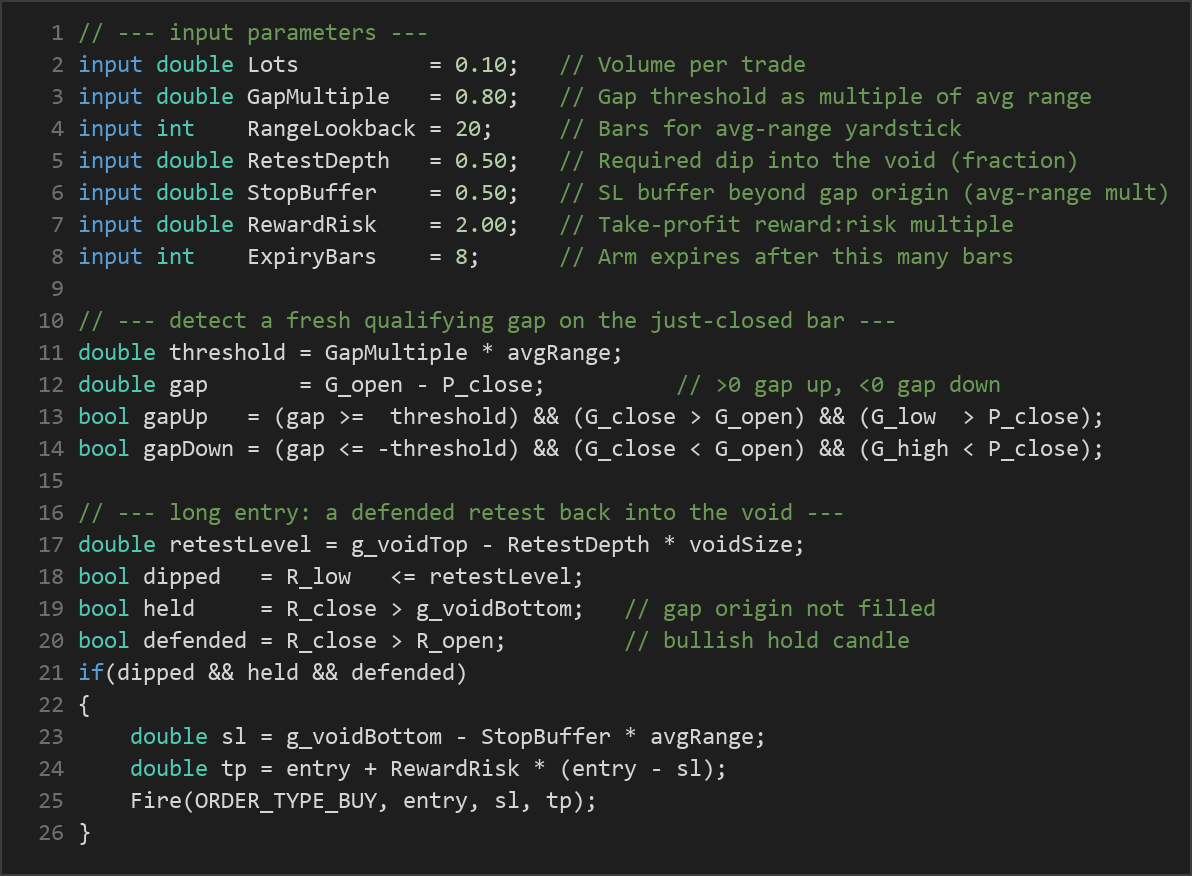
RetestDepth), must close back above the gap origin so the gap is not filled, and must close above its own open (a bullish "hold" candle). When all three conditions align, the strategy signals a market Buy at the Ask price. - For a short, the conditions are mirrored: the bar pops up into the void, closes below the gap origin, and closes below its open (a bearish hold). The strategy then signals a market Sell at the Bid price.
Stop-loss logic:
- The stop is placed beyond the gap origin by a buffer of
StopBuffer× average range. The reasoning is that if price closes through the gap origin, the "continuation" thesis is broken and the trade should be exited.
Take-profit logic:
- The target is set at a fixed reward-to-risk multiple (
RewardRisk) of the measured risk distance between entry and stop. A 2.0 setting, for example, places the target twice as far from entry as the stop.
Trade hygiene:
- Only one position is open at a time, and only one setup is armed at a time. A fresh qualifying gap re-arms onto the newer setup.
- An armed setup expires after
ExpiryBarsbars, and is voided immediately if a candle closes through the gap origin. The geometry is sanity-checked so the stop and target always sit on the correct side of the entry.
Strategy Parameters
| Parameter | Default | Min | Max | Description |
|---|---|---|---|---|
| Lots | 0.10 | 0.01 | 1.00 | Fixed trade volume (position size) in lots per trade. |
| GapMultiple | 0.80 | 0.20 | 4.00 | Gap size required to arm a setup, expressed as a multiple of the average bar range. Higher values demand larger, rarer gaps. |
| RangeLookback | 20 | 5 | 60 | Number of bars used to compute the average-range volatility yardstick. |
| RetestDepth | 0.50 | 0.10 | 1.00 | How deep the pullback must dip into the void, as a fraction of void size, before a retest qualifies. |
| StopBuffer | 0.50 | 0.10 | 2.00 | Extra distance beyond the gap origin for the stop-loss, as a multiple of average range. |
| RewardRisk | 2.00 | 1.00 | 5.00 | Take-profit distance as a reward-to-risk multiple of the entry-to-stop risk. |
| ExpiryBars | 8 | 1 | 40 | Number of bars an armed setup remains valid before it expires unused. |
Recommended Chart Settings
The Gap Anchor Continuation strategy operates on a single timeframe and trades the symbol of whatever chart it is attached to. Because the logic depends on the presence of genuine gaps, it tends to be most relevant on instruments and timeframes where gaps actually occur with meaningful frequency — for example, higher intraday timeframes (such as H1) on instruments that experience session breaks or news-driven jumps, where the open of a new bar can diverge from the prior close.
There is no single "correct" symbol or timeframe. The behavior of gaps varies enormously across markets: a continuously traded forex pair gaps differently from an index CFD that has session opens. You should test the strategy across several symbols and timeframes on historical data to understand where its gap definition produces sensible setups. Results will vary across different market conditions, and a setting that arms frequently on one instrument may rarely trigger on another.
How to Install on MetaTrader 5
- Download the .ex5 file from the link below
- Copy it to your MT5
MQL5\Expertsfolder - Restart MetaTrader 5 or refresh the Navigator panel
- Drag the EA onto a chart matching the recommended symbol and timeframe
- Configure the input parameters and enable Algo Trading
What to Consider Before Using This EA
Every approach has trade-offs, and understanding them is part of learning to use any EA responsibly.
Strengths of this approach:
- It is fully transparent. With no indicators to obscure the logic, every decision can be traced directly to candle geometry, which makes it an excellent study tool.
- It enforces patience by requiring a defended retest rather than chasing the gap candle, and it defines invalidation precisely at the gap origin.
- Risk is bounded on every trade: the stop and reward-to-risk target are calculated up front from the measured void.
Known limitations:
- The strategy depends entirely on gaps existing. On markets and timeframes where gaps are small or rare, it may arm infrequently and produce very few trades.
- Gaps do not always continue. The core assumption — that a defended retest signals support or resistance — may indicate continuation, but gaps can and do fill. The strategy accepts these losses at the stop.
- A defended retest that never arrives means the setup simply expires, so the EA can sit idle through otherwise interesting price action.
- Fixed lot sizing does not scale with account equity or volatility, so position size must be managed manually.
Where it may underperform:
- Choppy, range-bound conditions can produce frequent small gaps that fail to continue, leading to repeated stop-outs.
- Highly volatile news events can blow through the gap origin, turning a clean setup into a fast loss.
Risk Management Tips
Sound risk management matters more than any single strategy setting. Consider the following general principles as you study this EA:
- Position sizing: Size each trade so that a stop-loss represents only a small, fixed fraction of your account. A common educational guideline is to risk no more than 1–2% of account equity per trade.
- Demo first: Run the strategy on a demo account until you fully understand how often it arms, how it enters, and how it manages exits. Paper testing costs nothing and teaches a great deal.
- Understand drawdown: Even a well-defined strategy will experience losing streaks. Study the historical sequence of wins and losses to understand the depth of drawdown you might face, and ask whether you could hold the strategy through it.
- Respect the stop: The gap origin is the strategy's invalidation line for a reason. Disabling or widening stops removes the very risk control the logic is built around.
- Diversify your study: No single EA should carry an entire account. Treat this as one tool among many in your learning process.
Risk Warning
Trading foreign exchange, CFDs, and other leveraged financial instruments involves substantial risk of loss and is not suitable for all investors. The strategies and tools discussed on this page are provided for educational purposes only and do not constitute financial advice, investment recommendations, or solicitation to trade. Always consult a qualified financial adviser before making trading decisions. Past backtest performance is not indicative of future results.
Downloads
- Expert Advisor: GapAnchorContinuation.ex5 (65 downloads)
- Source Code: GapAnchorContinuation.mq5 (61 downloads)
- Documentation: GapAnchorContinuation.pdf (69 downloads)