
Disclaimer: This article is for educational and informational purposes only. It does not constitute financial or investment advice. Trading forex and CFDs carries significant risk of loss. Past performance of any strategy — including backtests — does not guarantee future results. Never trade with money you cannot afford to lose.
What Is This Strategy?
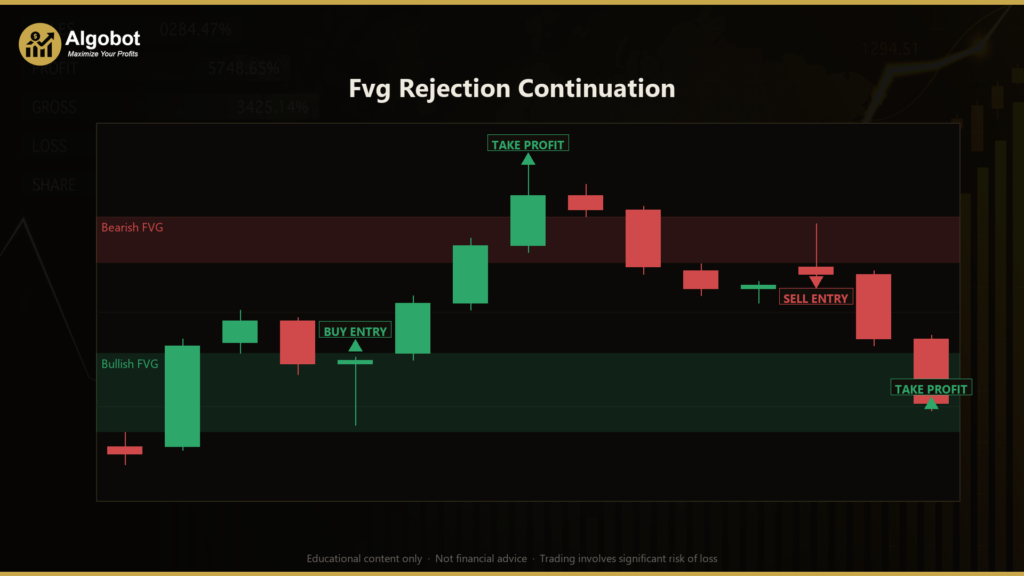
The Fvg Rejection Continuation strategy is a pure price-action expert advisor (EA) built around the Fair Value Gap (FVG) — also called a three-candle imbalance. An FVG is a small "hole" left in price when a strong middle candle moves so quickly that the wicks of the candle before it and the candle after it do not overlap. Many traders treat this unfilled space as an area where price may later return to find balance before continuing in the original direction. The Fvg Rejection Continuation EA is a trend-continuation, swing-style approach that trades on that idea, but with an important twist: it refuses to enter simply because price has touched the gap.
Instead, the strategy waits for a genuine rejection candle — a real wick rejection that dips into the imbalance and then closes back in the direction of the original impulse. This makes it more selective than a basic "touch and buy" gap system. The logic uses three honest filters: a displacement check (was the gap created by a real impulse?), a freshness check (is the gap still young and unbroken?), and a rejection-wick check (did price actually reject from the zone?). Notably, it uses no technical indicators at all — every measurement, including average range, is computed by hand from raw highs and lows.
This EA is best understood as a learning tool for traders who want to study how institutional-style "imbalance" concepts can be coded into objective, repeatable rules. It is suitable for intermediate students of price action who already understand candles, wicks, and basic risk-to-reward, and who want to see how a discretionary concept becomes a mechanical strategy.
How It Works
The strategy acts once per fully-closed bar — it never reacts to incomplete candles. On each new bar it inspects the three most recently closed candles (the "trio") and applies its filters in sequence.
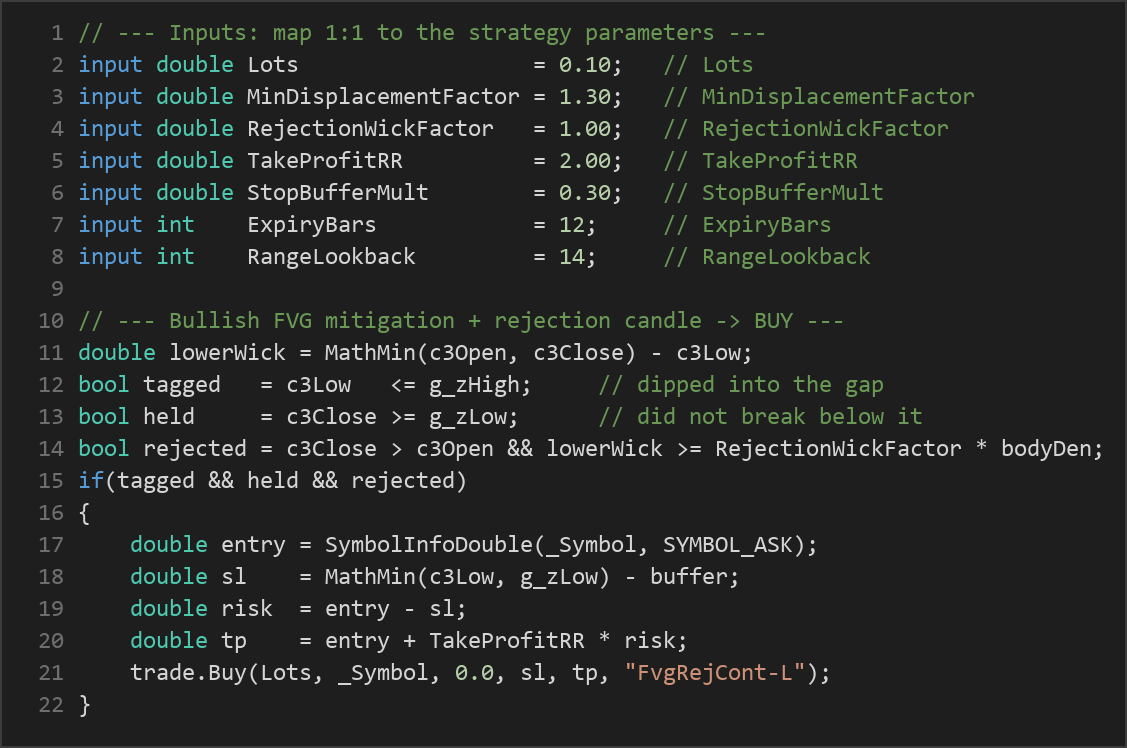
- Step 1 — Detect a fresh gap (displacement): The middle candle of the trio must have a body that is large relative to the recent average range (controlled by
MinDisplacementFactor). A bullish FVG is recorded when this candle closes up and the prior candle's high sits below the following candle's low, leaving a gap. A bearish FVG is recorded in the mirror situation. This filter ensures the imbalance came from a real impulse, not a quiet drift. - Step 2 — Check freshness and invalidation: The gap is only valid for a limited number of bars (
ExpiryBars). If price never returns in time, the gap is discarded as stale. If price closes fully through the gap (below a bullish zone or above a bearish zone), the setup is invalidated and dropped — the strategy will not chase a broken level. - Step 3 — Require a rejection candle: When price finally dips into the gap, the EA checks that the candle tagged the zone (wick entered it), held the zone (closed without breaking through), and printed a dominant rejection wick. For a long, the lower wick must be at least
RejectionWickFactortimes the candle body, and the candle must close up. For a short, the upper wick must dominate and the candle must close down.
When all three conditions align, the strategy signals an entry:
- Entry: A market Buy (at the Ask) for bullish setups, or a market Sell (at the Bid) for bearish setups.
- Stop-loss: Placed just beyond the rejection candle's extreme and the far edge of the gap, with an extra cushion set by
StopBufferMulttimes the average range. This anchors the stop to real structure. - Take-profit: Derived from a fixed reward-to-risk multiple (
TakeProfitRR). The distance from entry to stop becomes the "risk," and the target is placed that many multiples away. - Position management: Only one position per magic number is allowed at a time. Once a trade is open, the stop-loss and take-profit manage the exit — there is no averaging in or grid behavior.
The phrase "the strategy signals an entry" is deliberate: these are conditional rules, not predictions. The EA may indicate a setup, and historically such rejections can precede continuation, but outcomes vary with every market.
Strategy Parameters
| Parameter | Default | Min | Max | Description |
|---|---|---|---|---|
| Lots | 0.10 | 0.01 | 1.0 | Fixed trade size in lots for each position. Adjust to suit your account size and risk tolerance. |
| MinDisplacementFactor | 1.30 | 0.8 | 3.0 | How large the middle candle's body must be versus average range to count as a real impulse. Higher = stricter, fewer gaps. |
| RejectionWickFactor | 1.00 | 0.3 | 3.0 | How dominant the rejection wick must be relative to the candle body. Higher demands a more convincing rejection. |
| TakeProfitRR | 2.00 | 1.0 | 5.0 | Reward-to-risk multiple for the take-profit. At 2.00 the target sits twice as far as the stop. |
| StopBufferMult | 0.30 | 0.0 | 1.5 | Extra stop-loss cushion as a multiple of average range, placed beyond the candle/zone extreme. |
| ExpiryBars | 12 | 3 | 40 | Maximum number of bars a gap stays valid before being discarded as stale. |
| RangeLookback | 14 | 5 | 50 | Number of bars used to compute the hand-rolled average high-low range. |
A Magic number (default 7100) is also used internally so the EA only manages its own trades and can run alongside other strategies.
Recommended Chart Settings
This strategy was designed as a single-symbol, single-timeframe price-action EA. Because Fair Value Gaps and displacement are most reliable on liquid instruments with clean candle structure, a major forex pair such as EUR/USD on an intraday-to-swing timeframe (for example the H1 or H4 chart) is a sensible starting point for study. Higher timeframes tend to produce fewer but structurally cleaner imbalances, while lower timeframes generate more signals with more noise.
Keep in mind that the displacement and range filters are relative to each market's own volatility, so the same defaults will behave differently across symbols. Results will vary considerably across different instruments, sessions, and market conditions. Always test any symbol and timeframe combination on historical data and a demo account before drawing conclusions.
How to Install on MetaTrader 5
- Download the .ex5 file from the link below
- Copy it to your MT5
MQL5\Expertsfolder - Restart MetaTrader 5 or refresh the Navigator panel
- Drag the EA onto a chart matching the recommended symbol and timeframe
- Configure the input parameters and enable Algo Trading
What to Consider Before Using This EA
Strengths of this approach. The Fvg Rejection Continuation EA is selective by design. By demanding displacement, freshness, and a genuine rejection wick all at once, it filters out many weak gap touches that a simpler system would trade. Its stops and targets are anchored to actual candle structure rather than arbitrary fixed distances, and its invalidation rule means it stops tracking a gap the moment price closes cleanly through it. Because it uses no indicators, there is no lag from smoothing or repainting — every decision comes straight from price.
Known limitations. Fair Value Gap trading is inherently discretionary in real life, and turning it into fixed rules means some context is lost — the EA cannot judge whether a gap forms at a meaningful level or in the middle of nowhere. It is a trend-continuation idea, so it can struggle in choppy, range-bound conditions where gaps form and fail repeatedly. The "one position at a time" design keeps risk contained but also means it can sit idle during periods with few qualifying setups. A fixed reward-to-risk target may exit before a larger move completes, or miss trades that need more room. As with any rejection-based method, false rejections do occur, and the stop can be hit even on technically valid setups.
Where it may underperform. Expect weaker behavior during low-volatility consolidation, around major news spikes that distort wicks, and on illiquid symbols where candle structure is erratic. The strategy may indicate fewer signals on very high timeframes and noisier signals on very low ones.
Risk Management Tips
Sound risk management matters far more than any single entry technique. Consider these general principles as you study this EA:
- Risk a small, fixed fraction per trade. Many educators suggest risking no more than 1–2% of account equity on any single position. Use the stop-loss distance, not the lot size alone, to size your risk.
- Use a demo account first. Run the strategy on a demo or in the MT5 Strategy Tester long enough to understand its trade frequency, drawdown profile, and behavior across different market regimes before considering live capital.
- Understand drawdown. Even a sound rule set will experience losing streaks. Know the historical worst-case sequence of losses you could tolerate emotionally and financially.
- Match position size to volatility. Because this EA scales its stop to average range, larger volatility means wider stops — adjust lot size accordingly so your monetary risk stays consistent.
- Never trade with money you cannot afford to lose, and treat every parameter change as a new hypothesis that must be tested, not assumed.
Risk Warning
Trading foreign exchange, CFDs, and other leveraged financial instruments involves substantial risk of loss and is not suitable for all investors. The strategies and tools discussed on this page are provided for educational purposes only and do not constitute financial advice, investment recommendations, or solicitation to trade. Always consult a qualified financial adviser before making trading decisions. Past backtest performance is not indicative of future results.
Downloads
- Expert Advisor: FvgRejectionContinuation.ex5 (0 downloads)
- Source Code: FvgRejectionContinuation.mq5 (0 downloads)
- Documentation: FvgRejectionContinuation.pdf (0 downloads)