Disclaimer: This article is for educational and informational purposes only. It does not constitute financial or investment advice. Trading forex and CFDs carries significant risk of loss. Past performance of any strategy — including backtests — does not guarantee future results. Never trade with money you cannot afford to lose.
What Is This Strategy?
Fresh Zone Reversal is a supply-and-demand reversal strategy that combines institutional-style zone mapping with candlestick confirmation, filtered by the Average True Range (ATR) indicator. In plain terms, a supply zone is a price area where selling previously overwhelmed buying, and a demand zone is where buying previously overwhelmed selling. ATR is a volatility measure — the average distance price travels in a bar — and the strategy uses it to decide which zones are significant enough to trade. The result is a rules-based approach to a discretionary trading concept that many chart readers apply by eye.
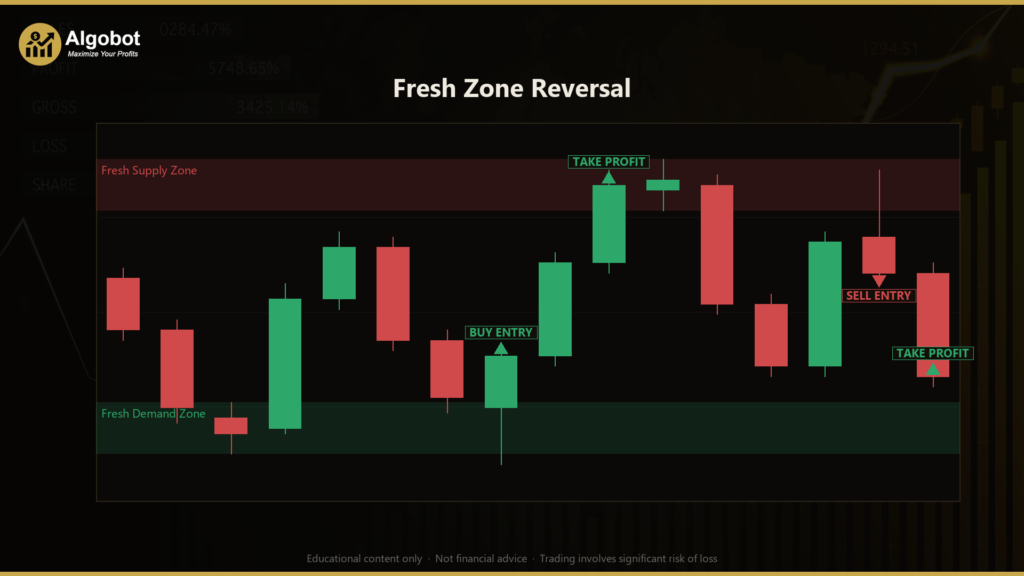
The core idea is that a genuine zone is born when a small "base" candle (a quiet, consolidating bar) is followed by a strong "displacement" candle that breaks out of that base and leaves an imbalance behind. That base candle's high-to-low range becomes the zone. Crucially, a zone is considered fresh only until price returns to it for the first time. Historically, chart analysts have observed that fresh, untested zones tend to produce cleaner reactions than zones that have already been revisited, so this strategy arms only the most recent fresh demand and supply zones and trades a single retest of each.
As a learning tool, Fresh Zone Reversal is best suited to traders who want to understand how supply-and-demand concepts can be turned into objective, testable rules. It is designed for ranging-to-trending conditions where clear impulsive moves leave behind well-defined bases. It is not a high-frequency system — it waits patiently for a specific sequence of events. If you are studying market structure, imbalance, and mean-reversion entries, this strategy offers a transparent, fully coded example to dissect.
How It Works
The strategy acts once per completed bar on the chart's selected timeframe. On each new bar it recalculates ATR, ages any armed zones, checks for an entry, and then looks to form a new zone. Here is the sequence in plain English:
- Defining a zone (the base + displacement pattern): The strategy looks at the previous bar (the "base") and the most recently closed bar (the "displacement"). The base must be small — its range no larger than
BaseAtrMult× ATR — signalling consolidation. The displacement bar's body must be large — at leastImpulseAtrMult× ATR — signalling a strong, imbalanced move. - Arming a demand zone: If the displacement candle closes bullish (close above open) and closes above the base candle's high, a fresh demand zone is armed. The zone's top is the base high and its bottom (the "distal" edge) is the base low.
- Arming a supply zone: If the displacement candle closes bearish (close below open) and closes below the base candle's low, a fresh supply zone is armed. The zone's top is the base high and its bottom is the base low.
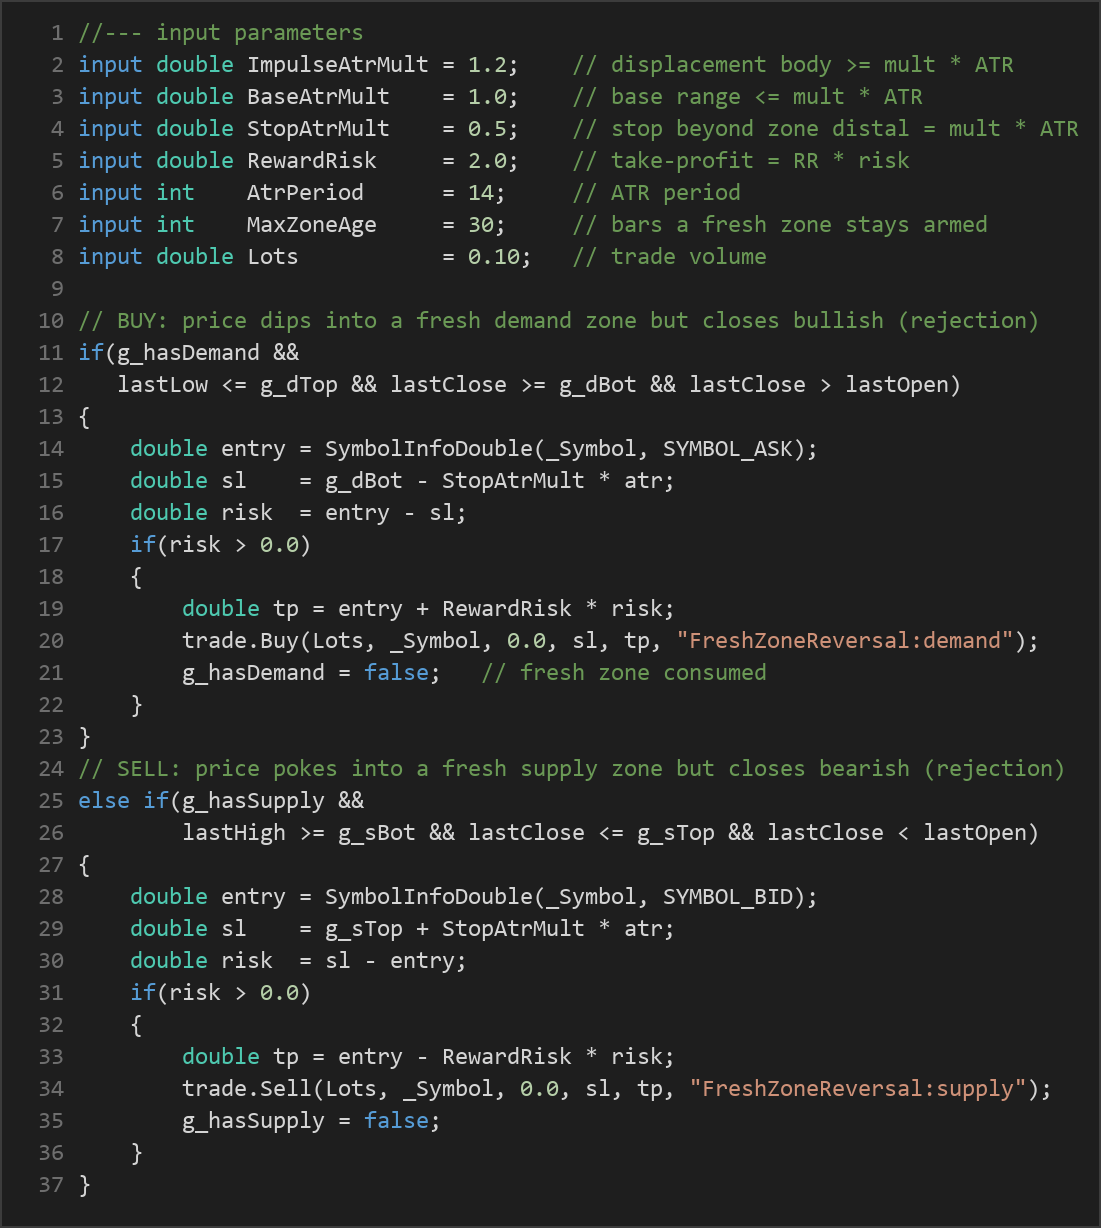
- Long entry signal: With a fresh demand zone armed and no position open, the strategy signals a buy when a later bar dips into the zone (its low reaches the zone top) but rejects it — closing back above the zone bottom and closing bullish. This rejection candle is the confirmation.
- Short entry signal: With a fresh supply zone armed, the strategy signals a sell when a bar pokes up into the zone (its high reaches the zone bottom) but closes back below the zone top and closes bearish.
- Stop-loss logic: For a long, the stop is placed below the zone's distal edge — at
zone bottom − StopAtrMult × ATR. For a short, it sits above the zone atzone top + StopAtrMult × ATR. The ATR buffer gives the trade a little breathing room beyond the raw zone boundary. - Take-profit logic: The target is set by a fixed reward-to-risk ratio. The risk (distance from entry to stop) is multiplied by
RewardRiskand added to the entry for longs (or subtracted for shorts). With the default of 2.0, the target sits twice as far from entry as the stop. - One attempt per zone: As soon as a zone produces a trade, it is consumed and disarmed — the strategy will not re-enter the same zone. A zone is also invalidated if price closes clean through it (a demand zone fails on a close below its bottom; a supply zone fails on a close above its top) or if it grows older than
MaxZoneAgebars without being retested.
Only one position is held at a time, and only the newest fresh zone of each side is ever armed, which keeps the logic focused and easy to follow.
Strategy Parameters
| Parameter | Default | Min | Max | Description |
|---|---|---|---|---|
| ImpulseAtrMult | 1.2 | 0.6 | 3.0 | Minimum displacement-candle body size, as a multiple of ATR. Higher values demand stronger breakouts before a zone is created. |
| BaseAtrMult | 1.0 | 0.4 | 2.5 | Maximum base-candle range, as a multiple of ATR. Lower values require a tighter, quieter base. |
| StopAtrMult | 0.5 | 0.1 | 2.0 | Distance the stop-loss is placed beyond the zone's distal edge, as a multiple of ATR. |
| RewardRisk | 2.0 | 1.0 | 4.0 | Reward-to-risk ratio used to set the take-profit relative to the stop distance. |
| AtrPeriod | 14 | 5 | 30 | Number of bars used to calculate the ATR volatility filter. |
| MaxZoneAge | 30 | 5 | 100 | Maximum number of bars a fresh zone stays armed before it expires unused. |
| Lots | 0.10 | 0.01 | 1.0 | Fixed trade volume in lots for each position. |
Recommended Chart Settings
Fresh Zone Reversal is timeframe-agnostic by design — all bar access uses the chart's primary timeframe, so the same logic runs on whatever timeframe you attach it to. A common starting point for supply-and-demand study is a major forex pair such as EUR/USD on the H1 (1-hour) chart, which tends to produce well-defined bases and clean displacement moves. Because the zones are defined relative to ATR rather than fixed pip distances, the strategy adapts to each instrument's volatility.
That said, no single symbol or timeframe is universally optimal. Results will vary considerably across different instruments, sessions, and market conditions. Treat any chosen combination as a starting point for your own testing rather than a recommendation, and re-evaluate the parameters whenever you change symbol or timeframe.
How to Install on MetaTrader 5
- Download the .ex5 file from the link below
- Copy it to your MT5
MQL5\Expertsfolder - Restart MetaTrader 5 or refresh the Navigator panel
- Drag the EA onto a chart matching the recommended symbol and timeframe
- Configure the input parameters and enable Algo Trading
What to Consider Before Using This EA
The main strength of Fresh Zone Reversal is its discipline. It turns a subjective, often-debated concept — supply and demand zones — into a fully objective ruleset with an ATR-based volatility filter, candlestick confirmation, and a strict "one attempt per fresh zone" rule. The fixed reward-to-risk target and ATR-buffered stop mean every trade has a defined structure before it is opened, which makes the strategy easy to study and to reason about.
There are real limitations to understand, however. Zone-based reversal trading assumes price will react at areas of prior imbalance, but markets in strong trends can slice straight through zones without pausing, triggering the invalidation logic and producing losing attempts. The requirement for a specific base-then-displacement sequence means signals can be infrequent, and in choppy, low-volatility conditions the ATR filter may either reject most setups or arm zones that never see a clean rejection. Because only the newest zone of each side is armed and each zone is used only once, the strategy may also skip valid-looking areas that a discretionary trader would take. As with any reversal approach, it can experience clustered losses when the broader trend is against the signals.
Fresh Zone Reversal should be viewed as a framework for learning how zone logic behaves — not as a finished, guaranteed system. Its behaviour depends heavily on the parameter choices and the market you apply it to.
Risk Management Tips
Sound risk management matters far more than any single entry technique. Consider these general principles as you study this or any strategy:
- Risk a small, fixed fraction per trade. Many educators suggest risking no more than 1–2% of account equity on any single position. The
Lotsparameter here is fixed, so size it deliberately relative to your account and the stop distance. - Understand your drawdown tolerance. A string of consecutive losses is normal for any reversal strategy. Know in advance how large a peak-to-trough decline you are willing to sit through before you would stop and reassess.
- Test on a demo account first. Run the EA on a demo or paper account across a range of market conditions before ever considering live capital. This lets you observe how the zone and rejection logic behaves in real time without financial risk.
- Never trade with money you cannot afford to lose. Leverage magnifies both gains and losses, and no strategy avoids losing trades.
- Review and adapt. Markets change. Periodically re-examine whether the parameters still suit current volatility and behaviour rather than assuming a fixed configuration will hold indefinitely.
Risk Warning
Trading foreign exchange, CFDs, and other leveraged financial instruments involves substantial risk of loss and is not suitable for all investors. The strategies and tools discussed on this page are provided for educational purposes only and do not constitute financial advice, investment recommendations, or solicitation to trade. Always consult a qualified financial adviser before making trading decisions. Past backtest performance is not indicative of future results.
Downloads
- Expert Advisor: FreshZoneReversal.ex5 (57 downloads)
- Source Code: FreshZoneReversal.mq5 (58 downloads)
- Documentation: FreshZoneReversal.pdf (62 downloads)