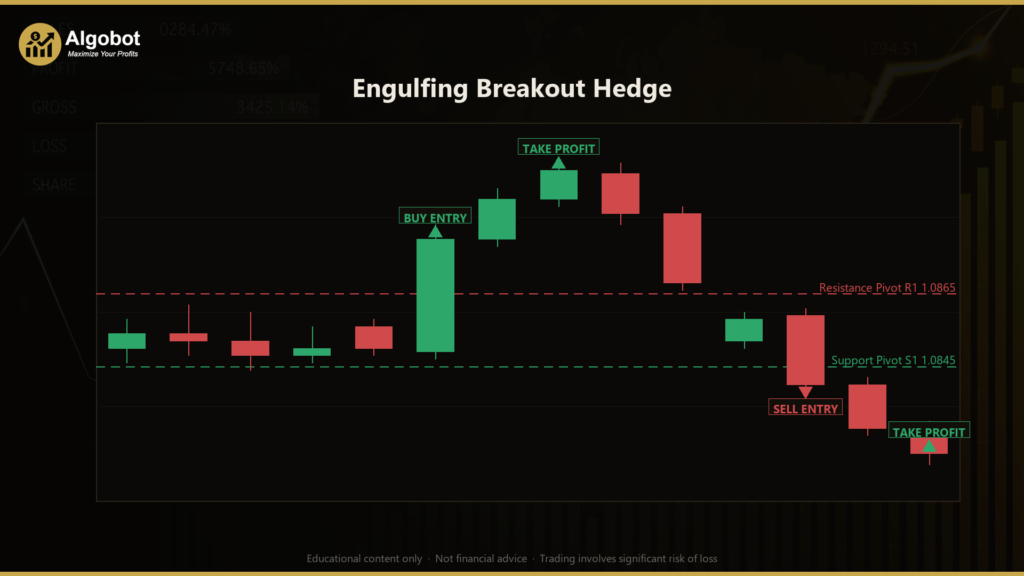
Disclaimer: This article is for educational and informational purposes only. It does not constitute financial or investment advice. Trading forex and CFDs carries significant risk of loss. Past performance of any strategy — including backtests — does not guarantee future results. Never trade with money you cannot afford to lose.
What Is This Strategy?
The Engulfing Breakout Hedge is a pure price-action trading strategy for MetaTrader 5 that combines three classic discretionary tools — floor pivot points (mathematically derived support and resistance levels), the engulfing candlestick pattern (where one candle's body completely covers the previous candle's body), and a momentum breakout filter. It uses no traditional indicators at all: there is no moving average, RSI, ATR, or Bollinger Band anywhere in the logic. Every decision is driven by raw candle geometry and recalculated price levels.
The strategy is designed for liquid, level-respecting markets where price tends to rotate around well-defined support and resistance — major forex pairs such as EUR/USD or GBP/USD, or gold (XAU/USD), on intraday timeframes like M5, M15, or M30. Its core thesis is the deliberate mirror of a range-fade approach: instead of selling resistance and buying support, it waits for a level to actually break and then trades in the direction of that break, confirmed by an engulfing candle that opens near the pivot and closes decisively through it.
As a learning tool, the Engulfing Breakout Hedge is best suited to traders who already understand basic candlestick patterns and pivot levels and who want to study how breakout confirmation, false-break handling, and basket-level money management can be combined into a single automated system. It is a strategy worth analyzing for its structure and risk logic — not a shortcut, and not a substitute for disciplined trading education.
How It Works
The strategy recomputes its levels on every freshly closed bar and only looks for new trades when no positions are open. Here is the full sequence in plain English:
- Pivot calculation: Over the most recent closed bars (set by
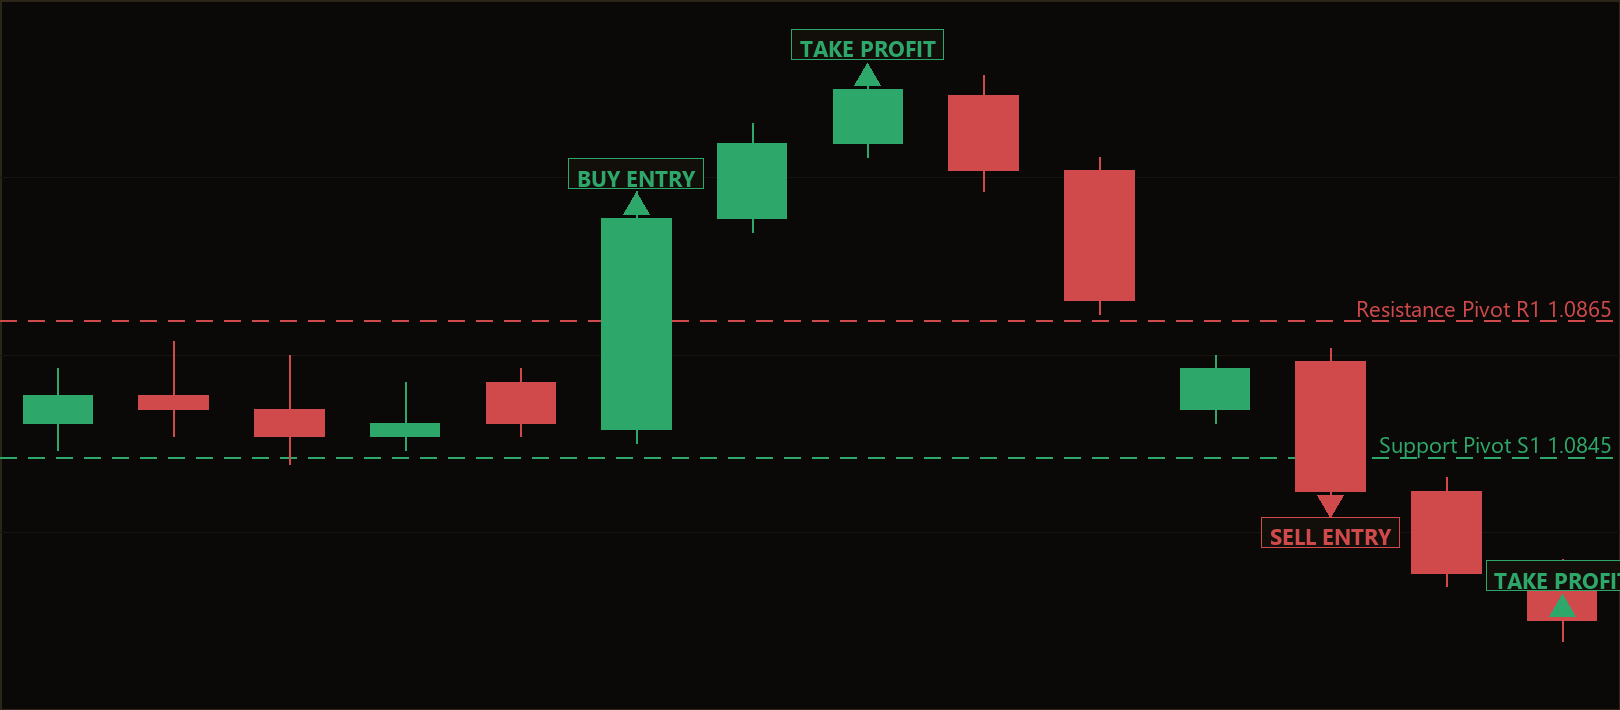
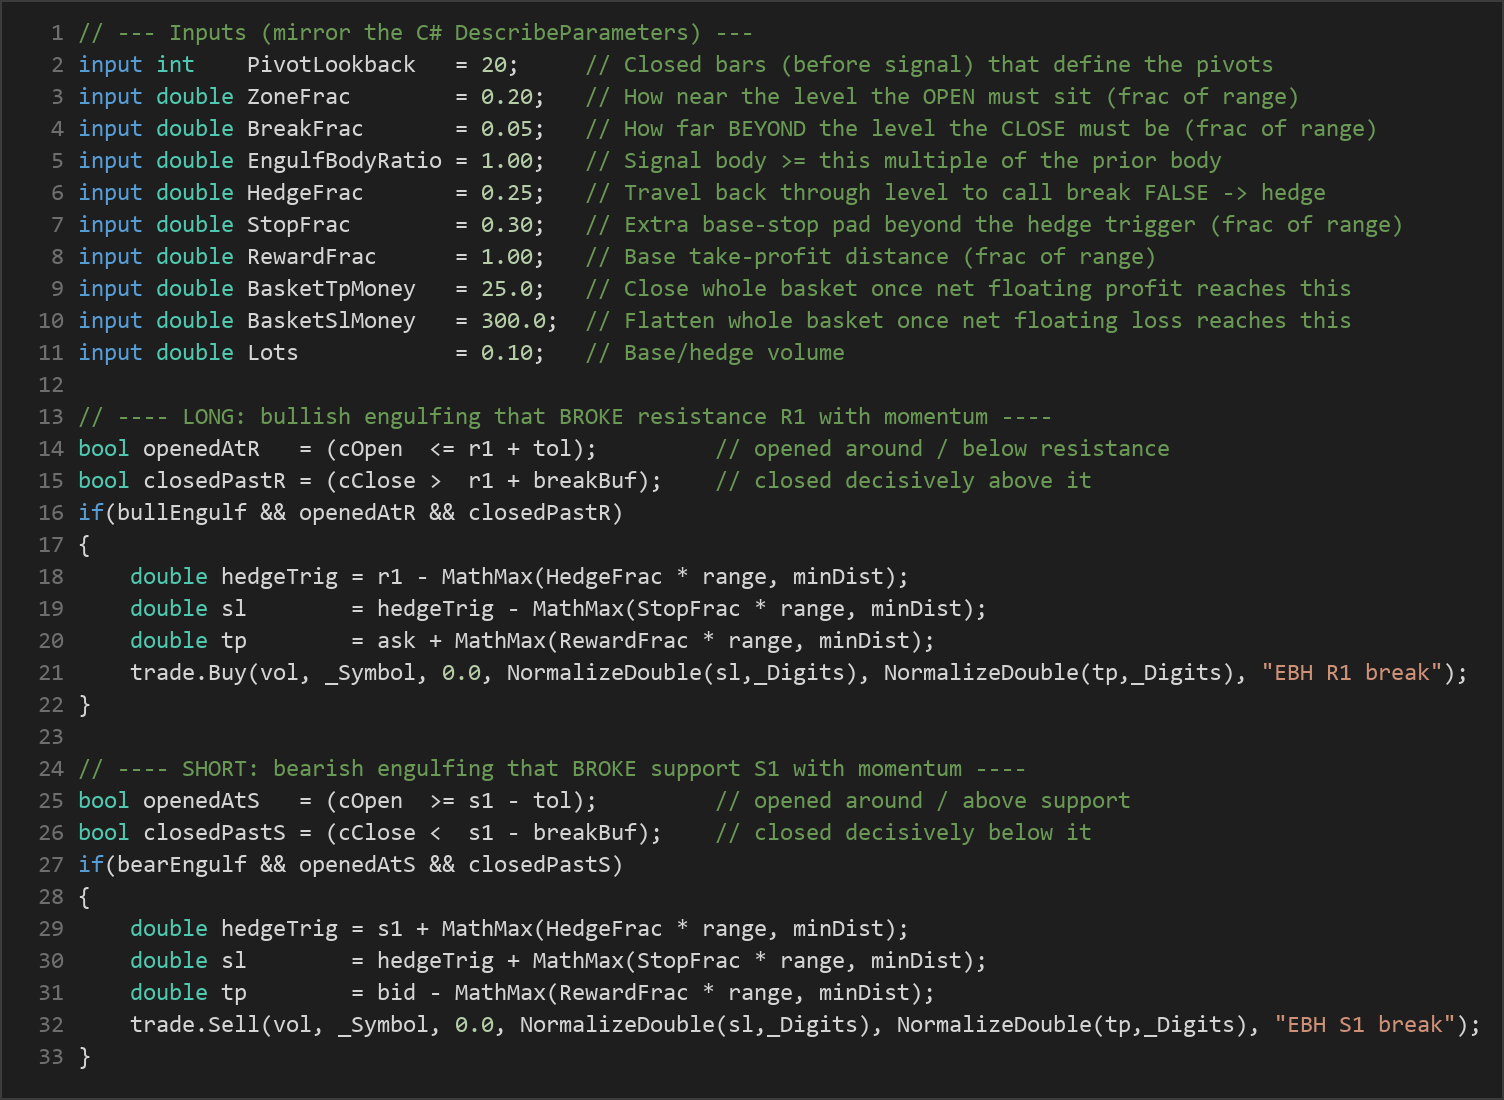
PivotLookback) that precede the signal candle, the strategy records the highest high (H), the lowest low (L), and the close (C) of the bar just before the signal. It then computes the floor pivotPP = (H + L + C) / 3, resistanceR1 = 2×PP − L, and supportS1 = 2×PP − H. The pivot "range" (R1 − S1, equal to H − L) is used to size every buffer, so distances scale automatically to any symbol or timeframe without hard-coded pip values. - Long entry signal: The strategy signals a long when the just-closed candle is a bullish engulfing (a bullish body that engulfs the prior bearish body) that opens at or below resistance R1 and closes decisively above it. This may indicate that resistance has broken with momentum.
- Short entry signal: It signals a short when the just-closed candle is a bearish engulfing that opens at or above support S1 and closes decisively below it — historically read as a momentum break of support.
- Entry filters: The engulfing body must be at least
EngulfBodyRatiotimes the prior candle's body. The open must sit withinZoneFracof the level, and the close must clear it by at leastBreakFracof the range. Entries are skipped when the spread exceedsMaxSpreadPoints. - Base stop-loss: The base trade's stop is placed structurally — beyond the hedge trigger by an extra pad (
StopFrac) — so that the reversal hedge always has a chance to engage before the stop is reached. - Base take-profit: The base take-profit projects
RewardFracof one pivot range in the breakout direction. - The hedge mechanic: While the single base leg is open, if price travels
HedgeFracof a range back through the broken level, the breakout is treated as false. The strategy then opens an opposite market order, creating a genuine locked hedge that rides the snap-back in the other direction and offsets the trapped base leg. - Basket exit (the dominant exit): Whenever any exposure is held, net floating profit and loss across all legs is monitored. If net floating P/L reaches
BasketTpMoney, everything is closed to bank the result. If net floating loss reachesBasketSlMoney, the whole basket is flattened as a hard safety ceiling.
Strategy Parameters
| Parameter | Default | Min | Max | Description |
|---|---|---|---|---|
| PivotLookback | 20 | 5 | 150 | Number of closed bars before the signal candle whose H/L/C define the floor pivots. |
| ZoneFrac | 0.20 | 0.02 | 1.00 | How near the broken level the candle's open must sit, as a fraction of the pivot range. |
| BreakFrac | 0.05 | 0.00 | 0.50 | How far beyond the level the candle must close to count as a break, as a fraction of the range. |
| EngulfBodyRatio | 1.00 | 0.50 | 3.00 | Engulfing strength: the signal body must be at least this multiple of the prior candle's body. |
| HedgeFrac | 0.25 | 0.05 | 1.00 | Distance price must travel back through the level to call the break false and deploy the hedge. |
| StopFrac | 0.30 | 0.05 | 2.00 | Extra base stop-loss pad placed beyond the hedge trigger, as a fraction of the range. |
| RewardFrac | 1.00 | 0.20 | 4.00 | Base take-profit distance in the breakout direction, as a fraction of the range. |
| ReclaimFrac | 0.30 | 0.05 | 1.50 | Hedge invalidation pad: if price reclaims the level by this much, the reversal is treated as wrong. |
| BasketTpMoney | 25.0 | 5.0 | 2000.0 | Close the whole basket once net floating profit reaches this amount (account currency). |
| BasketSlMoney | 300.0 | 50.0 | 100000.0 | Flatten the whole basket once net floating loss reaches this amount (account currency). |
| MaxSpreadPoints | 50 | 0 | 500 | Skip new entries while spread (in points) exceeds this value (0 = off). |
| Lots | 0.10 | 0.01 | 1.00 | Base and hedge order volume in lots. |
| Magic | 8310 | 0 | 9,999,999 | Magic number used to identify and manage this EA's positions. |
Recommended Chart Settings
The Engulfing Breakout Hedge was designed for liquid, level-respecting instruments: major forex pairs such as EUR/USD and GBP/USD, or XAU/USD (gold). It is intended for intraday timeframes — M5, M15, or M30 — where pivot breaks and false breaks tend to alternate throughout the trading session. Because every buffer is expressed as a fraction of the pivot range rather than a fixed pip distance, the logic adapts to whichever symbol and timeframe you select at run time. Keep in mind that results will vary significantly across different instruments, broker spreads, and market conditions, so any setting should be studied carefully before use.
How to Install on MetaTrader 5
- Download the .ex5 file from the link below
- Copy it to your MT5
MQL5\Expertsfolder - Restart MetaTrader 5 or refresh the Navigator panel
- Drag the EA onto a chart matching the recommended symbol and timeframe
- Configure the input parameters and enable Algo Trading
What to Consider Before Using This EA
The strengths of this approach are rooted in well-understood price-action concepts. Trading with a confirmed level break aligns the strategy with the stop-loss orders and fresh momentum that often appear when a crowded range finally gives way, and requiring an engulfing candle adds a recognizable confirmation filter rather than acting on a single tick poking through a level. The fraction-of-range sizing is also a thoughtful design choice, since it removes brittle pip hard-coding.
That said, the limitations are real and should be studied honestly. Breakout systems are vulnerable to false breaks — price that pokes through a level, traps breakout traders, then snaps back. This strategy attempts to address that with its reversal hedge, but hedging introduces its own complications: while both legs are open, the account holds exposure in two directions, and a strong continuation of the original failed breakout can still pressure the basket toward its loss ceiling. In choppy, low-volatility conditions, repeated small false breaks may also lead to frequent entries and exits. Pivot-based levels work best in markets that genuinely respect structure, so performance can degrade during news-driven spikes or thin liquidity. Finally, the basket money-management exits are denominated in account currency, which means appropriate values depend heavily on your lot size and account balance.
Risk Management Tips
Sound risk management matters far more than any single parameter. Consider the following general principles:
- Position sizing: Keep your lot size proportional to your account. Many educational sources suggest risking no more than 1–2% of your account on any single trade or basket.
- Test on demo first: Run the strategy on a demo account across varied market conditions before risking real capital, so you can observe how the hedge and basket exits behave.
- Understand drawdown: Study how the basket stop-loss (
BasketSlMoney) relates to your balance, and be honest about the maximum loss you are prepared to tolerate. - Match settings to your account: Because the basket thresholds are in money terms, recalibrate them whenever you change lot size or account size.
- Avoid over-optimization: Tuning parameters to fit past data can produce results that do not hold up in live markets. Favor robust, sensible settings over curve-fitted ones.
Risk Warning
Trading foreign exchange, CFDs, and other leveraged financial instruments involves substantial risk of loss and is not suitable for all investors. The strategies and tools discussed on this page are provided for educational purposes only and do not constitute financial advice, investment recommendations, or solicitation to trade. Always consult a qualified financial adviser before making trading decisions. Past backtest performance is not indicative of future results.
Downloads
- Expert Advisor: EngulfingBreakoutHedge.ex5 (57 downloads)
- Source Code: EngulfingBreakoutHedge.mq5 (61 downloads)
- Documentation: EngulfingBreakoutHedge.pdf (58 downloads)