Disclaimer: This article is for educational and informational purposes only. It does not constitute financial or investment advice. Trading forex and CFDs carries significant risk of loss. Past performance of any strategy — including backtests — does not guarantee future results. Never trade with money you cannot afford to lose.
What Is This Strategy?
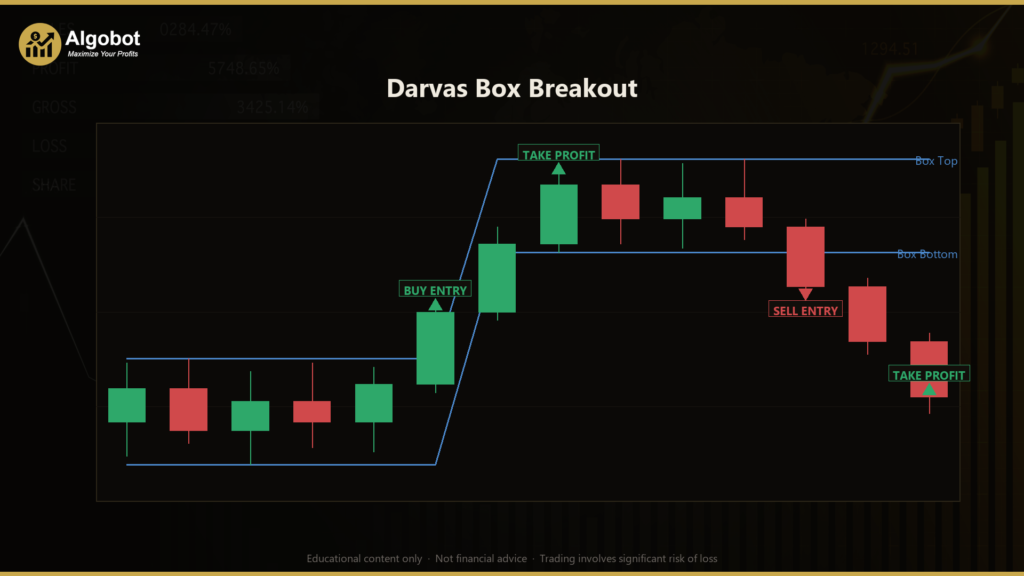
The Darvas Box Breakout is a pure price-action breakout strategy that revives Nicolas Darvas's classic "box" theory using nothing but raw OHLC (Open, High, Low, Close) data — no moving averages, no oscillators, and no lagging indicators of any kind. A "box" is simply a horizontal price range, defined by a recent swing high (the box top) and a recent swing low (the box bottom), inside which price has been consolidating. The strategy watches for the moment price closes decisively beyond one of those edges, which it treats as a potential breakout from the consolidation.
This approach is designed for trending or range-then-trend market conditions, where price often pauses inside a tight range before resuming a directional move. The core idea — borrowed from Darvas, a 1950s dancer-turned-trader who tracked stock prices by telegram — is that genuine consolidations (boxes that have "settled" and held their boundaries) frequently precede meaningful expansions in price. The strategy only acts on boxes that have matured, deliberately ignoring ranges that are still actively forming or that look more like an in-progress trend leg than a true pause.
As a learning tool, the Darvas Box Breakout is well suited to traders who want to understand structure-based, indicator-free trading. Because every decision is derived from visible price levels — swing extremes, box height, and an average-range volatility proxy — it offers a transparent way to study how breakouts, structural stop placement, and reward-to-risk targeting fit together. Treat this article as a strategy analysis and an educational walkthrough, not a profit opportunity.
How It Works
The strategy evaluates its logic once per completed bar (it ignores the still-forming candle). On each newly closed bar, it rebuilds the box from recent history and checks whether that bar broke out. Here is the logic in plain English:
- Building the box: The strategy scans the most recent
BoxLookbackbars immediately preceding the just-closed "trigger" bar. The highest high among those bars becomes the box top; the lowest low becomes the box bottom. - Maturity (the "hold" filter): Both the box top and box bottom must have been set at least
MinHoldBarsbars before the trigger bar. This confirms the box has genuinely held — a settled consolidation — rather than a range that is still extending into a fresh high or low. - Volatility proxy: The strategy calculates the average bar range (High minus Low) over the last
RangePeriodbars. This stands in for volatility without using any indicator. - Tightness filter: The box height (top minus bottom) must be no greater than
MaxBoxRangetimes the average range. This rejects tall, trending "boxes" and keeps the strategy focused on genuinely tight consolidations. - The breakout buffer: A small buffer —
BufferMulttimes the average range — is added beyond each edge so that marginal, borderline closes do not trigger a signal.
Once a valid, mature, tight box is identified, the strategy signals an entry as follows:
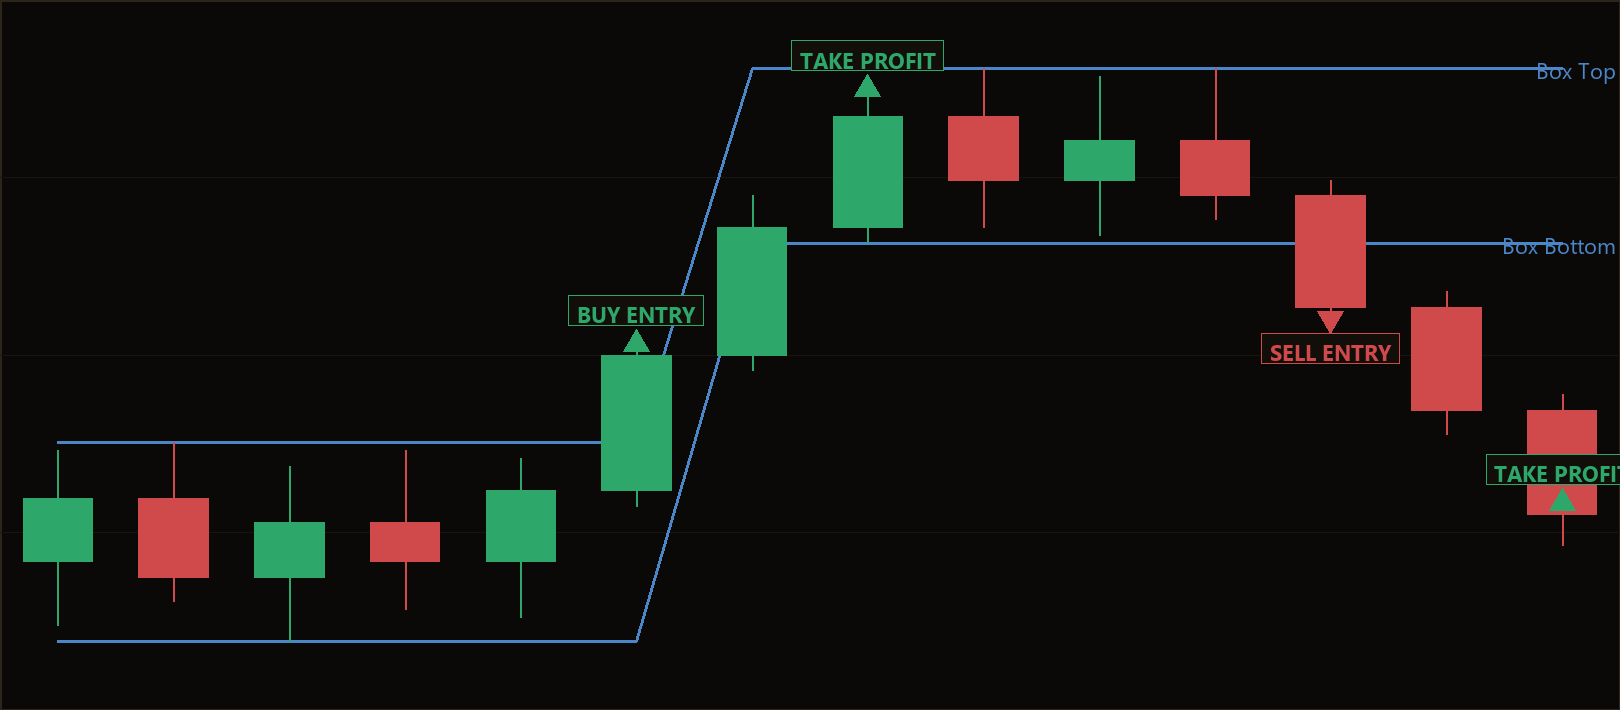
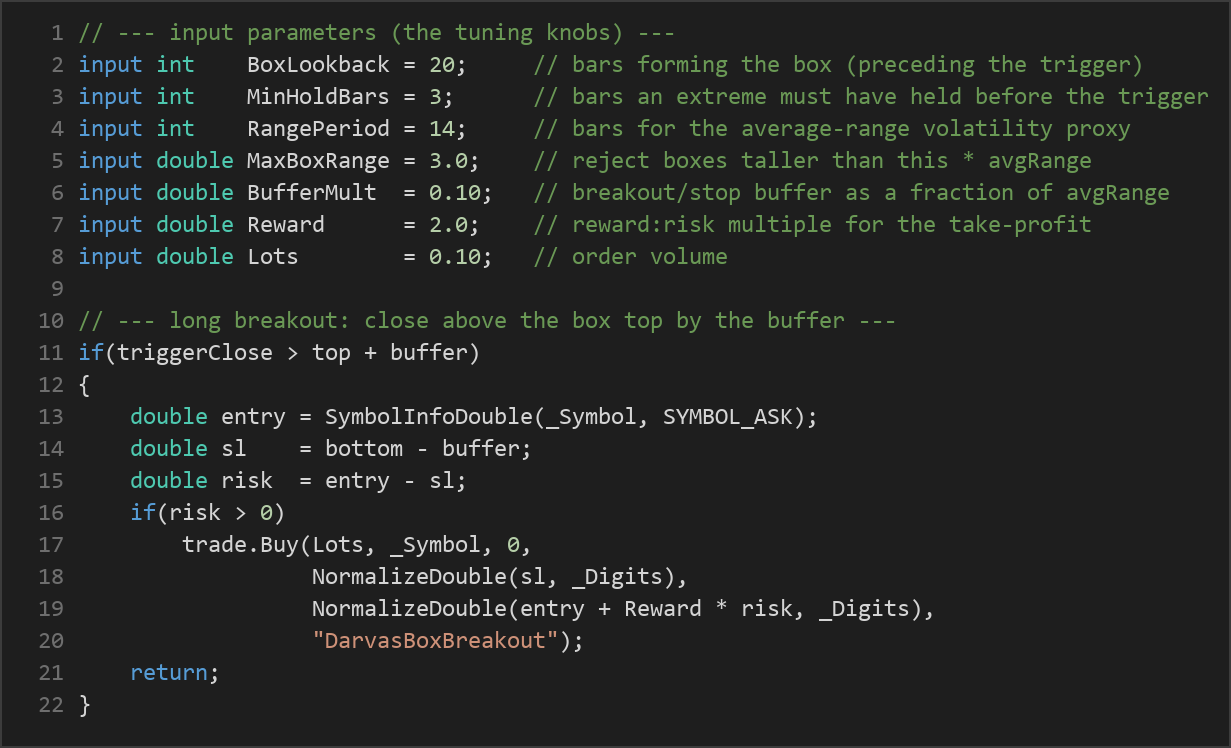
- Long breakout: If the trigger bar closes above the box top plus the buffer, the strategy signals a buy at the current Ask price. The stop-loss is placed just below the box bottom (bottom minus the buffer), putting the structural invalidation level on the far side of the box.
- Short breakout: If the trigger bar closes below the box bottom minus the buffer, the strategy signals a sell at the current Bid price. The stop-loss is placed just above the box top (top plus the buffer).
- Take-profit: The distance from entry to stop-loss defines the risk. The take-profit is set at
Rewardmultiples of that risk. With the defaultRewardof 2.0, the target sits twice as far from entry as the stop — a 2:1 reward-to-risk structure. - One trade at a time: The strategy holds only a single open position per magic number. While a trade is live, it does not open another; the stop-loss and take-profit manage the exit automatically.
Because exits are fully defined by the structural stop and the reward-based target at entry, the strategy never relies on a discretionary close — every trade has its risk and reward mapped out the moment it opens.
Strategy Parameters
| Parameter | Default | Min | Max | Description |
|---|---|---|---|---|
| BoxLookback | 20 | 8 | 60 | Number of bars used to form the box (the swing high/low range preceding the trigger bar). Larger values build wider, longer-term boxes. |
| MinHoldBars | 3 | 1 | 12 | How many bars an extreme must have held before the trigger bar for the box to count as a settled consolidation. Higher values demand more maturity. |
| RangePeriod | 14 | 5 | 40 | Number of bars used to compute the average bar range, the price-action volatility proxy. |
| MaxBoxRange | 3.0 | 1.0 | 8.0 | Maximum allowed box height as a multiple of average range. Lower values restrict trades to tighter consolidations. |
| BufferMult | 0.10 | 0.0 | 1.0 | Breakout and stop buffer expressed as a fraction of average range. Larger values require a more decisive close beyond the box edge. |
| Reward | 2.0 | 0.5 | 5.0 | Reward-to-risk multiple for the take-profit. A value of 2.0 sets the target at twice the stop distance. |
| Lots | 0.10 | 0.01 | 1.0 | Order volume (position size) in lots. |
Recommended Chart Settings
The Darvas Box Breakout is a structural, swing-oriented strategy, so it is generally studied on the H1 (1-hour) or H4 (4-hour) timeframes, where consolidation boxes are clear and breakouts are less prone to intrabar noise. It can be applied to liquid instruments such as major forex pairs (for example EUR/USD or GBP/USD), major indices, or commodities — any market that tends to range and then trend.
Because the logic is derived entirely from price structure, it adapts to whatever instrument and timeframe you attach it to, but the behavior of boxes differs considerably across markets and sessions. Results will vary across different symbols, timeframes, and market conditions, and the default parameters are a starting point for study rather than a tuned configuration. Always test any settings on historical and demo data before drawing conclusions.
How to Install on MetaTrader 5
- Download the
DarvasBoxBreakout.ex5file from the link below. - Copy it to your MT5
MQL5\Expertsfolder. - Restart MetaTrader 5 or refresh the Navigator panel.
- Drag the EA onto a chart matching the recommended symbol and timeframe.
- Configure the input parameters and enable Algo Trading.
What to Consider Before Using This EA
Like every approach, the Darvas Box Breakout has clear strengths and equally clear limitations, and an honest assessment matters more than enthusiasm.
Strengths. The logic is transparent and entirely price-based, which makes it easy to study and to reason about — there are no hidden indicator calculations. The maturity and tightness filters are thoughtful: by requiring a box to hold for several bars and to stay tight relative to recent volatility, the strategy attempts to avoid chasing ranges that are still forming. Every trade has a predefined structural stop and a fixed reward-to-risk target, which enforces disciplined risk planning.
Known limitations. Breakout strategies are vulnerable to false breakouts (or "fakeouts"), where price briefly closes beyond a box edge and then reverses back into the range. In choppy, sideways markets without follow-through, this can produce a series of losing trades as boxes break and fail repeatedly. The structural stop on the far side of the box can also be relatively wide on larger boxes, which affects position sizing. And because the strategy trades only one position at a time and waits for completed bars, it may miss fast moves or enter a breakout slightly late.
Where it may underperform. Tightly oscillating, low-volatility ranges and news-driven whipsaws are the toughest conditions for any breakout method. The strategy historically performs best when a genuine consolidation is followed by sustained directional expansion — a condition that is never guaranteed to occur. Use it as a framework for understanding breakout structure, and validate its behavior thoroughly before relying on it.
Risk Management Tips
Sound risk management matters far more than any single entry signal. Consider these general educational principles:
- Risk a small, fixed fraction per trade. Many educators suggest never risking more than 1–2% of account equity on a single position. Adjust the
Lotsparameter so that the distance to your structural stop represents only that small fraction of your account. - Size around the stop, not the other way around. Because the Darvas box stop is structural, its distance changes with box height. Calculate your position size from that distance so your monetary risk stays consistent.
- Always start on a demo account. Run the EA on a demo or paper account first to understand how it behaves across different sessions and conditions before considering any live use.
- Understand drawdown. Even a sound strategy will experience losing streaks. Know the maximum drawdown you are willing to tolerate, and recognize that a sequence of false breakouts is a normal part of breakout trading.
- Avoid over-optimization. Tuning parameters to fit past data ("curve fitting") often produces settings that fail going forward. Favor robust, sensible values over historically perfect ones.
Risk Warning
Trading foreign exchange, CFDs, and other leveraged financial instruments involves substantial risk of loss and is not suitable for all investors. The strategies and tools discussed on this page are provided for educational purposes only and do not constitute financial advice, investment recommendations, or solicitation to trade. Always consult a qualified financial adviser before making trading decisions. Past backtest performance is not indicative of future results.
Downloads
- Expert Advisor: DarvasBoxBreakout.ex5 (45 downloads)
- Source Code: DarvasBoxBreakout.mq5 (48 downloads)
- Documentation: DarvasBoxBreakout.pdf (53 downloads)