
Disclaimer: This article is for educational and informational purposes only. It does not constitute financial or investment advice. Trading forex and CFDs carries significant risk of loss. Past performance of any strategy — including backtests — does not guarantee future results. Never trade with money you cannot afford to lose.
What Is This Strategy?
The Contracting Body Reversal strategy is a candlestick-pattern trading system that hunts for short-term momentum exhaustion using a "same-colour shrinking body" formation combined with a reclaim trigger and an EMA (Exponential Moving Average — a trend line that weights recent prices more heavily) trend filter. It belongs to the family of counter-trend reversal trading styles, meaning it looks for the moment a directional push runs out of fuel and price snaps back the other way.
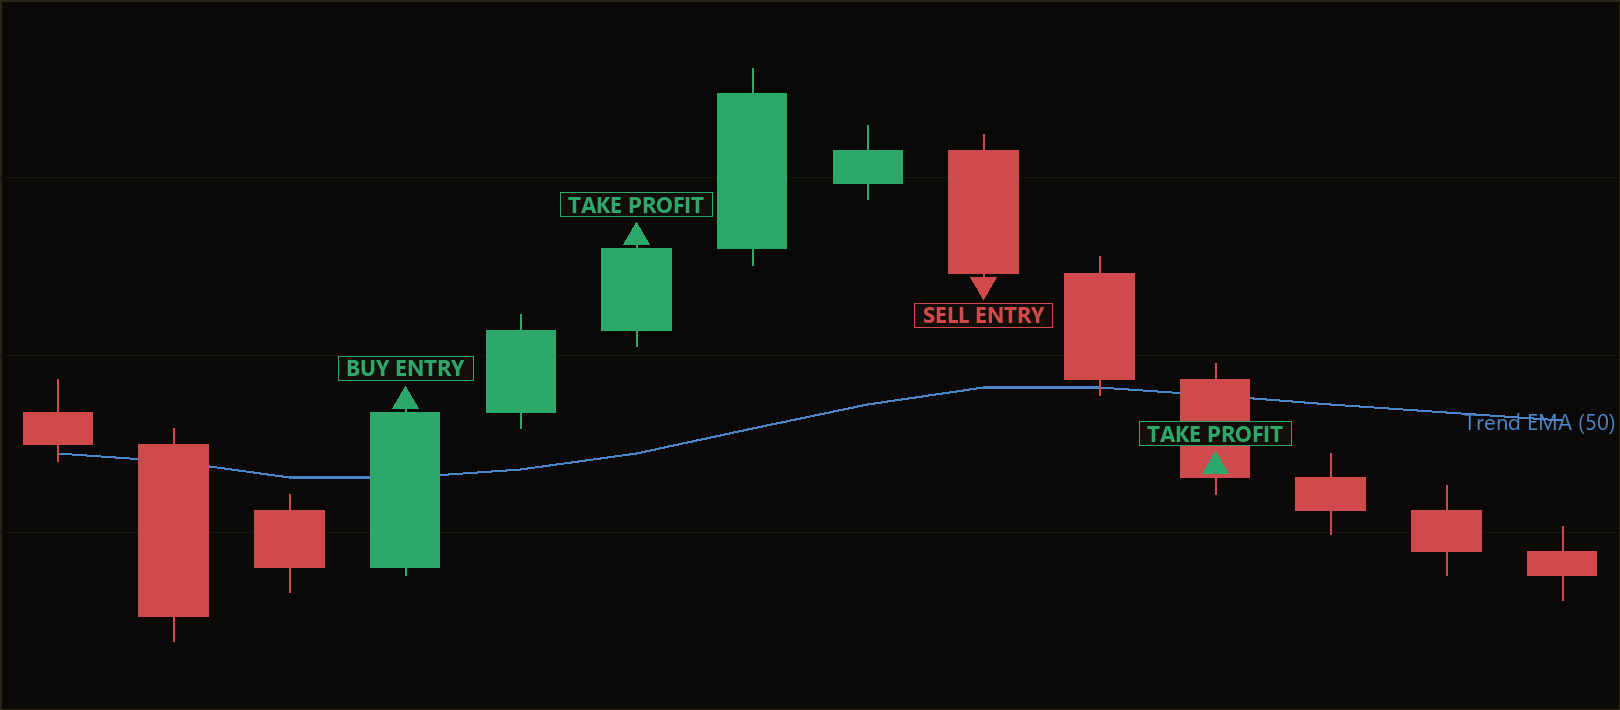
Most popular two-candle reversal patterns — such as the harami or the engulfing pattern — rely on an opposite-colour second candle to signal a turn. Contracting Body Reversal deliberately does the reverse. It watches for two consecutive candles of the same colour whose real bodies are shrinking, with the second body swallowed entirely inside the first. This absorption footprint (traders sometimes call the bullish version a "Homing Pigeon" and the bearish version a "Descending Hawk") suggests the crowd is still pushing in one direction but with steadily less force. When that quiet exhaustion appears at a fresh local extreme and price then reclaims the whole pattern, the short-term move may have flipped.
As a learning tool, this strategy is well suited to traders who want to study price action and market microstructure rather than lagging indicators alone. It teaches how body size, local extremes, and a trend filter can be combined into a single rules-based decision. It is not a shortcut and it is not a guaranteed edge — it is a transparent framework you can dissect, backtest, and reason about.
How It Works
The strategy only evaluates its rules once a fresh bar has fully closed, so it never acts on an incomplete candle. It labels three candles: b3 (the outer, first-push candle), b2 (the inner, contracting candle), and b1 (the confirmation or reclaim bar). It also computes an ATR (Average True Range — a volatility gauge) and a trend EMA over the recent closes.
For a long (bullish reclaim) signal, the strategy requires all of the following:
- Both b3 and b2 are bearish (each closes below its open) — the recent push is downward.
- b2's body sits entirely inside b3's body and is meaningfully smaller — the second down-candle's open and close are contained within the first candle's body, and the body is no larger than the contraction ratio times the first body. This is the "selling force is fading" condition.
- The first push is meaningful — b3's body must be at least
MinBodyAtr × ATR, so the pattern ignores tiny, insignificant candles. - The pattern low is a fresh local bottom — the lowest point of the two-candle pattern is the lowest low over the recent lookback window, marking a genuine down-swing.
- The pattern formed below the trend EMA — b2 closes under the EMA, confirming price is on the "value" (dip) side of the trend.
- b1 reclaims the pattern — the confirmation bar closes back above the pattern high, signalling buyers have decisively stepped in.
For a short (bearish reclaim) signal, the rules are an exact mirror: two bullish contracting candles, a fresh local high above the EMA, and a confirmation bar that closes below the pattern low.
Exit, stop-loss, and take-profit logic:
- Trades are bracketed with ATR-based risk at entry. There is no discretionary exit — each position carries a fixed stop and target from the outset.
- Stop-loss is placed
AtrMultSl × ATRaway from entry (below for longs, above for shorts). - Take-profit is placed
AtrMultTp × ATRaway from entry (above for longs, below for shorts). - The strategy holds one position per magic number at a time, so it will not stack multiple trades on the same signal.
Strategy Parameters
| Parameter | Default | Min | Max | Description |
|---|---|---|---|---|
| TrendPeriod | 50 | 20 | 200 | Period of the trend EMA used to decide whether the pattern formed on the "value" side of the market. |
| ExtremeLookback | 12 | 5 | 40 | Number of bars used to confirm the pattern sits at a fresh local high or low. |
| ContractionRatio | 0.70 | 0.30 | 0.90 | The inner body must be no larger than this fraction of the outer body for the contraction to qualify. |
| MinBodyAtr | 0.50 | 0.10 | 1.50 | Minimum size of the first push body, measured as a multiple of ATR, so the pattern ignores trivial candles. |
| AtrPeriod | 14 | 7 | 30 | Number of bars used to calculate the ATR volatility measure. |
| AtrMultSl | 1.50 | 0.50 | 4.0 | ATR multiplier that sets the stop-loss distance from entry. |
| AtrMultTp | 2.50 | 0.50 | 6.0 | ATR multiplier that sets the take-profit distance from entry. |
| Lots | 0.10 | 0.01 | 1.0 | Trade volume in lots for each position. |

Recommended Chart Settings
The Contracting Body Reversal EA is designed to run on a single primary timeframe using standard candlestick data. Because it reads real-body geometry, it tends to be most legible on intraday-to-swing timeframes such as H1 or H4, where candle bodies carry clear meaning and noise is more manageable than on very low timeframes. Liquid instruments with clean candles — for example major forex pairs like EUR/USD — are a sensible starting point for study.
That said, no single symbol or timeframe is universally correct. Volatility regimes, spread, and session behaviour differ across markets, and results will vary considerably across different conditions. Treat the defaults as a starting point for your own testing rather than a fixed prescription, and always validate any configuration on historical data and a demo account before considering it further.
How to Install on MetaTrader 5
- Download the .ex5 file from the link below
- Copy it to your MT5
MQL5\Expertsfolder - Restart MetaTrader 5 or refresh the Navigator panel
- Drag the EA onto a chart matching the recommended symbol and timeframe
- Configure the input parameters and enable Algo Trading
What to Consider Before Using This EA
Like every trading approach, Contracting Body Reversal has both strengths and genuine limitations that you should understand before relying on it.
Strengths of the approach:
- Transparent, rules-based logic. Every condition — contraction, fresh extreme, EMA side, and reclaim — is explicit and easy to audit, which makes it an excellent study piece for learning price action.
- Built-in confirmation. The strategy does not act on the contraction alone; it waits for a reclaim/break bar, which historically filters out many patterns that fail to follow through.
- Volatility-aware risk. Stops and targets scale with ATR, so the strategy adapts its bracket to current market conditions rather than using fixed pip distances.
Known limitations:
- Counter-trend by design. The strategy tries to catch turns, and reversal signals can appear repeatedly during a strong trend that simply keeps going. In persistent trends, the mean-reversion premise may underperform.
- Pattern rarity. The combination of same-colour contraction, a fresh local extreme, an EMA-side check, and a reclaim is fairly restrictive. Signals may be infrequent, which can make performance sensitive to a small number of trades.
- Whipsaw risk in choppy markets. Sideways, low-conviction conditions can produce reclaim bars that quickly reverse again, stopping the trade out.
- Sensitivity to parameters. The contraction ratio, minimum body size, and lookback window all shape how often the pattern triggers. Over-tuning them to past data may not generalise to future conditions.
The honest takeaway is that this is a well-defined analytical framework, not a finished money-making machine. It may indicate short-term exhaustion under the right conditions, but it will also produce losing trades, and its behaviour depends heavily on the market you apply it to.
Risk Management Tips
Sound risk management matters far more than any single entry pattern. Consider these general principles as you study this strategy:
- Risk only a small fraction per trade. Many educational sources suggest never risking more than 1–2% of account equity on any single position, so that a losing streak does not threaten your capital.
- Size positions deliberately. Choose your lot size based on your stop distance and account size, not on how confident a signal feels. The ATR-based stop makes this calculation straightforward.
- Start on a demo account. Test the strategy in a risk-free simulated environment first so you can observe how often it trades and how it behaves in different regimes before any live capital is involved.
- Understand drawdown. Even a well-designed strategy will endure losing streaks. Know the maximum historical drawdown of any configuration you study, and ask whether you could tolerate it emotionally and financially.
- Keep leverage modest. High leverage amplifies both gains and losses; conservative leverage gives your account room to survive normal fluctuations.
- Review and journal. Keep records of your testing so you can evaluate the strategy objectively rather than reacting to individual outcomes.
Risk Warning
Trading foreign exchange, CFDs, and other leveraged financial instruments involves substantial risk of loss and is not suitable for all investors. The strategies and tools discussed on this page are provided for educational purposes only and do not constitute financial advice, investment recommendations, or solicitation to trade. Always consult a qualified financial adviser before making trading decisions. Past backtest performance is not indicative of future results.
Downloads
- Expert Advisor: ContractingBodyReversal.ex5 (28 downloads)
- Source Code: ContractingBodyReversal.mq5 (35 downloads)
- Documentation: ContractingBodyReversal.pdf (39 downloads)