
Disclaimer: This article is for educational and informational purposes only. It does not constitute financial or investment advice. Trading forex and CFDs carries significant risk of loss. Past performance of any strategy — including backtests — does not guarantee future results. Never trade with money you cannot afford to lose.
What Is This Strategy?
The Coiled Range Breakout is a pure price-action, volatility-squeeze breakout strategy that uses no technical indicators at all — no moving averages, no RSI, no ATR, no Bollinger Bands. Every decision it makes is derived from raw candle data: the highs, lows, opens, and closes of recent bars. As a trading style, it sits firmly in the breakout/momentum family, aiming to enter a market just as a tight consolidation resolves into a directional move.
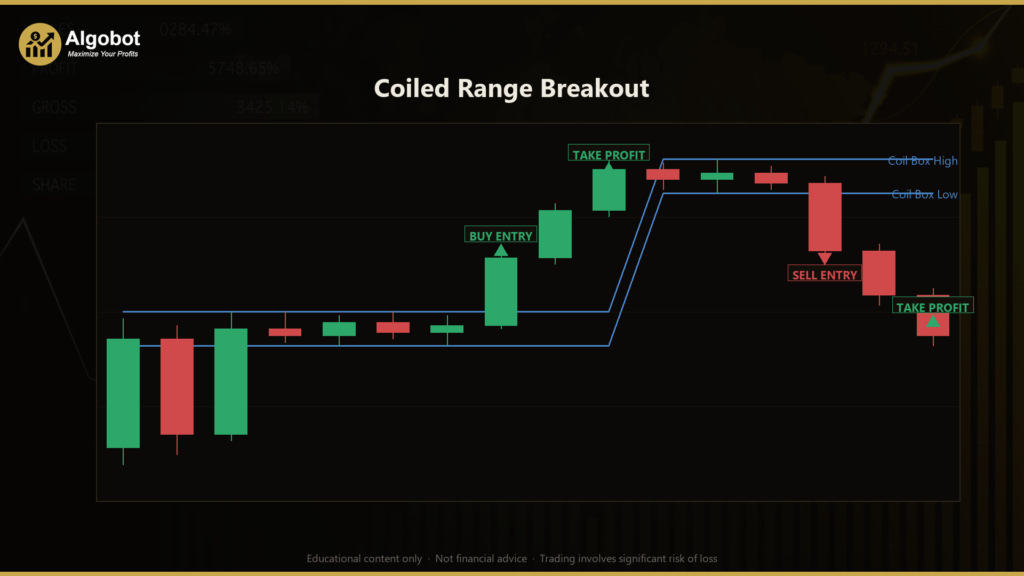
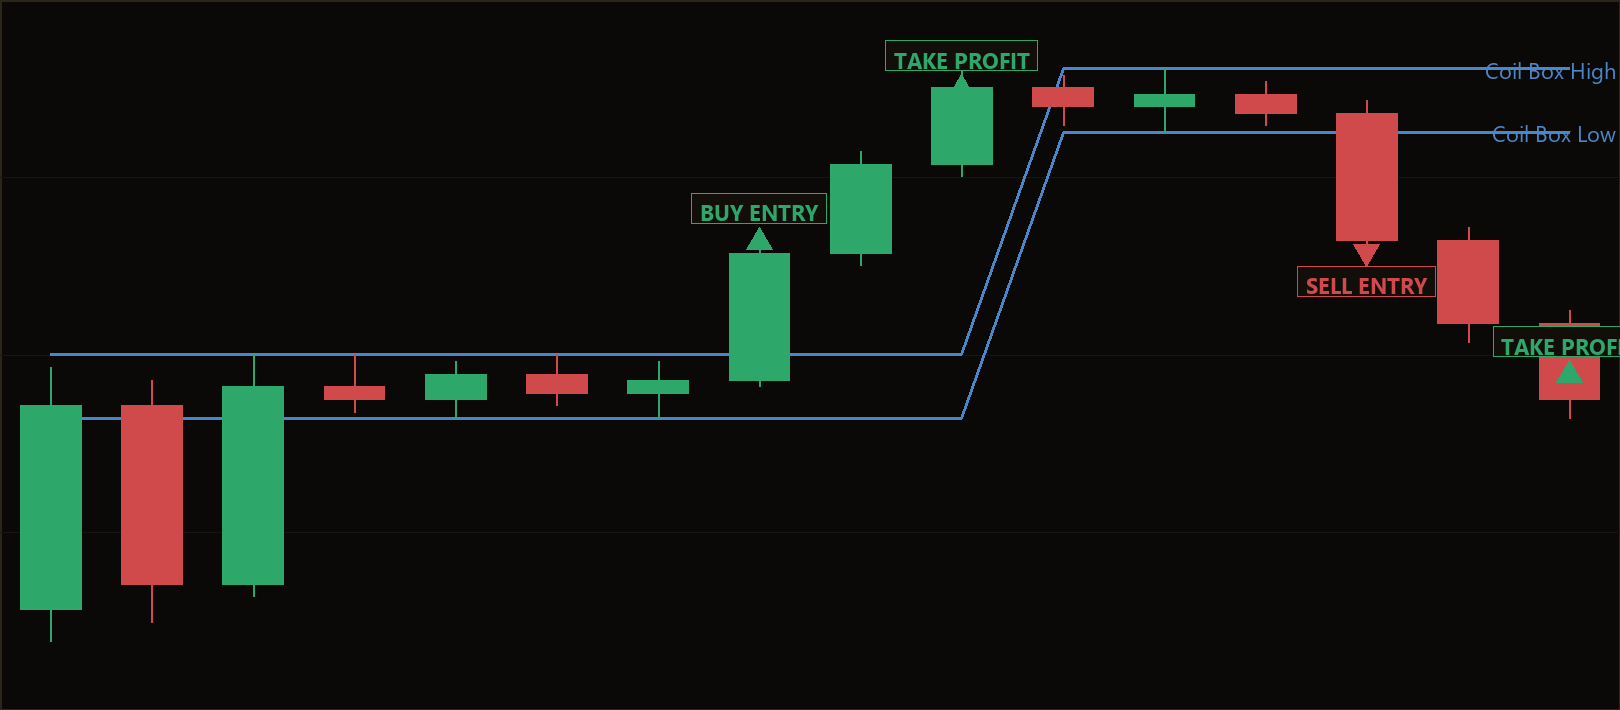
The core idea is what traders call "the coil." Markets naturally alternate between expansion (wide, trending swings) and contraction (quiet, sideways ranges). When price spends several bars trapped inside a narrow horizontal box — especially after a period of much wider movement — energy is effectively being stored, like a spring being compressed. Eventually that range resolves with a decisive thrust, and the first close out of the box often signals the direction of the next leg. Rather than guessing which way the market will break, the strategy waits and lets price itself pick the side.
This makes the Coiled Range Breakout a useful learning tool for anyone studying volatility cycles, support/resistance ranges, and breakout mechanics without the noise of stacked indicators. It is best suited to traders who want to understand how structural stop placement and reward-to-risk targeting can be built directly from candle geometry. It is presented here as a strategy analysis for educational study — not as a profit opportunity.
How It Works
The strategy reads the market in three regions of recent, fully closed bars and only acts once per newly-closed bar. Here is how it identifies a setup and manages the trade:
- Builds the "coil" box. It takes the most recent
CoilBarsclosed bars sitting just before the signal bar. The highest high becomes the BoxHigh, the lowest low becomes the BoxLow, and the difference between them is the BoxHeight — the height of the consolidation box. - Measures the "baseline" range. It looks at the
BaselineBarsbars that came before the coil and calculates their full range (highest high minus lowest low). This represents the market's "normal" swing size in the recent past. - Applies the squeeze gate. The coil only qualifies as a genuine squeeze when it is compressed relative to that normal range. Specifically, the BoxHeight must be less than or equal to
CompressionRatio× the baseline range. If the box is too wide, no setup is recognized. - Demands range expansion on the signal bar. The just-closed signal bar must show a decisive expansion — its own high-to-low range must be at least
ExpansionMult× the BoxHeight. This filters out the small, aimless pokes that often trap naive range traders. - Signals a LONG. The strategy signals a long entry when the signal bar closes strictly above BoxHigh, is bullish (close above open), and meets the expansion requirement — the spring releasing upward.
- Signals a SHORT. The mirror condition: the signal bar closes strictly below BoxLow, is bearish (close below open), and shows the same expansion — the spring releasing downward.
- Stop-loss logic (structural). The stop is placed just beyond the opposite edge of the entire box, buffered by a fraction of the box height (
StopBufferFrac). For a long, the stop sits below BoxLow; for a short, it sits above BoxHigh. The logic is simple: if price falls back through the whole coil, the breakout is considered invalidated and the trade is closed. - Take-profit logic (reward-to-risk). The target is set at a fixed multiple of the structural stop distance, defined by
RewardRatio. If the measured risk is the distance from entry to the stop, the take-profit is placed that same distance multiplied by the reward ratio in the direction of the trade. - One position at a time. Only a single position per magic number is held; the structural stop and target manage the exit, so no additional trade is opened until the current one resolves.
Because the stop and target are derived from the box height rather than fixed pips or points, the risk model is self-scaling — it adapts automatically to any symbol or timeframe.
Strategy Parameters
| Parameter | Default | Min | Max | Description |
|---|---|---|---|---|
| CoilBars | 4 | 2 | 10 | Number of closed bars that form the tight consolidation box (the coil). |
| BaselineBars | 20 | 10 | 60 | Window of bars before the coil used to measure the market's "normal" range. |
| CompressionRatio | 0.50 | 0.20 | 0.90 | The coil box height must be less than or equal to this fraction of the baseline range to qualify as a squeeze. |
| ExpansionMult | 1.00 | 0.50 | 3.00 | The signal bar's own high-low range must be at least this multiple of the box height (expansion filter). |
| StopBufferFrac | 0.25 | 0.00 | 1.00 | Extra distance placed beyond the opposite box edge for the stop, as a fraction of box height. |
| RewardRatio | 2.00 | 1.00 | 5.00 | Take-profit distance expressed as a multiple of the structural stop distance. |
| Lots | 0.10 | 0.01 | 1.00 | Trade volume in lots. |
| Magic | 8801 | 0 | 9,999,999 | Unique magic number used to identify and manage this EA's positions. |
Recommended Chart Settings
The Coiled Range Breakout was designed with a liquid major pair in mind — such as EURUSD or GBPUSD — on the M30 or H1 timeframes. These conditions tend to offer the clean alternation between contraction and expansion that the strategy relies on, while still providing enough liquidity to reduce erratic spikes.
Keep in mind that breakout behavior differs widely across instruments and sessions. A setting that produces frequent, clean signals on one pair may behave very differently on another, or during periods of unusually high or low volatility. Results will vary across different market conditions, and any timeframe or symbol change should be studied carefully on a demo account before live use.
Historical Backtest Results
Note: The figures below are from a historical backtest simulation. Backtests have inherent limitations — they do not account for slippage, requotes, spread widening, or psychological factors. These results should not be interpreted as a prediction of future performance.
No backtest data is available for this strategy yet. When a historical simulation has been run, this section will be updated with the relevant metrics — such as Net Profit, Profit Factor, Sharpe Ratio, Win Rate, Maximum Drawdown, and Total Trades — using the real measured numbers only. Until then, treat the strategy purely as a structural and educational study of breakout mechanics rather than as a performance-validated system.
How to Install on MetaTrader 5
- Download the
.ex5file from the link below. - Copy it to your MT5
MQL5\Expertsfolder. - Restart MetaTrader 5 or refresh the Navigator panel.
- Drag the EA onto a chart matching the recommended symbol and timeframe.
- Configure the input parameters and enable Algo Trading.
What to Consider Before Using This EA
Like every approach, the Coiled Range Breakout has both strengths and limitations, and understanding them is part of using it responsibly.
Strengths. Because it uses no indicators, the logic is transparent and easy to reason about — you can see exactly why a signal fires by looking at the candles. The double filter of compression (the squeeze gate) plus expansion (the decisive signal bar) is designed to screen out many of the false breakouts that plague simpler range-breakout systems. Its structural, self-scaling risk model means stops and targets are anchored to real market geometry rather than arbitrary pip values, which makes it adaptable across symbols and timeframes.
Known limitations. Breakout strategies are vulnerable to "false breaks," where price closes out of the box, triggers an entry, and then reverses back through the range. The expansion filter reduces but cannot eliminate this. In choppy, rangebound markets with no clear volatility cycle, the strategy may produce a series of small losing trades as breakouts fail to follow through. It also depends on the box being correctly framed — if the baseline window happens to capture an unusual swing, the compression gate may misjudge what "normal" looks like. Finally, because it only holds one position at a time and relies on a fixed reward-to-risk target, it can leave additional momentum on the table during strong trends, or give back open profit if a move stalls before reaching the target.
The strategy tends to perform best when genuine squeezes are followed by sustained directional expansion, and may underperform during prolonged sideways drift or during high-impact news spikes that whipsaw price. None of this makes it good or bad in isolation — it simply means the approach has conditions it favors and conditions it does not.
Risk Management Tips
Sound risk management matters more than any single entry signal. As you study this strategy, keep these general principles in mind:
- Size positions deliberately. Many educational frameworks suggest risking no more than 1–2% of account equity on any single trade. Adjust the
Lotsparameter so the structural stop distance fits within that limit rather than choosing a lot size at random. - Test on a demo account first. Run the EA on a demo or simulated account across varied market conditions before considering any live capital, so you can observe how it behaves through both winning and losing streaks.
- Understand drawdown. Even a sound strategy will experience losing periods. Knowing how deep a drawdown you can tolerate — financially and emotionally — helps you avoid abandoning a plan at the worst possible moment.
- Account for trading costs. Spreads, commissions, and slippage all erode results in live trading and are often understated in backtests. Factor them in when setting expectations.
- Never risk money you cannot afford to lose. Leverage magnifies both gains and losses, and breakout trades can move quickly against an open position.
Risk Warning
Trading foreign exchange, CFDs, and other leveraged financial instruments involves substantial risk of loss and is not suitable for all investors. The strategies and tools discussed on this page are provided for educational purposes only and do not constitute financial advice, investment recommendations, or solicitation to trade. Always consult a qualified financial adviser before making trading decisions. Past backtest performance is not indicative of future results.
Downloads
- Expert Advisor: CoiledRangeBreakout.ex5 (1 downloads)
- Source Code: CoiledRangeBreakout.mq5 (1 downloads)
- Documentation: CoiledRangeBreakout.pdf (1 downloads)