Disclaimer: This article is for educational and informational purposes only. It does not constitute financial or investment advice. Trading forex and CFDs carries significant risk of loss. Past performance of any strategy — including backtests — does not guarantee future results. Never trade with money you cannot afford to lose.
What Is This Strategy?
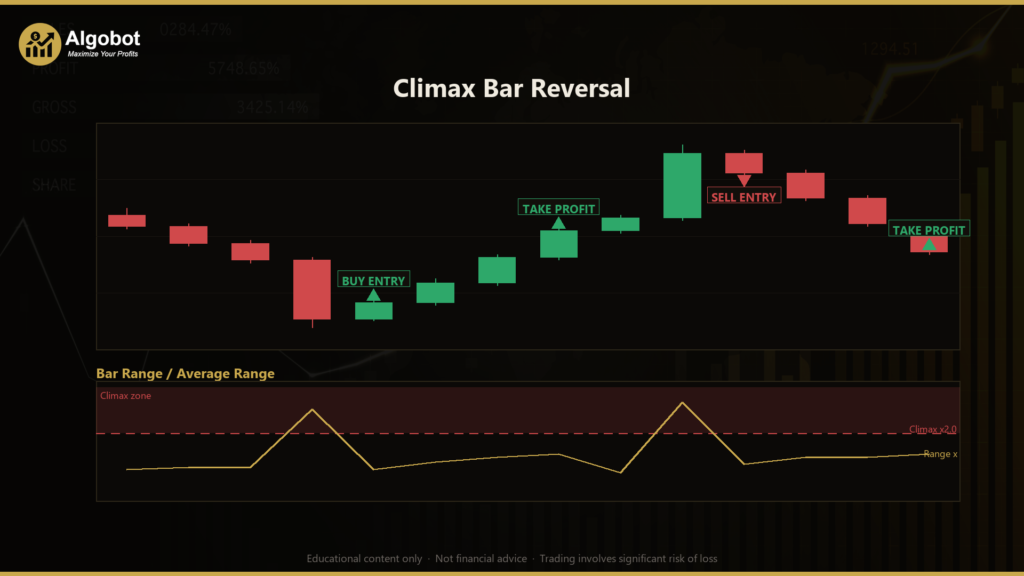
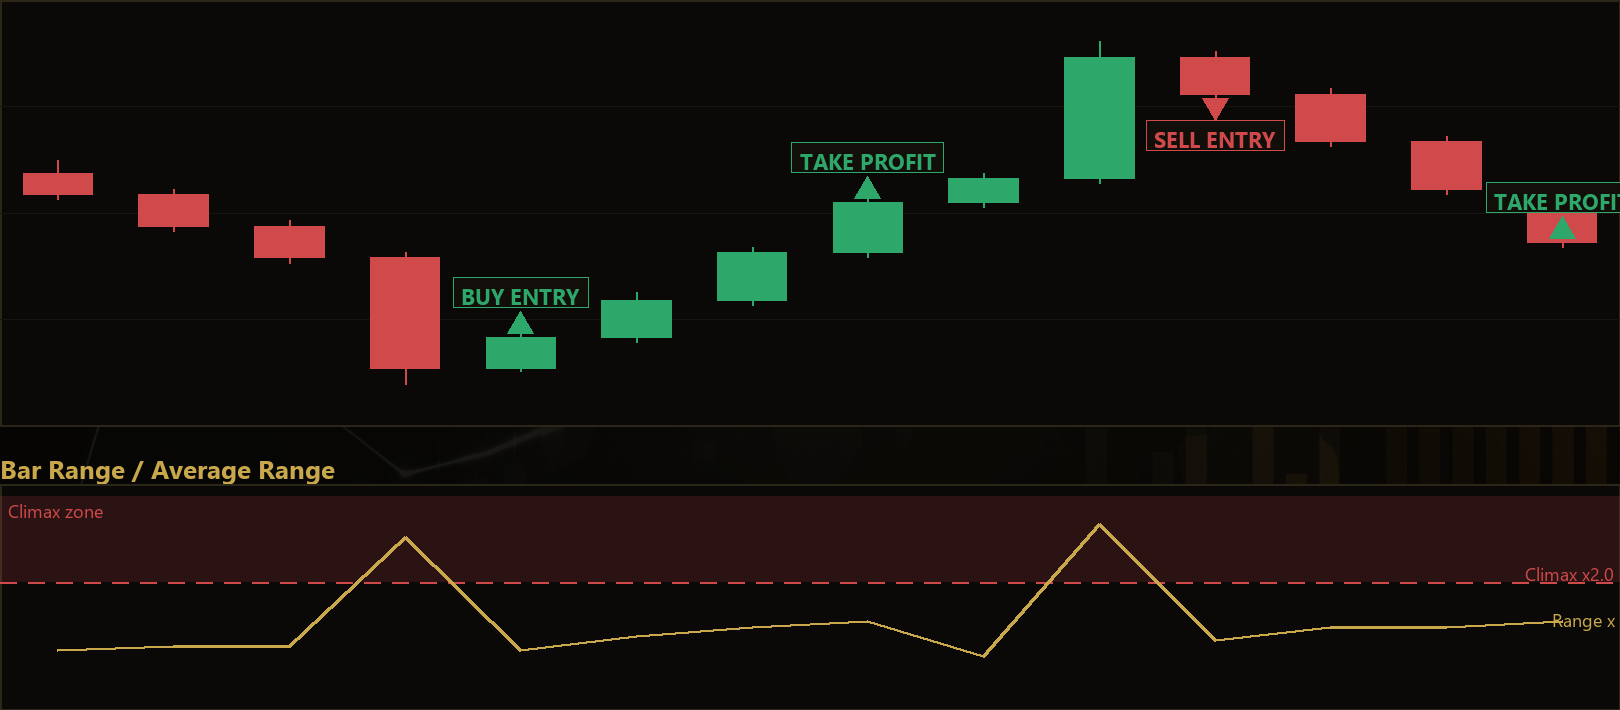
The Climax Bar Reversal is a pure price-action, exhaustion-reversal strategy that uses no indicators at all — it reads raw candle geometry (the highs, lows, opens, and closes of recent bars) to spot a moment of market capitulation and then fades it. A "climax bar" is a single completed candle whose range is abnormally large compared with the recent average, printed right at a fresh local extreme. In plain terms, it is the candle where the crowd piles in or panics out at the worst possible price: a buying climax at a new high, or a selling climax at a new low.
This is a counter-trend, mean-reversion style of trading. Rather than chasing momentum, the strategy waits for momentum to overextend and then bets on a snap-back. Because it relies entirely on price structure, it can be applied to any instrument and timeframe without recalibrating indicator inputs — though, as with any approach, its behaviour will differ from market to market.
As a learning tool, the Climax Bar Reversal is best suited to traders who want to understand how supply-and-demand exhaustion shows up in candlestick patterns, and how to build structural, price-derived stop-losses. It is not a "set and forget" system; it is a transparent, readable example of how a discretionary price-action concept can be coded into rules. Treat it as a study of reversal mechanics, not as a profit opportunity.
How It Works
The strategy evaluates only once per newly closed bar, and it holds a maximum of one position at a time. It looks at three reference points: the climax bar (two bars back), the confirmation bar (the bar immediately after the climax), and a lookback/range window beneath the climax. Here is what the strategy checks, step by step:
- It measures the climax bar's range. It compares the high-to-low range of the suspected climax bar against the average range of the preceding window (default 14 bars). The climax range must be at least
ClimaxMulttimes that average (default 2×) to qualify as abnormally wide. - It requires a fresh local extreme. For a buying climax, the climax bar's high must be the highest high over the lookback window (default 12 bars). For a selling climax, its low must be the lowest low. This confirms the move reached a genuine new high or low.
- It checks for a strong thrust, not a doji. The climax bar must close decisively toward its own extreme. The
ClosePushPctparameter sets how far into the range the close must sit (default 50%), filtering out indecisive candles. - It waits for the confirmation bar to fail. The strategy never trades the climax bar itself. Instead, it requires the very next bar to fail to extend the move (it does not break the climax high/low) and to close back against the climax bar. This failure-to-follow-through is the exhaustion signal.
When these conditions align, the strategy signals a fade in the opposite direction of the climax:
- Buying climax → SELL. A large up-bar at a fresh high, followed by a rejection bar that closes lower, signals a potential short.
- Selling climax → BUY. A large down-bar at a fresh low, followed by a rejection bar that closes higher, signals a potential long.
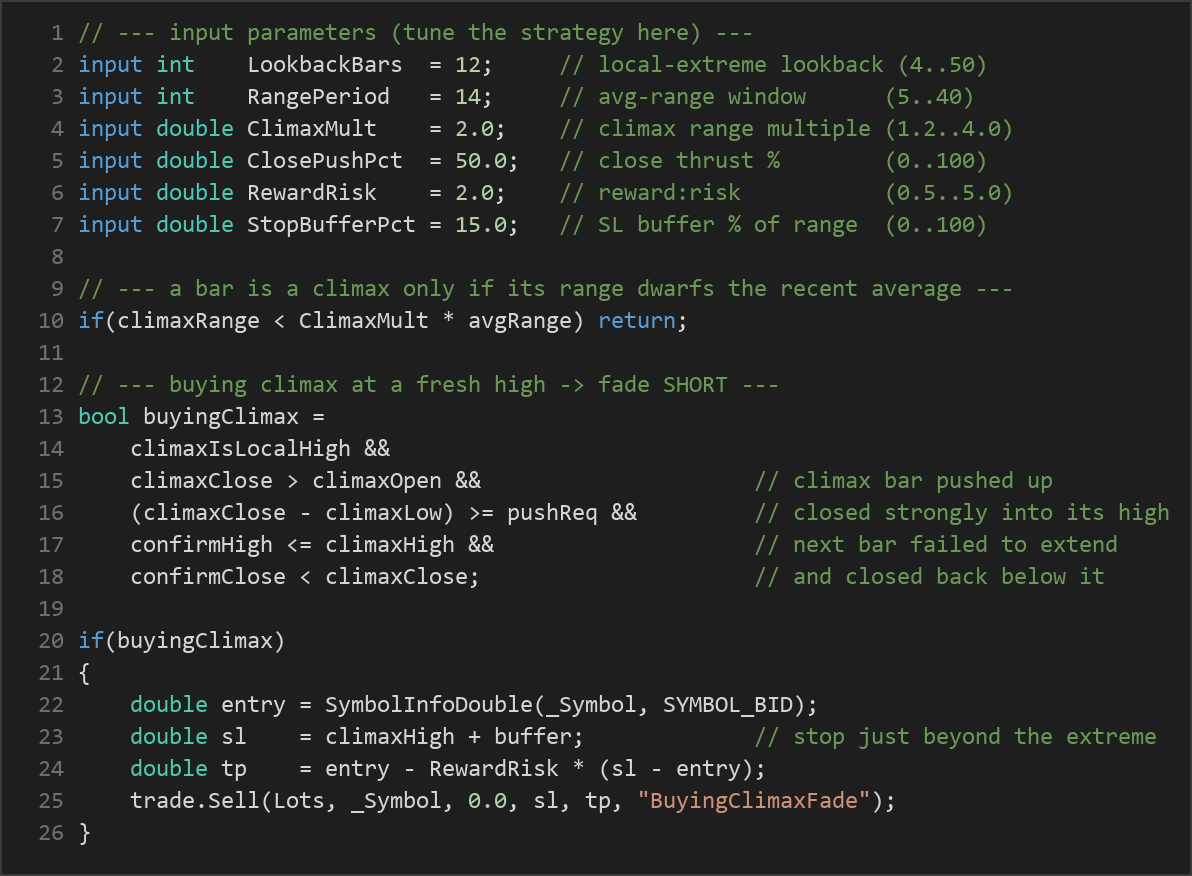
Stop-loss logic: The stop sits just beyond the climax extreme — above the climax high for shorts, below the climax low for longs — plus a small buffer set by StopBufferPct (default 15% of the climax range). This is a structural stop derived from price, not a fixed pip distance.
Take-profit logic: The target is placed at a configurable reward-to-risk multiple (RewardRisk, default 2.0) of the stop distance. If the stop sits 30 pips away, a 2.0 reward:risk target sits 60 pips in the trade's favour. Once the order is sent, the stop-loss and take-profit manage the exit; the strategy does not add to or scale the position.
Strategy Parameters
| Parameter | Default | Min | Max | Description |
|---|---|---|---|---|
| LookbackBars | 12 | 4 | 50 | Number of bars used to confirm the climax bar prints a fresh local high or low. |
| RangePeriod | 14 | 5 | 40 | Window of bars used to compute the average range that the climax is measured against. |
| ClimaxMult | 2.0 | 1.2 | 4.0 | How many times the average range the climax bar must exceed to qualify as abnormally wide. |
| ClosePushPct | 50.0 | 0.0 | 100.0 | How far toward its own extreme the climax bar must close (a thrust filter, not a doji). |
| RewardRisk | 2.0 | 0.5 | 5.0 | Reward-to-risk multiple that sets the take-profit distance relative to the stop. |
| StopBufferPct | 15.0 | 0.0 | 100.0 | Extra buffer beyond the climax extreme for the stop-loss, as a percentage of the climax range. |
| Lots | 0.10 | 0.01 | 1.0 | Fixed trade volume in lots for each position. |
Recommended Chart Settings
Because the Climax Bar Reversal reads pure bar geometry rather than fixed indicator settings, it can be tested across many symbols and timeframes. As a starting point for study, intraday timeframes such as the H1 (1-hour) chart on major forex pairs — for example EUR/USD or GBP/USD — give a reasonable balance of signal frequency and bar reliability. Higher timeframes tend to produce fewer but more structurally significant climax bars.
Keep in mind that results will vary considerably across different instruments, volatility regimes, and broker spreads. Always test any configuration on historical data and a demo account before considering it for live conditions.
How to Install on MetaTrader 5
- Download the .ex5 file from the link below
- Copy it to your MT5
MQL5\Expertsfolder - Restart MetaTrader 5 or refresh the Navigator panel
- Drag the EA onto a chart matching the recommended symbol and timeframe
- Configure the input parameters and enable Algo Trading
What to Consider Before Using This EA
The Climax Bar Reversal has some genuine strengths as a learning model. It is fully transparent — every decision comes from visible price structure, so you can verify each signal by eye on the chart. Its stops are structural and adaptive, scaling with the size of the climax bar rather than using an arbitrary fixed distance. And because it fades exhaustion, it can perform well in choppy, range-bound conditions where momentum strategies tend to get whipsawed.
The approach also has well-known limitations. Counter-trend, mean-reversion strategies are inherently exposed to strong trends: a market that keeps making new highs can print climax bar after climax bar, and fading each one can produce a string of losing trades. The single-bar confirmation is a relatively light filter — a one-bar pullback does not always mean a reversal has begun. The strategy also takes only one position at a time and uses a fixed lot size, so it does not adapt position size to account equity or volatility on its own.
Markets where this style may underperform include sustained directional moves, news-driven spikes, and very low-volatility periods where genuine climax bars rarely form. The strategy may indicate a reversal that historically would have reverted, but no pattern works in every condition. Approach it as an educational framework to study, adapt, and test — not as a finished trading system.
Risk Management Tips
Sound risk management matters far more than any single entry signal. Consider these general principles:
- Risk only a small fraction per trade. Many educators suggest risking no more than 1–2% of account equity on any single position, so a losing streak does not threaten your capital.
- Size positions to your stop, not the other way around. Because this strategy uses structural stops that vary with the climax range, a fixed lot size means your actual risk in currency terms changes from trade to trade. Adjust volume so the monetary risk stays consistent.
- Always start on a demo account. Test the strategy thoroughly in simulated conditions before committing real funds, and observe how it behaves across different market phases.
- Understand drawdown. Even a sound strategy will have losing periods. Know the maximum drawdown you can tolerate emotionally and financially before you begin.
- Account for costs. Spreads, commissions, and slippage all erode results, especially on shorter timeframes — factor them into any evaluation.
Risk Warning
Trading foreign exchange, CFDs, and other leveraged financial instruments involves substantial risk of loss and is not suitable for all investors. The strategies and tools discussed on this page are provided for educational purposes only and do not constitute financial advice, investment recommendations, or solicitation to trade. Always consult a qualified financial adviser before making trading decisions. Past backtest performance is not indicative of future results.
Downloads
- Expert Advisor: ClimaxBarReversal.ex5 (60 downloads)
- Source Code: ClimaxBarReversal.mq5 (50 downloads)
- Documentation: ClimaxBarReversal.pdf (62 downloads)