Disclaimer: This article is for educational and informational purposes only. It does not constitute financial or investment advice. Trading forex and CFDs carries significant risk of loss. Past performance of any strategy — including backtests — does not guarantee future results. Never trade with money you cannot afford to lose.
What Is This Strategy?
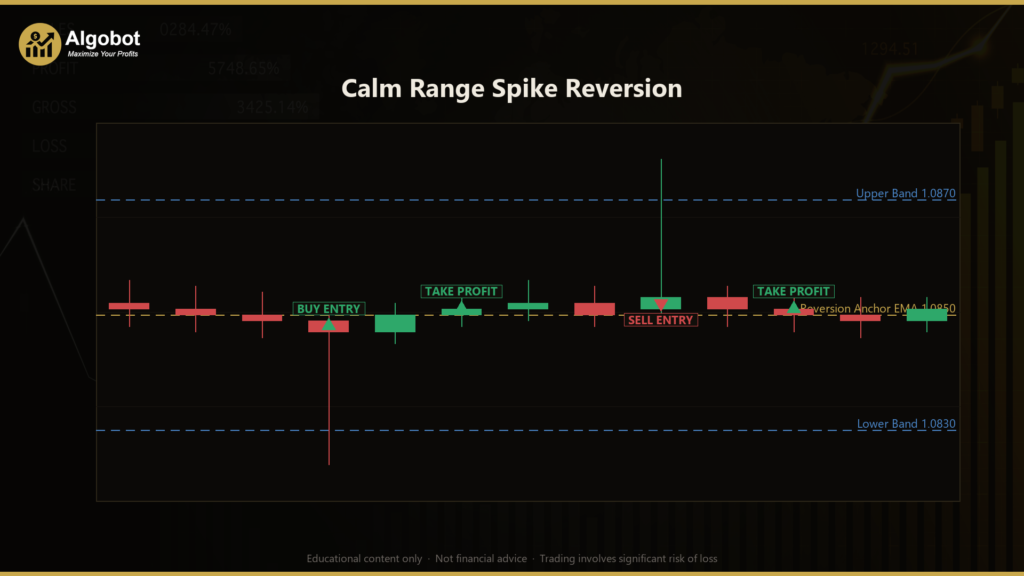
The Calm Range Spike Reversion strategy is a mean-reversion trading system that combines the Average True Range (ATR) indicator — a standard measure of market volatility — with an Exponential Moving Average (EMA) and a single-bar candlestick spike pattern. Rather than trying to catch trends, it is designed to fade sudden, isolated price spikes that shoot past a volatility band and then immediately snap back inside on the very same bar. In plain terms, it looks for a "liquidity flush": a brief stab in price that gets rejected almost as fast as it appears.
What makes this approach distinct is that it is regime-gated. Mean reversion tends to work well in quiet, sideways markets and to break down badly in trending or volatile ones. The strategy addresses this directly by refusing to trade unless two conditions are both true: the market's trend is flat (the EMA has barely moved) and volatility is contracting (short-term ATR sits below long-term ATR). Only when the market is genuinely calm does the strategy look for a spike to fade. This selectivity is the core idea — it trades rarely, on purpose.
As a learning tool, this strategy is well suited to traders who want to understand how volatility bands, moving-average slope filters, and candlestick rejection wicks can be combined into a single rule-based system. It is a useful case study in when not to trade, which is often more valuable than another entry signal. It is not designed to be active in fast-moving or trending conditions, and it should be studied as an example of conditional, context-aware logic rather than as a standalone income tool.
How It Works
The strategy processes one completed bar at a time and only evaluates signals when a new bar opens, so every calculation is based on finished price data. Before it even considers a trade, it checks the market regime.
Regime gate (both conditions must hold):
- Flat trend filter — The strategy measures how far the EMA has drifted over a defined lookback window (
SlopeLookback). If that drift is smaller thanFlatFactor× short-term ATR, the trend is considered flat. A moving market fails this test and no trade is taken. - Low volatility filter — The short-window ATR must be below
ContractFactor× the long-window ATR. This signals that volatility is contracting rather than expanding. If volatility is rising, the gate stays shut.
Once both gates pass, the strategy builds a volatility band around the EMA "anchor" (fair value): an upper band at anchor + BandMultiplier × ATR and a lower band at anchor − BandMultiplier × ATR. It then inspects the last completed bar (the "signal" bar) and the bar before it.
Long entry — the strategy signals a buy when:
- The signal bar's low pierces below the lower band but its close is back inside the band (the snap-back).
- The bar shows a lower-wick rejection — the close sits in the upper portion of the bar's range, controlled by
WickFraction, indicating buyers pushed price back up. - The previous bar was still inside the band, confirming this is a fresh, single-bar spike rather than an ongoing move.
Short entry is the exact mirror: the signal bar's high pierces above the upper band, the close falls back inside, an upper-wick rejection is present, and the prior bar was inside the band.
Exit logic (stop-loss and take-profit):
- Stop-loss is placed just beyond the spike extreme — below the signal bar's low for longs (or above the high for shorts), offset by
StopBufferAtr× ATR to give the trade a small buffer. - Take-profit is set at the EMA anchor — the mean the price is expected to revert toward.
- Reward filter — Before sending an order, the strategy checks that the distance from entry to the take-profit is at least
MinRewardAtr× ATR. If the potential reversion move is too small, the trade is skipped.
The system holds only one position at a time per its magic number, keeping exposure simple and controlled.

Strategy Parameters
| Parameter | Default | Min | Max | Description |
|---|---|---|---|---|
| TrendPeriod | 50 | 20 | 150 | EMA period used as the trend filter and the reversion anchor (fair value / take-profit target). |
| ShortAtrPeriod | 14 | 5 | 30 | Short-window ATR period driving the volatility band and regime tests. |
| LongAtrPeriod | 50 | 30 | 120 | Long-window ATR period used as the baseline for detecting volatility contraction. |
| SlopeLookback | 20 | 5 | 60 | Number of bars back over which the EMA drift (flat-trend test) is measured. |
| BandMultiplier | 2.0 | 1.0 | 4.0 | Width of the volatility band in ATR units around the EMA anchor. |
| FlatFactor | 1.0 | 0.3 | 3.0 | Maximum allowed EMA drift (in ATR units) for the trend to count as flat. |
| ContractFactor | 0.90 | 0.5 | 1.2 | Short ATR must be below this factor × long ATR to qualify as low volatility. |
| WickFraction | 0.50 | 0.3 | 0.8 | Fraction of the bar's range the rejection wick must cover to confirm a snap-back. |
| StopBufferAtr | 0.30 | 0.0 | 1.5 | Extra stop-loss distance beyond the spike extreme, in ATR units. |
| MinRewardAtr | 0.60 | 0.1 | 2.0 | Minimum take-profit distance (in ATR units) required to accept a trade. |
| Lots | 0.10 | 0.01 | 1.0 | Trade volume in lots. |

Recommended Chart Settings
This strategy was designed with liquid forex pairs and intraday-to-swing timeframes in mind, where quiet, range-bound sessions occur regularly between trending moves. Timeframes such as M15, M30, and H1 are natural starting points for study, because they produce enough bars for the ATR and EMA windows to stabilize while still capturing the short, isolated spikes the logic targets.
Because the entire approach depends on identifying calm regimes, its behaviour will differ significantly across instruments and sessions. A pair that spends long stretches trending will generate very few signals, while a pair that oscillates within a range may produce more. Always remember that results will vary across different market conditions, symbols, and broker data feeds, and that any settings should be studied on historical data before live use.
How to Install on MetaTrader 5
- Download the .ex5 file from the link below
- Copy it to your MT5
MQL5\Expertsfolder - Restart MetaTrader 5 or refresh the Navigator panel
- Drag the EA onto a chart matching the recommended symbol and timeframe
- Configure the input parameters and enable Algo Trading
What to Consider Before Using This EA
Strengths of the approach. The regime gate is the standout feature. By requiring both a flat trend and contracting volatility before acting, the strategy avoids the two environments — strong trends and volatility expansions — that historically punish mean-reversion systems the hardest. The single-bar spike requirement, combined with a wick-rejection filter and a "fresh spike" check on the prior bar, makes each entry deliberate rather than reactive. Placing the stop just beyond the spike extreme and targeting the mean gives every trade a clearly defined, structural risk-to-reward frame.
Known limitations. Mean reversion carries an inherent asymmetry: winners tend to be capped at the mean while a spike that keeps running can produce a full stop-out. The strategy's protection against this is selectivity, not prediction — it cannot know in advance which flush will revert and which is the start of a real breakout. Because the gates are strict, the system may go long periods without trading, which can test a user's patience and makes robust evaluation require a large sample of history.
Where it may underperform. During regime transitions — when a quiet market suddenly begins to trend or when volatility expands after a news event — a spike that looks like a flush may actually be the first bar of a sustained move. In those moments the take-profit at the mean may never be reached and the stop may be hit. News-driven gaps and thin-liquidity periods can also distort the ATR band and produce lower-quality signals. This EA is a tool for studying conditional entry logic, not a set-and-forget solution.
Risk Management Tips
Sound risk management matters more than any single entry rule. Consider these general principles as you study this or any strategy:
- Risk a small, fixed fraction per trade. Many educational sources suggest risking no more than 1–2% of account equity on any single position, so that a string of losses cannot do lasting damage.
- Size positions from your stop distance. Because this strategy's stop sits at a defined level beyond the spike, you can calculate lot size from the distance between entry and stop rather than trading a fixed lot blindly.
- Test on a demo account first. Run the EA on a demo or on historical data across many different market conditions before considering any live capital.
- Understand drawdown. Even a selective system will experience losing streaks. Know the worst historical drawdown you are studying and ask whether you could tolerate it emotionally and financially.
- Keep expectations grounded. No filter eliminates risk. Treat every parameter change as a hypothesis to be tested, not a shortcut to a better outcome.
Risk Warning
Trading foreign exchange, CFDs, and other leveraged financial instruments involves substantial risk of loss and is not suitable for all investors. The strategies and tools discussed on this page are provided for educational purposes only and do not constitute financial advice, investment recommendations, or solicitation to trade. Always consult a qualified financial adviser before making trading decisions. Past backtest performance is not indicative of future results.
Downloads
- Expert Advisor: CalmRangeSpikeReversion.ex5 (34 downloads)
- Source Code: CalmRangeSpikeReversion.mq5 (33 downloads)
- Documentation: CalmRangeSpikeReversion.pdf (40 downloads)