
Disclaimer: This article is for educational and informational purposes only. It does not constitute financial or investment advice. Trading forex and CFDs carries significant risk of loss. Past performance of any strategy — including backtests — does not guarantee future results. Never trade with money you cannot afford to lose.
What Is This Strategy?
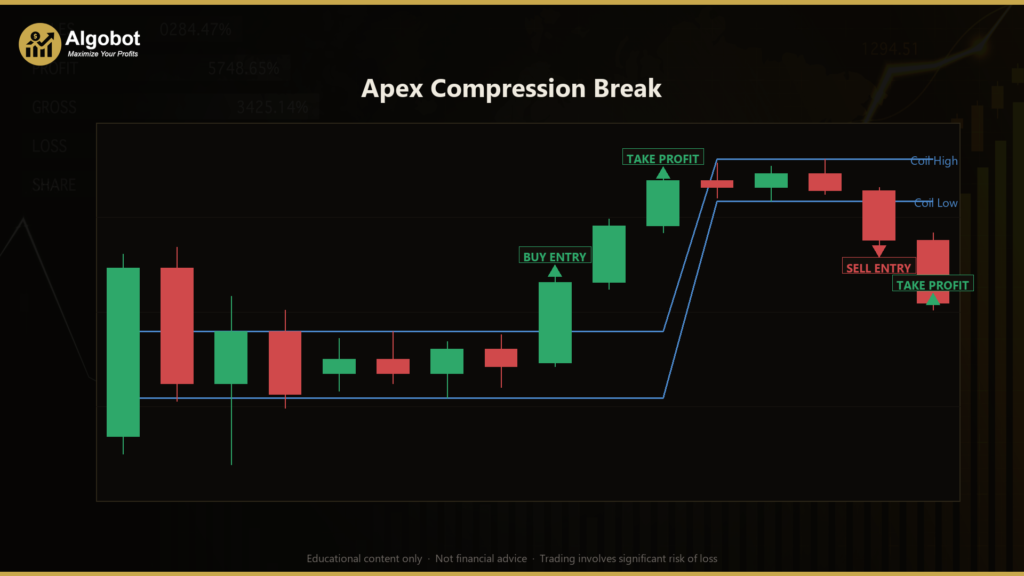
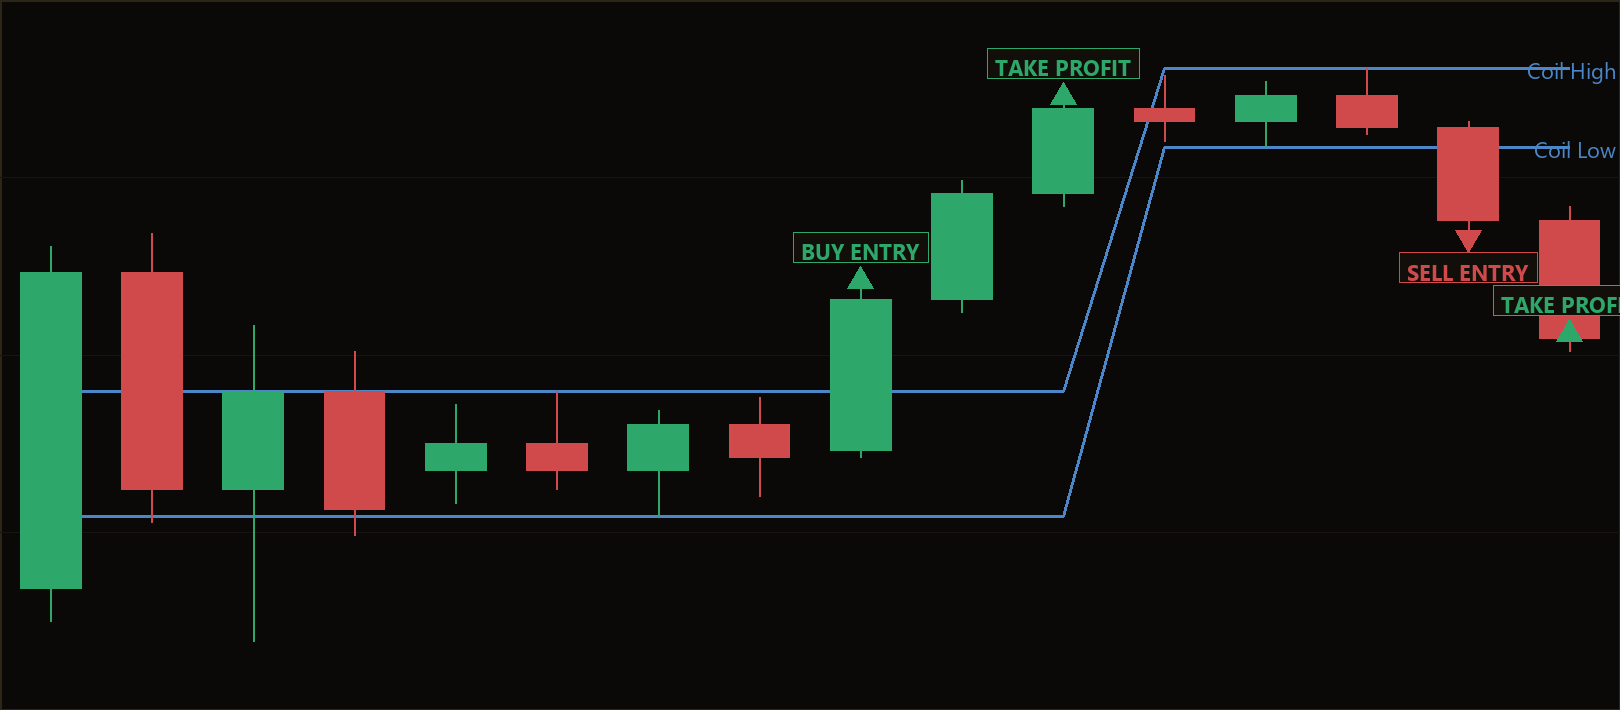
The Apex Compression Break is a pure price-action breakout strategy that uses no technical indicators at all — it reads raw candle ranges to detect a volatility "coil" and then trades the expansion that often follows. Instead of leaning on moving averages, oscillators, or other lagging tools, it measures the price range of a recent window of bars (the "apex" or coil) and compares it to the range of the window immediately before it. When the recent range has contracted to a fraction of the prior range, the market is consolidating into a tightening box, and the strategy watches for a decisive candle to break out of that box.
This approach belongs to the breakout-trading family, a style built around the observation that markets tend to alternate between periods of compression (quiet, range-bound consolidation) and expansion (sharp directional moves). Compression — sometimes called a volatility squeeze — is the condition this strategy is specifically designed to identify. It looks for the moment when a market has gone quiet and energy appears to be building inside a narrowing range, then it waits for a single strong candle to signal which way that energy may release.
As a learning tool, the Apex Compression Break is well-suited to traders who want to understand breakout mechanics and price structure without the clutter of indicators. Because every rule is based on simple, transparent candle math — highs, lows, opens, and closes — it is easy to follow exactly why a trade was or was not taken. That transparency makes it a useful study piece for newer traders learning how volatility cycles work, and for more experienced traders curious about indicator-free, rules-based entries.
How It Works
The strategy evaluates the market once per completed bar and only acts when a full set of conditions lines up. It manages just one position per magic number at a time, then leaves that trade entirely to its stop-loss and take-profit. Here is the logic, step by step:
- Build the coil box (the apex): The strategy scans a recent window of bars — its size set by
RangeBars— and records the highest high and lowest low. The distance between them is the "box height," representing how much the market has ranged during the coil. - Build the prior reference window: It then measures the same number of bars immediately before the coil, recording that window's high-to-low range as the "prior height." This earlier window is the baseline the coil is compared against.
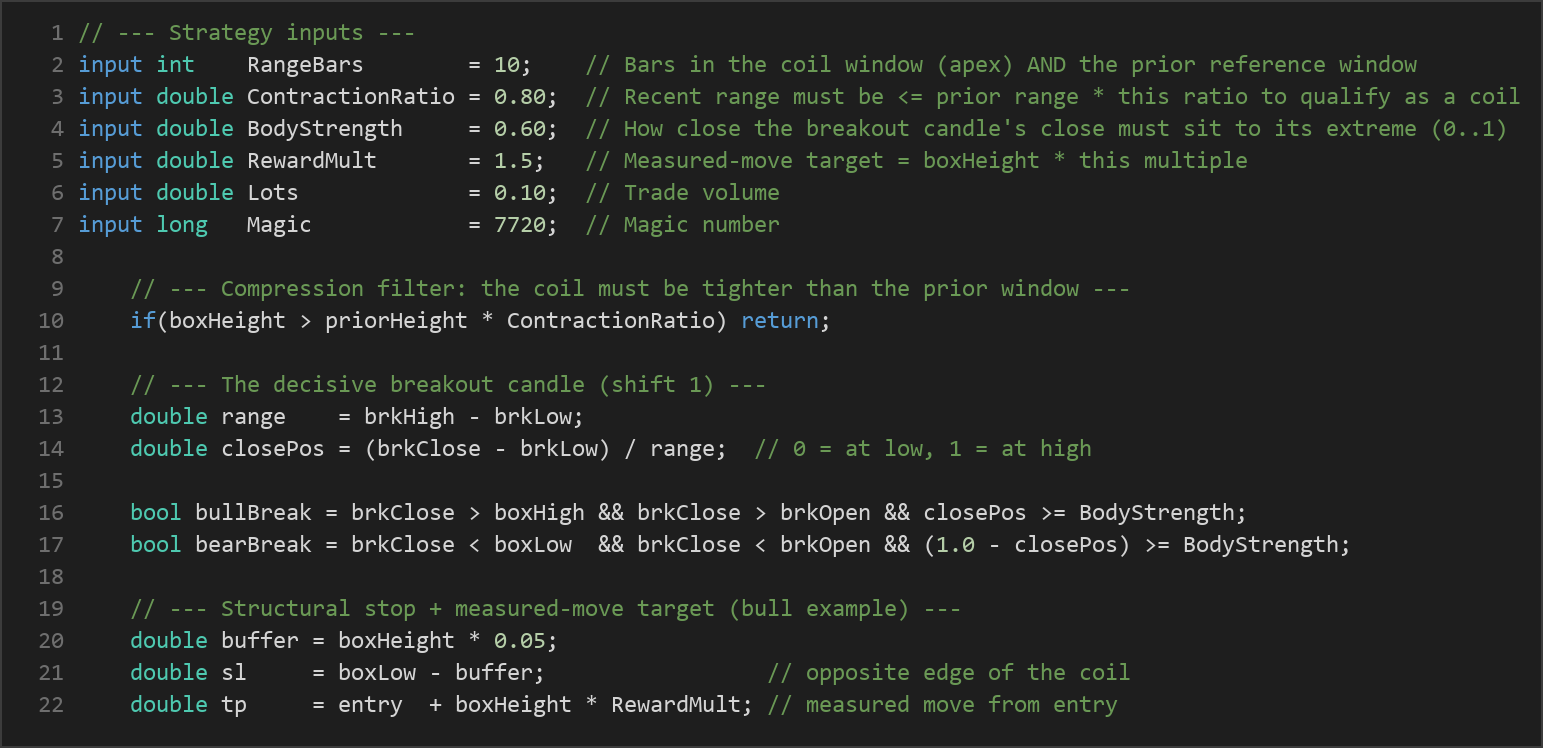
- Apply the compression filter: For a valid setup, the coil must be tighter than the prior window. Specifically, the box height must be less than or equal to the prior height multiplied by the
ContractionRatio. If the recent range has not contracted enough, no trade is considered — the market is not coiled. - Wait for a decisive breakout candle: The strategy then inspects the most recently closed bar. For a bullish signal, that candle must close above the top of the box, close above its own open, and finish with its close pinned near its high (a strong body, not a wick-rejection). The "near the high" requirement is controlled by
BodyStrength. For a bearish signal, the mirror image applies: the candle must close below the box, close below its open, and finish near its low. - Entry: When a bullish break is confirmed, the strategy signals a buy at the current ask price. When a bearish break is confirmed, it signals a sell at the current bid price.
- Stop-loss (structural): The stop is placed at the opposite edge of the coil, plus a small buffer of 5% of the box height so it sits just outside the structure. A long trade's stop goes below the box low; a short trade's stop goes above the box high. This ties risk directly to the consolidation structure rather than an arbitrary distance.
- Take-profit (measured move): The target is a projected "measured move" — the box height multiplied by the
RewardMult— added to the entry for a buy or subtracted for a sell. The idea is that the expansion out of a coil may travel a distance proportional to the size of the coil itself.
Once a position is open, the strategy does not add to it, scale out, or trail — the trade is managed entirely by its fixed stop-loss and take-profit until one of them is reached.
Strategy Parameters
| Parameter | Default | Min | Max | Description |
|---|---|---|---|---|
| RangeBars | 10 | 5 | 30 | Number of bars in the coil window (the apex) and in the prior reference window. Larger values measure compression over a longer stretch of price history. |
| ContractionRatio | 0.80 | 0.50 | 1.00 | The recent range must be less than or equal to the prior range times this ratio to qualify as a coil. Lower values demand a tighter, more pronounced squeeze. |
| BodyStrength | 0.60 | 0.40 | 0.90 | How close the breakout candle's close must sit to its extreme (0 to 1). Higher values require a stronger, more convincing body and reject weaker breaks. |
| RewardMult | 1.5 | 0.5 | 4.0 | The measured-move target equals the box height times this multiple. Higher values set more distant take-profit levels relative to the size of the coil. |
| Lots | 0.10 | 0.01 | 1.0 | Trade volume in lots for each position the strategy opens. |
Recommended Chart Settings
The Apex Compression Break is built to work on any symbol and timeframe, because its logic is entirely self-referential — it compares each window of bars only to the window before it. That said, breakout strategies are commonly studied on liquid forex majors such as EUR/USD or GBP/USD, and on intraday timeframes like M15, M30, or H1, where compression-and-expansion cycles are frequent enough to observe and slow enough to manage. When you first explore it, choosing a single, liquid instrument on a clean timeframe makes the behaviour easier to follow.
Keep in mind that results will vary considerably across different symbols, timeframes, and market conditions. A setting that produces frequent signals on one instrument may rarely trigger on another, and the same parameters can behave very differently in trending versus ranging environments. Treat the defaults as a starting point for study, not a finished configuration.
How to Install on MetaTrader 5
- Download the .ex5 file from the link below
- Copy it to your MT5
MQL5\Expertsfolder - Restart MetaTrader 5 or refresh the Navigator panel
- Drag the EA onto a chart matching the recommended symbol and timeframe
- Configure the input parameters and enable Algo Trading
What to Consider Before Using This EA
Every strategy involves trade-offs, and an honest assessment helps you study this one effectively.
Strengths. Because it uses no indicators, the Apex Compression Break is fully transparent — each decision traces back to plain candle math you can verify by eye. Its stops are structural, anchored to the actual edge of the consolidation rather than a fixed pip count, which keeps risk tied to what the market is doing. The BodyStrength filter is designed to screen out weak, wick-heavy candles that close back inside their range, focusing only on more decisive breaks.
Limitations. Breakout strategies are well known for false breakouts — situations where price pushes beyond a box, triggers an entry, and then reverses back inside. No filter eliminates these entirely, and tightly coiled ranges can produce a cluster of failed breaks before any sustained move develops. Because the system trades only one position at a time and relies on fixed exits, it does not adapt once a trade is live; a move that stalls just short of the target will simply ride to the stop or take-profit.
Where it may underperform. Choppy, directionless markets with no clear compression cycles may generate signals that quickly fail. Very low-volatility conditions can make the measured-move target unrealistically small, while news-driven spikes can blow through structural stops. As with any breakout approach, the strategy historically tends to work best when genuine expansion follows compression — and there is no way to know in advance when that will happen.
Risk Management Tips
Sound risk management matters far more than any single entry rule. Keep these general principles in mind as you study any automated strategy:
- Size positions sensibly. Many educators suggest risking no more than 1–2% of account equity on any single trade. Adjust the
Lotsvalue so that the distance to your structural stop translates into a small, controlled portion of your balance. - Test on a demo account first. Run the strategy on a demo or simulated account until you understand its behaviour across different conditions before considering any live capital.
- Understand drawdown. Even a well-designed system experiences losing streaks. Knowing how deep a drawdown you can tolerate — emotionally and financially — helps you avoid abandoning a plan at the worst moment.
- Account for costs. Spreads, commissions, and slippage all affect breakout entries, particularly around volatile breaks. Factor them into any evaluation.
- Never rely on a single strategy. Treat this EA as one educational component of a broader, diversified approach to learning the markets, not a complete trading plan.
Risk Warning
Trading foreign exchange, CFDs, and other leveraged financial instruments involves substantial risk of loss and is not suitable for all investors. The strategies and tools discussed on this page are provided for educational purposes only and do not constitute financial advice, investment recommendations, or solicitation to trade. Always consult a qualified financial adviser before making trading decisions. Past backtest performance is not indicative of future results.
Downloads
- Expert Advisor: ApexCompressionBreak.ex5 (0 downloads)
- Source Code: ApexCompressionBreak.mq5 (0 downloads)
- Documentation: ApexCompressionBreak.pdf (0 downloads)