Disclaimer: This article is for educational and informational purposes only. It does not constitute financial or investment advice. Trading forex and CFDs carries significant risk of loss. Past performance of any strategy — including backtests — does not guarantee future results. Never trade with money you cannot afford to lose.
What Is This Strategy?
The Accumulation Confirmed Breakout is a trend-following breakout strategy that pairs a classic Donchian-style price channel with On-Balance Volume (OBV) — Joseph Granville's cumulative volume indicator first popularized in 1963 — to filter out low-conviction breakouts. In plain terms, a Donchian channel tracks the highest high and lowest low over a recent window of bars, and a breakout occurs when price closes beyond that boundary. OBV is a running tally that adds a bar's volume when price closes up and subtracts it when price closes down, producing a line that reflects whether buying or selling pressure is accumulating beneath the surface.
The core idea this strategy explores is Granville's premise that volume precedes price. When strong hands quietly accumulate a position, OBV can climb even while price merely drifts sideways; when they distribute, OBV bleeds lower under a flat tape. A price breakout that is not accompanied by a matching surge in OBV is often a false break — the kind that traps momentum traders and reverses. So rather than acting on every channel break, this strategy demands that raw price structure and cumulative volume flow agree on the same freshly closed bar before it signals an entry.
As a learning tool, the Accumulation Confirmed Breakout is well suited to traders who want to study how a volume confirmation filter changes the behavior of a simple breakout system. It is designed for trending market conditions — where decisive structural breaks tend to follow through — and it is best understood as a case study in combining a price-based signal with a volume-based confirmation, not as a shortcut to any particular outcome. Treat it as a framework for understanding conviction in breakouts rather than a finished trading product.
How It Works
The strategy processes one signal per newly closed bar on a single timeframe. On each closed bar it updates its cumulative OBV line, measures recent volatility with the Average True Range (ATR) — a standard gauge of how far price typically moves per bar — and then checks whether the two independent conditions line up.
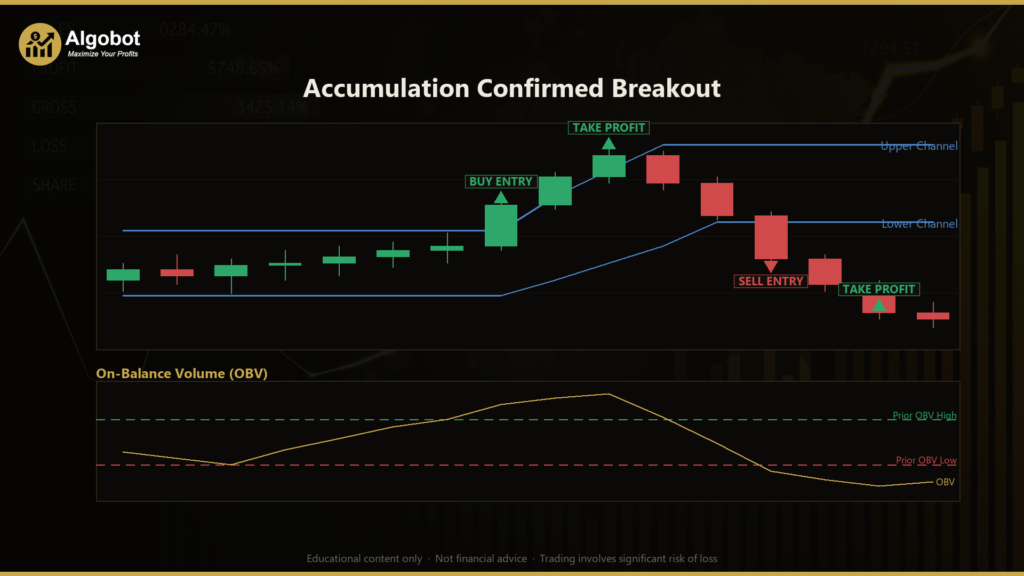
Long entry — the strategy signals a buy when both of the following are true on the just-closed bar:
- The bar's close breaks above the highest high of the prior
Channelbars by at leastBreakoutBuffer× ATR. This buffer requires a decisive break rather than a marginal poke past the boundary, filtering out weak fakeouts. - OBV simultaneously prints a new high versus the prior
ObvLookbackbars — meaning accumulation is leading or confirming the upside break.
Short entry — the strategy signals a sell when both of the following are true:
- The bar's close breaks below the lowest low of the prior
Channelbars by at leastBreakoutBuffer× ATR. - OBV simultaneously prints a new low versus the prior
ObvLookbackbars — meaning distribution is confirming the downside break.
If price breaks the channel but OBV fails to make its own fresh extreme, the signal is rejected. That single volume requirement is what separates this from a plain price-channel breakout.
Stop-loss logic:
- For a long, the stop is placed
AtrStopMult× ATR below the entry price. For a short, it is placed the same distance above entry. Because the stop is scaled to ATR, it automatically widens in volatile conditions and tightens in quiet ones.
Take-profit logic:
- The target sits at
RewardRisk× the stop distance from entry. With the default reward-to-risk of 2.0, the take-profit is twice as far from entry as the stop, so a winning trade aims to cover the risk of two losing ones.
Trade management rules:
- Only one position per magic number is held at a time; the ATR stop and reward-to-risk target manage every exit, with no averaging in or pyramiding.
- New entries are skipped when the current spread exceeds
MaxSpreadPoints, avoiding trades during illiquid, high-cost conditions. - Every channel and OBV reading is taken from bars strictly prior to the signal bar, so no level ever "sees itself" — an important detail for avoiding look-ahead bias in a backtest.

Strategy Parameters
| Parameter | Default | Min | Max | Description |
|---|---|---|---|---|
| Channel | 20 | 5 | 80 | Lookback in bars for the price high/low channel whose break triggers an entry. |
| ObvLookback | 20 | 5 | 80 | Lookback in bars that OBV must exceed (long) or undercut (short) to confirm the break with a fresh OBV extreme. |
| AtrPeriod | 14 | 5 | 40 | ATR lookback used to size the breakout buffer, stop and target. |
| BreakoutBuffer | 0.25 | 0.00 | 2.00 | How far past the channel (in multiples of ATR) the close must clear, filtering marginal fakeouts. |
| AtrStopMult | 2.00 | 0.50 | 5.00 | Protective stop distance as a multiple of ATR beyond the entry. |
| RewardRisk | 2.00 | 0.50 | 6.00 | Take-profit distance as a multiple of the stop distance (reward-to-risk ratio). |
| MaxSpreadPoints | 60 | 5 | 300 | Skip new entries when the current spread (in points) is wider than this. |
| Lots | 0.10 | 0.01 | 1.00 | Order volume in lots. |
| Magic | 8123 | 0 | 9,999,999 | Magic number identifying this EA's positions. |

Recommended Chart Settings
The Accumulation Confirmed Breakout is designed as a single-timeframe system and is a natural fit for liquid instruments where tick volume is a reasonable proxy for real activity — a major forex pair, gold, or a stock index. The M15 to H4 timeframes are sensible starting points for study, since they are slow enough for structural breaks to carry meaning yet active enough to generate a workable number of signals.
Because both the breakout buffer and the risk targets are volatility-scaled through ATR, the strategy self-adjusts to whatever symbol and timeframe you place it on. That said, every instrument behaves differently, and results will vary considerably across different market conditions, sessions, and volatility regimes. Always test a given symbol and timeframe combination on historical data and a demo account before drawing any conclusions.
How to Install on MetaTrader 5
- Download the .ex5 file from the link below.
- Copy it to your MT5
MQL5\Expertsfolder. - Restart MetaTrader 5 or refresh the Navigator panel.
- Drag the EA onto a chart matching the recommended symbol and timeframe.
- Configure the input parameters and enable Algo Trading.
What to Consider Before Using This EA
Strengths of the approach. The defining feature here is the volume confirmation. By requiring OBV to make its own fresh extreme in the same direction as the price break, the strategy attempts to sidestep the single biggest weakness of naive channel systems: the false breakout on thinning or against-trend volume. The fully ATR-scaled risk model is another strength, since it keeps stop and target distances proportional to current volatility rather than fixed in pips. The logic is also transparent and easy to reason about, which makes it a good teaching example.
Known limitations. OBV is built from tick volume in the MetaTrader environment, not true traded volume, so its readings are an approximation of real order flow — the confirmation is only ever as good as that proxy. Like all breakout strategies, this one is vulnerable to choppy, range-bound markets, where price repeatedly pokes past a channel only to reverse; the buffer and volume filter reduce but do not eliminate these whipsaws. Because it waits for two conditions to align, the strategy is more selective and may sit out moves that a simpler breakout system would take — the trade-off for fewer false signals is fewer signals overall. Trend-following systems in general also tend to endure long stretches of small losses between larger winning trends, which can be psychologically demanding.
Where it may underperform. Expect the strategy to struggle in low-volatility consolidation, during news-driven spikes that gap through stops, and on illiquid instruments where tick volume poorly reflects genuine participation. It is neither a "set and forget" solution nor a guaranteed edge; it is one structured way to combine price and volume that you should evaluate critically.
Risk Management Tips
Sound risk management matters more than any single entry signal. Consider these general principles as you study the strategy:
- Risk only a small fraction per trade. Many educational sources suggest risking no more than 1–2% of account equity on any single position. Size your lots so that the ATR-based stop distance corresponds to that fraction, rather than trading a fixed lot blindly.
- Understand drawdown. Even a well-designed strategy will have losing streaks. Know the largest peak-to-trough decline you are willing to tolerate before you begin, and stop to reassess if you approach it.
- Start on a demo account. Run the EA on a demo or a small account first to observe how it behaves in live conditions, including spread, slippage, and how often the volume filter actually blocks trades.
- Test across conditions. Backtest and forward-test across trending, ranging, and volatile periods so you understand the strategy's character, not just its behavior in one favorable stretch.
- Never rely on a single tool. Treat the EA as one input within a broader plan that accounts for your capital, goals, and risk tolerance, and never trade with money you cannot afford to lose.
Risk Warning
Trading foreign exchange, CFDs, and other leveraged financial instruments involves substantial risk of loss and is not suitable for all investors. The strategies and tools discussed on this page are provided for educational purposes only and do not constitute financial advice, investment recommendations, or solicitation to trade. Always consult a qualified financial adviser before making trading decisions. Past backtest performance is not indicative of future results.
Downloads
- Expert Advisor: AccumulationConfirmedBreakout.ex5 (47 downloads)
- Source Code: AccumulationConfirmedBreakout.mq5 (48 downloads)
- Documentation: AccumulationConfirmedBreakout.pdf (61 downloads)