
Disclaimer: This article is for educational and informational purposes only. It does not constitute financial or investment advice. Trading forex and CFDs carries significant risk of loss. Past performance of any strategy — including backtests — does not guarantee future results. Never trade with money you cannot afford to lose.
What Is This Strategy?
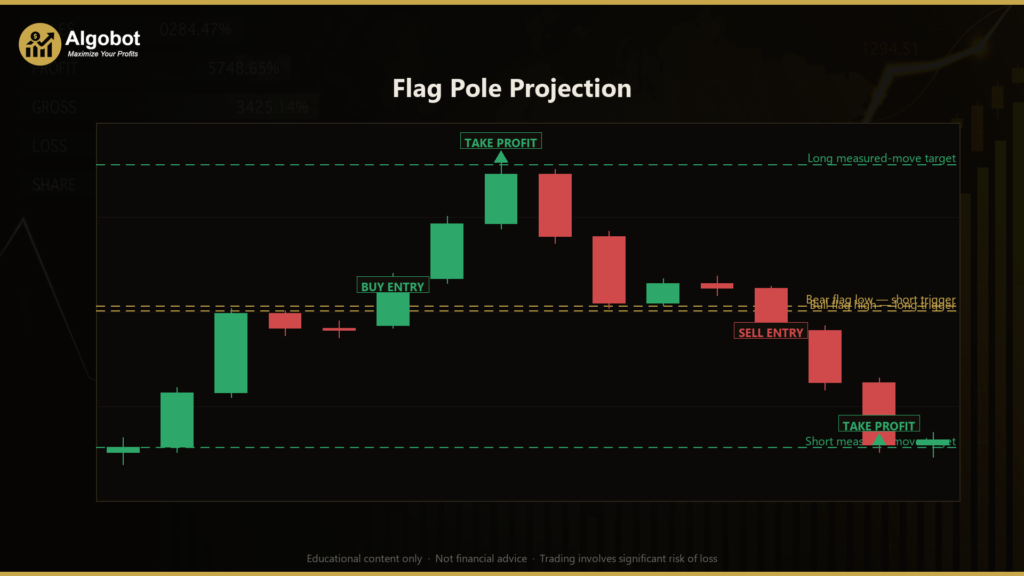
Flag Pole Projection is a pure price-action, trend-continuation strategy built around one of the most recognizable formations in technical analysis: the bull flag and bear flag. A flag pattern is a brief, tight consolidation that forms after a sharp directional move, and traders have studied it for decades as a sign that an existing trend may resume rather than reverse. What makes this Expert Advisor (EA) distinctive is that it uses no indicators at all — no moving averages, no RSI, no ATR, no channels. Every decision is made from raw candle geometry: the size, direction, and shape of recent bars.
The strategy is designed for trending instruments such as gold (XAU/USD) or GBP/USD on intraday timeframes like M15 and H1, though it will technically run on any liquid symbol. Its trading style is best described as a measured-move continuation breakout — it waits for a powerful impulse (the "pole"), then a shallow pause (the "flag"), and only acts when live price actually breaks out of that pause in the same direction as the original thrust.
As a learning tool, Flag Pole Projection is well suited to traders who want to understand how classic chart patterns can be expressed in objective, rule-based code. Because it relies entirely on geometry rather than lagging indicators, it is a clear example of how to translate a discretionary visual concept — "a flag on a chart" — into precise, testable conditions. This article frames the EA as a strategy analysis for study, not as a profit opportunity.
How It Works
The strategy re-evaluates the chart once per newly-closed bar and looks for a two-part structure: an impulsive pole followed by a tight flag. It only acts when a position is not already open and the live spread is within an acceptable limit.
- Baseline measurement: First, the strategy measures the average bar range over a quiet stretch of candles (the
BaselineLookbackwindow) that preceded the move. This becomes the yardstick for what counts as "impulsive." - Pole detection: Over the next block of candles (
PoleBars), the net open-to-close travel must be at leastPoleFactortimes that baseline average range. The move must also be directionally dominant — its net travel has to cover at leastPoleDominanceof the pole's full high-to-low range — so that choppy, back-and-forth bars are filtered out and only clean thrusts qualify. - Flag detection: The most recent block of candles (
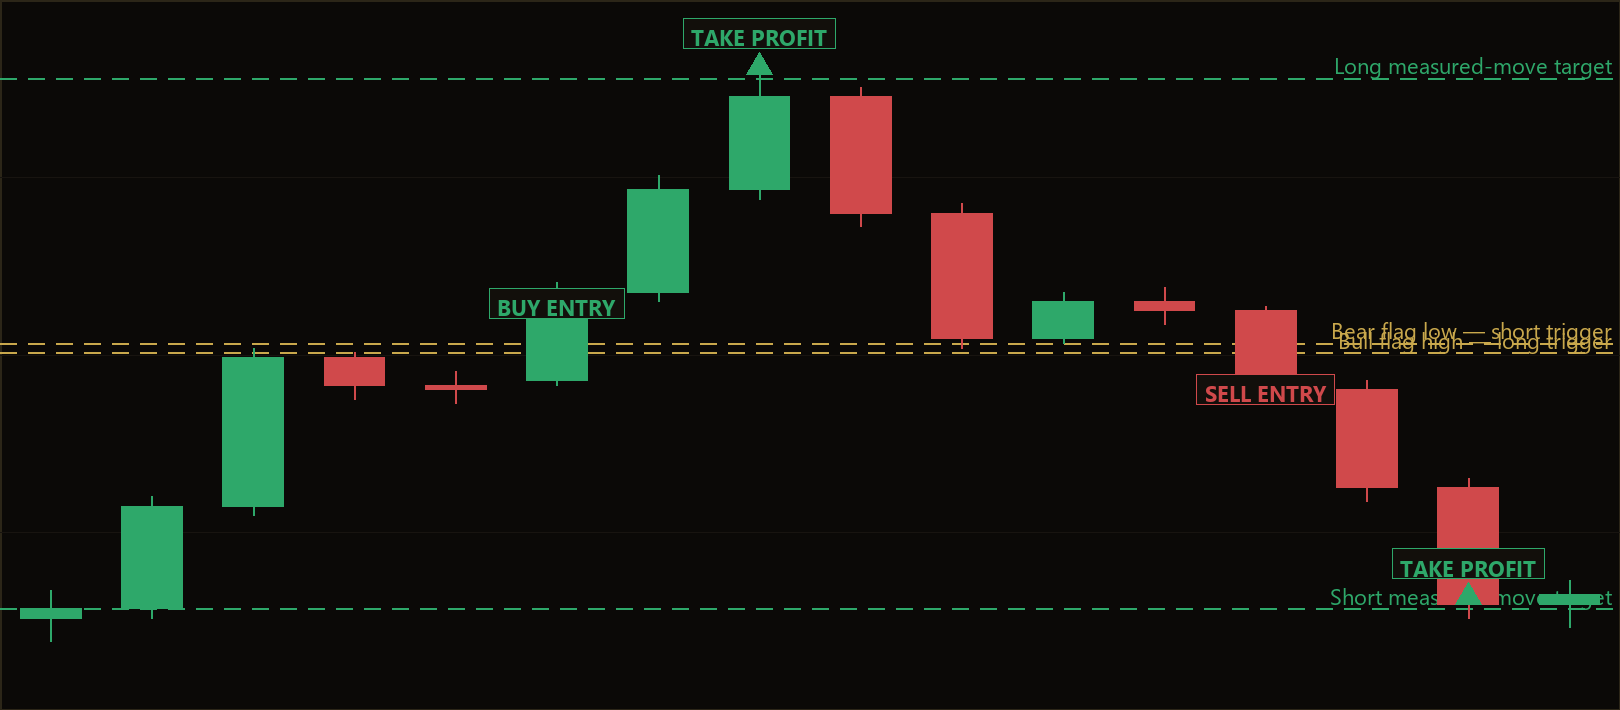
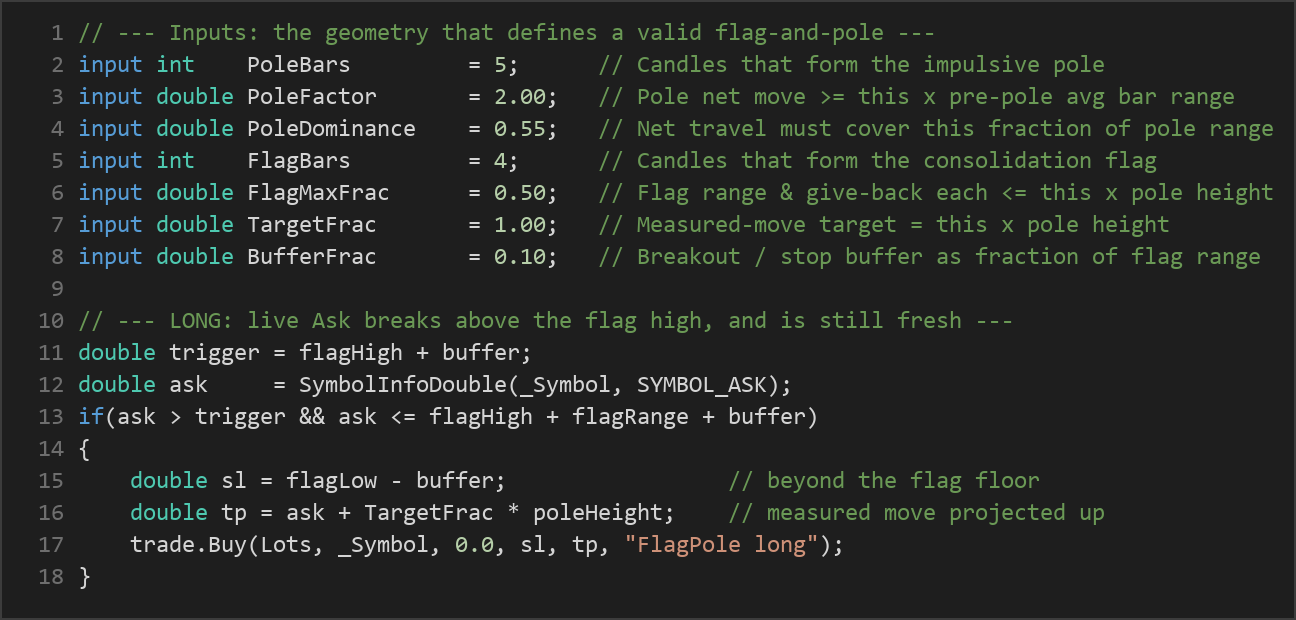
FlagBars) must form a tight, shallow pause. The flag's entire high-low range must be no larger thanFlagMaxFracof the pole's height, and the give-back from the pole's extreme must also stay withinFlagMaxFracof the pole height. This ensures the consolidation hugs the top of an up-move (or the bottom of a down-move) rather than retracing deeply, which would suggest a reversal. - Long entry signal (bull flag): When the pole points up and a tight flag holds near its top, the strategy signals a buy only when the live Ask price breaks above the flag high plus a small buffer. Crucially, the break must still be fresh — if price has already extended a full flag-range beyond the breakout level, the trade is skipped to avoid chasing.
- Short entry signal (bear flag): This is the exact mirror image. When the pole points down and the flag holds near its bottom, the strategy signals a sell when the live Bid breaks below the flag low minus the buffer, again only while the break is fresh.
- Stop-loss logic: Risk is placed on the far side of the flag — below the flag low (plus buffer) for longs, above the flag high for shorts. This is the level where the continuation thesis is considered to have failed.
- Take-profit logic: The target is the classic measured move — the pole's height, multiplied by
TargetFrac, projected from the entry price. For a long, that is entry plus the pole height; for a short, entry minus the pole height. - Trade management: Only one position per magic number is allowed at a time. Once a trade is open, the strategy lets the structural stop-loss or the measured-move target close it rather than adding new entries.
Strategy Parameters
| Parameter | Default | Min | Max | Description |
|---|---|---|---|---|
| PoleBars | 5 | 3 | 12 | Number of candles that form the impulsive pole. |
| PoleFactor | 2.00 | 1.20 | 5.00 | Pole's net move must be at least this multiple of the pre-pole average bar range. |
| PoleDominance | 0.55 | 0.30 | 0.90 | Fraction of the pole's high-low range that its net directional travel must cover (filters chop). |
| FlagBars | 4 | 2 | 10 | Number of candles that form the consolidation flag. |
| FlagMaxFrac | 0.50 | 0.20 | 1.00 | Flag range and give-back from the pole extreme must each stay within this fraction of pole height. |
| BaselineLookback | 20 | 10 | 50 | Quiet stretch of bars before the pole used to calculate the average-range baseline. |
| TargetFrac | 1.00 | 0.30 | 2.00 | Measured-move target as a multiple of pole height, projected from entry. |
| BufferFrac | 0.10 | 0.00 | 0.50 | Breakout and stop buffer expressed as a fraction of the flag range. |
| MaxSpreadPoints | 30 | 1 | 200 | Skip the trade if the live spread (in points) is wider than this. |
| Lots | 0.10 | 0.01 | 1.00 | Order volume (fixed lot size). |
| Magic | 7411 | 0 | 9,999,999 | Magic number used to identify and manage this EA's trades. |
Recommended Chart Settings
Flag Pole Projection was designed with trending instruments in mind — particularly XAU/USD (gold) and GBP/USD — on the M15 or H1 timeframe. These markets tend to produce the clean, impulsive thrusts followed by tight pauses that the strategy is built to detect. That said, the EA will run on any liquid symbol and whatever single primary timeframe you select at backtest time.
Keep in mind that pattern behavior, volatility, and spread characteristics differ from one symbol and session to another. Results will vary considerably across different market conditions, and a setting that looks reasonable on one instrument may behave very differently on another. Always test on the exact symbol and timeframe you intend to study before drawing any conclusions.
How to Install on MetaTrader 5
- Download the
FlagPoleProjection.ex5file from the link below. - Copy it to your MT5
MQL5\Expertsfolder. - Restart MetaTrader 5 or refresh the Navigator panel.
- Drag the EA onto a chart matching the recommended symbol and timeframe.
- Configure the input parameters and enable Algo Trading.
What to Consider Before Using This EA
The main strength of this approach is its clarity and objectivity. By translating the well-known flag pattern into measurable geometric rules, the strategy removes much of the subjectivity that plagues discretionary pattern trading. The "fresh break" filter is a thoughtful touch — it prevents the EA from entering long after a move has already played out, which historically is one of the most common ways breakout traders give back gains. The structural stop and measured-move target also give every trade a defined, logical risk-to-reward framework.
There are real limitations to be aware of, however. Flag patterns are a trend-continuation concept, so the strategy is at its most vulnerable in choppy, sideways, or range-bound markets where impulsive poles fail to follow through. Breakouts can be prone to false breaks — price pokes past the flag, triggers an entry, then reverses. Because entries are taken at the live Ask or Bid, the strategy also pays the spread on every breakout, which is why the spread gate matters and why high-spread symbols or volatile news periods can erode the edge. Finally, the measured-move target assumes the pole's height projects forward cleanly; in practice, price may stall well short of, or run far beyond, that level. This EA is best understood as a structured way to study flag breakouts, not as a complete or guaranteed system.
Risk Management Tips
Sound risk management matters far more than any single entry rule. Consider these general principles as you study the strategy:
- Risk a small, fixed percentage per trade. Many educators suggest never risking more than 1–2% of account equity on any single position, so that a string of losses does not threaten the account.
- Size positions to your stop, not the other way around. Because this strategy places a structural stop on the far side of the flag, the distance to that stop will vary trade to trade. Adjust your lot size so the dollar risk stays consistent.
- Always start on a demo account. Test the EA in a risk-free simulated environment until you fully understand how it behaves across different conditions before considering any live capital.
- Understand drawdown. Even a well-built strategy will experience losing streaks. Know the maximum drawdown you are willing to tolerate and how it would feel in real time.
- Account for spread and slippage. Breakout entries are sensitive to execution costs, so factor realistic spreads into any evaluation rather than assuming perfect fills.
Risk Warning
Trading foreign exchange, CFDs, and other leveraged financial instruments involves substantial risk of loss and is not suitable for all investors. The strategies and tools discussed on this page are provided for educational purposes only and do not constitute financial advice, investment recommendations, or solicitation to trade. Always consult a qualified financial adviser before making trading decisions. Past backtest performance is not indicative of future results.
Downloads
- Expert Advisor: FlagPoleProjection.ex5 (0 downloads)
- Source Code: FlagPoleProjection.mq5 (0 downloads)
- Documentation: FlagPoleProjection.pdf (0 downloads)