
Disclaimer: This article is for educational and informational purposes only. It does not constitute financial or investment advice. Trading forex and CFDs carries significant risk of loss. Past performance of any strategy — including backtests — does not guarantee future results. Never trade with money you cannot afford to lose.
What Is This Strategy?
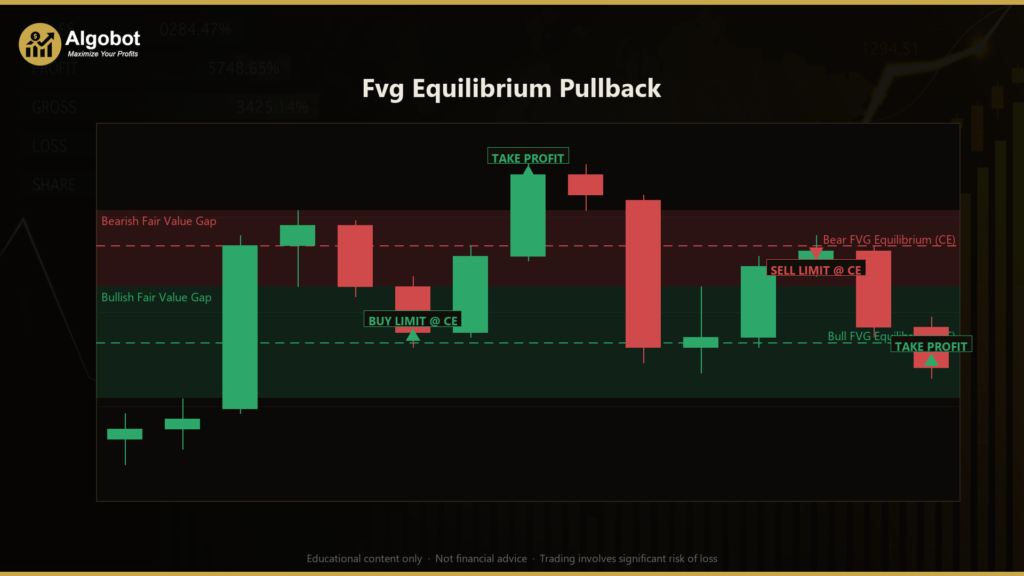
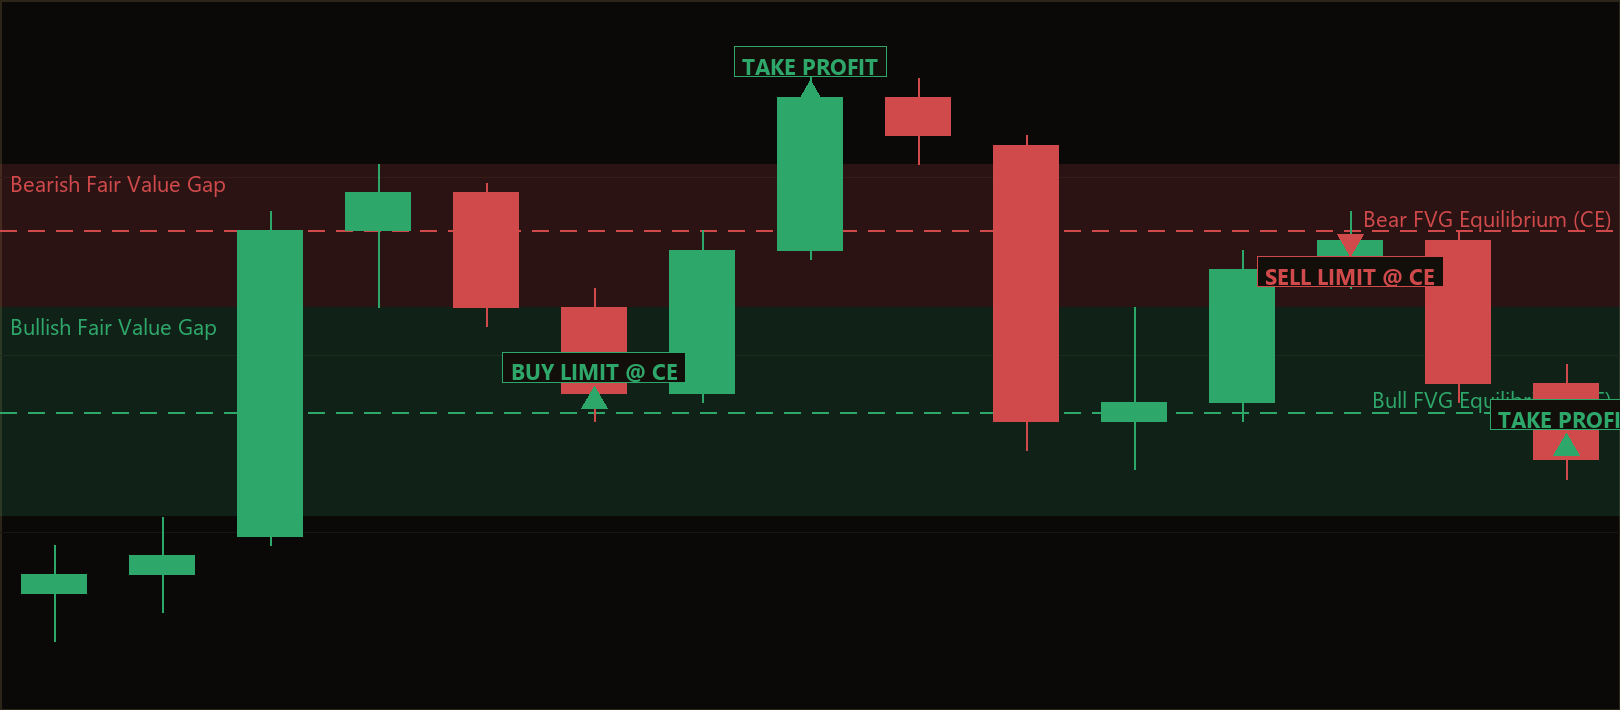
The Fvg Equilibrium Pullback is a pure price-action strategy built around the fair-value gap (FVG) — a three-candle pattern that marks an "imbalance" left behind by a fast, one-sided move. It uses no traditional indicators at all: no moving averages, no RSI, no ATR, no oscillators. Every decision is measured directly from raw candle geometry, which makes it a clean case study in how structural, mechanical price-action logic can be expressed in code.
A fair-value gap forms when a strong middle candle (the "displacement" candle) travels so quickly that the wick of the candle before it and the wick of the candle after it never overlap. That non-overlapping zone is a slice of price that was never properly traded — an imbalance. The midpoint of that gap is its equilibrium, known in ICT terminology as the "consequent encroachment" or the 50% line. Price frequently retraces back toward this equilibrium before the original move resumes. Rather than chasing the breakout, the Fvg Equilibrium Pullback rests a passive limit order at exactly that midline and waits for price to come to it.
As a learning tool, this strategy suits traders who want to understand continuation trading and imbalance-based entries on liquid, trend-prone instruments such as EUR/USD, XAU/USD, or major indices on the M15 to H1 timeframes. It is designed for trending or impulsive market conditions, where displacement candles and clean gaps appear most often. Treat it as a framework for studying how fair-value gaps behave — not as a shortcut to results.
How It Works
The strategy only ever manages one setup at a time and acts once per newly closed bar on the chart timeframe. Here is the logic in plain English:
- Volatility scaling first. The strategy averages the candle range (high minus low) over a lookback window of recent closed bars. This average becomes the yardstick that scales every threshold, so the system adapts to whatever symbol or timeframe it runs on without needing a fixed point size.
- The strategy scans the just-closed three-candle trio for a fresh fair-value gap, looking at the oldest candle, the middle displacement candle, and the newest candle.
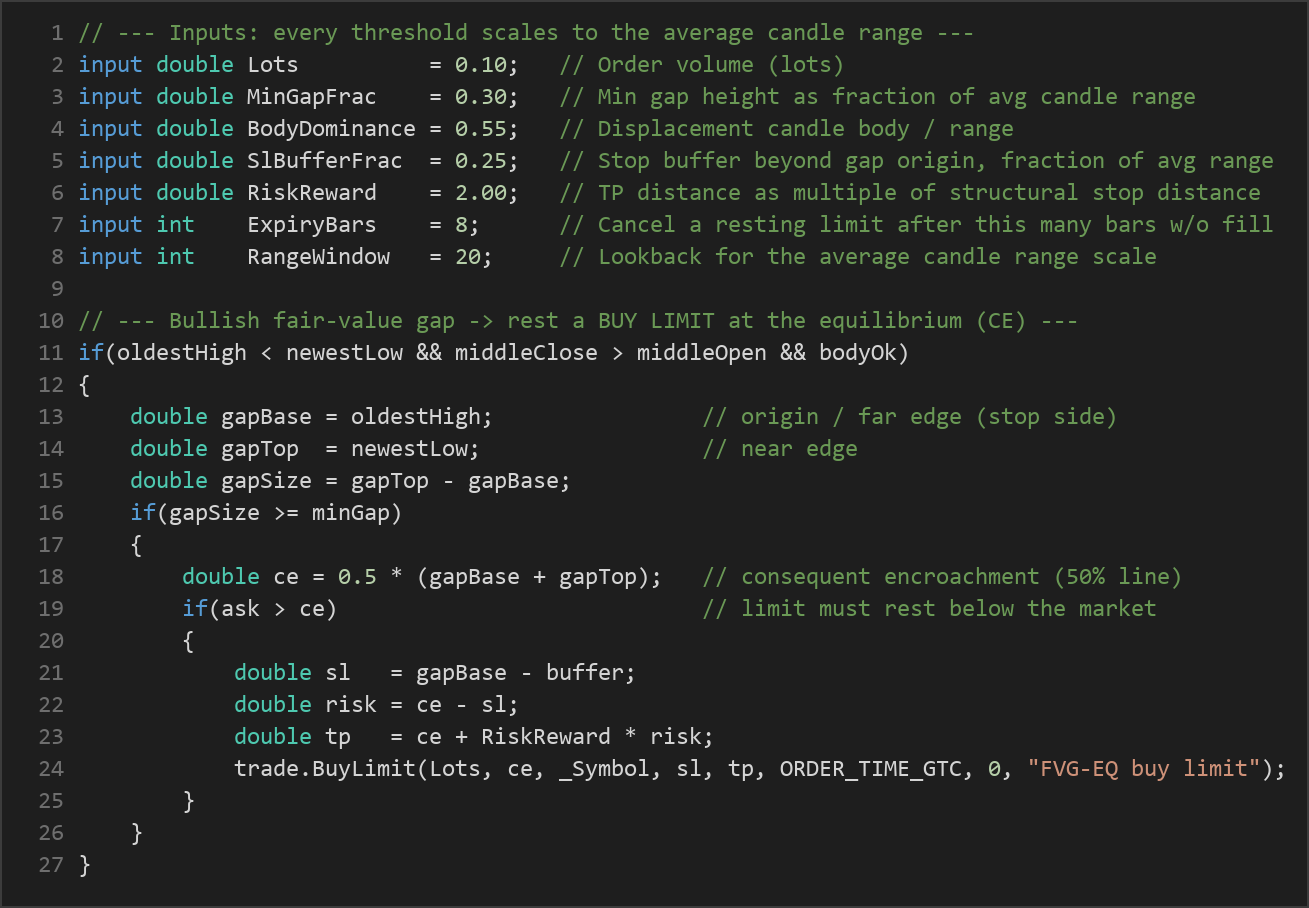
- A bullish gap is signalled when: the high of the oldest candle is below the low of the newest candle (an upward imbalance), the middle candle is bullish (closes above its open), and the middle candle's body is "dominant" — its body makes up at least a set fraction of its full range, confirming a real thrust rather than an indecisive candle.
- The gap must be wide enough to matter — its height has to clear the minimum gap fraction of the average candle range. Tiny gaps are ignored as noise.
- Entry (bullish): the strategy rests a buy limit at the gap's equilibrium (the 50% midline). Because a buy limit must sit below the current market, the strategy also checks that price has not already traded back into the gap.
- Stop-loss (bullish): placed a buffer below the gap's origin edge (the oldest candle's high). If price breaks beyond the gap base, the imbalance is considered invalidated and the trade is closed for a small, structural loss.
- Take-profit (bullish): placed at a fixed reward multiple of that structural stop distance, above the entry. This keeps every trade on a defined risk-to-reward footing.
- A bearish gap is the exact mirror: the low of the oldest candle is above the high of the newest candle (a downward imbalance), the middle candle is bearish and body-dominant, and the strategy rests a sell limit at the equilibrium with the stop a buffer above the gap base.
- Order ageing. If price never returns to the equilibrium, the resting limit is cancelled after a set number of bars so stale setups do not linger.
- Position handling. Once a limit fills and a position is live, any leftover pending order is pulled, and the stop-loss and take-profit manage the exit. The strategy never stacks a second order on top of a live one.
Strategy Parameters
| Parameter | Default | Min | Max | Description |
|---|---|---|---|---|
| Lots | 0.10 | 0.01 | 1.00 | Order volume in lots for each trade. |
| MinGapFrac | 0.30 | 0.05 | 1.50 | Minimum gap height as a fraction of the average candle range — filters out insignificant imbalances. |
| BodyDominance | 0.55 | 0.30 | 0.90 | Required ratio of the displacement candle's body to its full range — how one-sided the thrust must be. |
| SlBufferFrac | 0.25 | 0.00 | 1.00 | Stop buffer beyond the gap's origin edge, expressed as a fraction of the average range. |
| RiskReward | 2.00 | 1.00 | 5.00 | Take-profit distance as a multiple of the structural stop distance. |
| ExpiryBars | 8 | 2 | 40 | Number of bars to wait before cancelling a resting equilibrium limit that has not filled. |
| RangeWindow | 20 | 8 | 60 | Lookback length for the average candle range that scales every threshold. |
| Magic | 8841 | 0 | 9,999,999 | Unique identifier so the EA only manages its own orders and positions. |
Recommended Chart Settings
The Fvg Equilibrium Pullback was designed for liquid, trend-prone instruments — EUR/USD, XAU/USD (gold), and major stock indices are natural fits — on the M15 to H1 timeframes, where displacement candles and clean fair-value gaps occur frequently enough to study. Because every threshold is scaled to the average candle range rather than a fixed pip value, the logic can technically run on other symbols and timeframes. Keep in mind that behaviour will vary significantly across different instruments and market conditions, and any settings that look good on one symbol may behave very differently on another.
How to Install on MetaTrader 5
- Download the .ex5 file from the link below
- Copy it to your MT5
MQL5\Expertsfolder - Restart MetaTrader 5 or refresh the Navigator panel
- Drag the EA onto a chart matching the recommended symbol and timeframe
- Configure the input parameters and enable Algo Trading
What to Consider Before Using This EA
The appeal of an equilibrium-pullback approach is its structure and discipline. Entries are defined mechanically, every trade carries a logical stop just beyond an invalidated gap, and the fixed risk-to-reward framing means the strategy never improvises an exit. Because it rests a passive limit rather than chasing momentum, fills happen at a precise, pre-planned price — which can make outcomes easier to study and review afterward.
The limitations are just as important to understand. Fair-value gaps assume that price respects imbalances, but markets do not always retrace cleanly — sometimes price runs straight through the equilibrium without pausing, and sometimes it fills the gap and keeps going against the trade. In choppy, range-bound, or low-volatility conditions, fewer qualifying gaps appear, and those that do may produce false continuations. The body-dominance and minimum-gap filters reduce noise but cannot eliminate it. The strategy also trades only one setup at a time, so it may sit idle through stretches where no clean imbalance forms. As with any single-pattern system, historically the FVG concept has worked best as one tool among several, not as a standalone guarantee of edge.
Risk Management Tips
Sound risk management matters more than any single entry rule. Consider these general principles as you study the strategy:
- Risk only a small fraction per trade. A common guideline is risking no more than 1–2% of account equity on any single position, so a string of losses cannot do disproportionate damage.
- Size positions to your stop, not the other way around. Let the structural stop distance determine your lot size rather than forcing a fixed lot onto every setup.
- Test on a demo account first. Run the EA in a demo or strategy-tester environment long enough to understand how often it trades and how it behaves in different market regimes before risking real capital.
- Understand drawdown. Every strategy experiences losing streaks. Know the maximum drawdown you are emotionally and financially prepared to tolerate, and stop if you reach it.
- Avoid over-optimization. Tuning parameters until a backtest looks flawless often produces a curve-fit that fails on live data. Favour robust, sensible settings over perfect-looking ones.
Risk Warning
Trading foreign exchange, CFDs, and other leveraged financial instruments involves substantial risk of loss and is not suitable for all investors. The strategies and tools discussed on this page are provided for educational purposes only and do not constitute financial advice, investment recommendations, or solicitation to trade. Always consult a qualified financial adviser before making trading decisions. Past backtest performance is not indicative of future results.
Downloads
- Expert Advisor: FvgEquilibriumPullback.ex5 (0 downloads)
- Source Code: FvgEquilibriumPullback.mq5 (0 downloads)
- Documentation: FvgEquilibriumPullback.pdf (0 downloads)