
Disclaimer: This article is for educational and informational purposes only. It does not constitute financial or investment advice. Trading forex and CFDs carries significant risk of loss. Past performance of any strategy — including backtests — does not guarantee future results. Never trade with money you cannot afford to lose.
What Is This Strategy?
The Power Candle Scalper is a pure price-action momentum scalping strategy for MetaTrader 5 that uses no technical indicators at all — no moving averages, no RSI, no ATR. Instead of relying on a calculated indicator, it reads the raw shape and sequence of candlesticks directly off the chart. Scalping is a short-term style that aims to capture small, fast moves, and this strategy is designed for the 1-minute (M1) timeframe on tight-spread, fast-moving instruments such as EUR/USD.
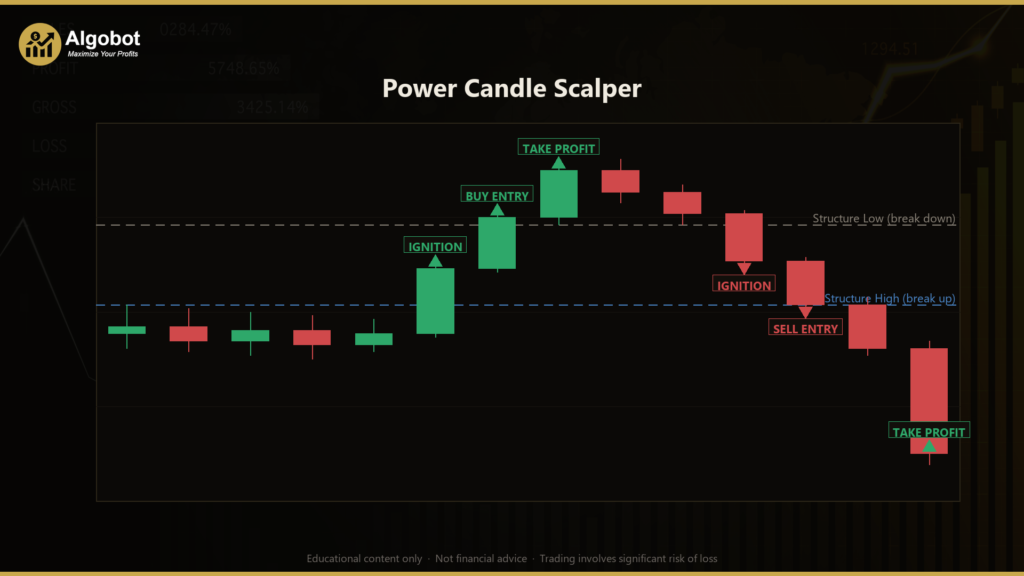
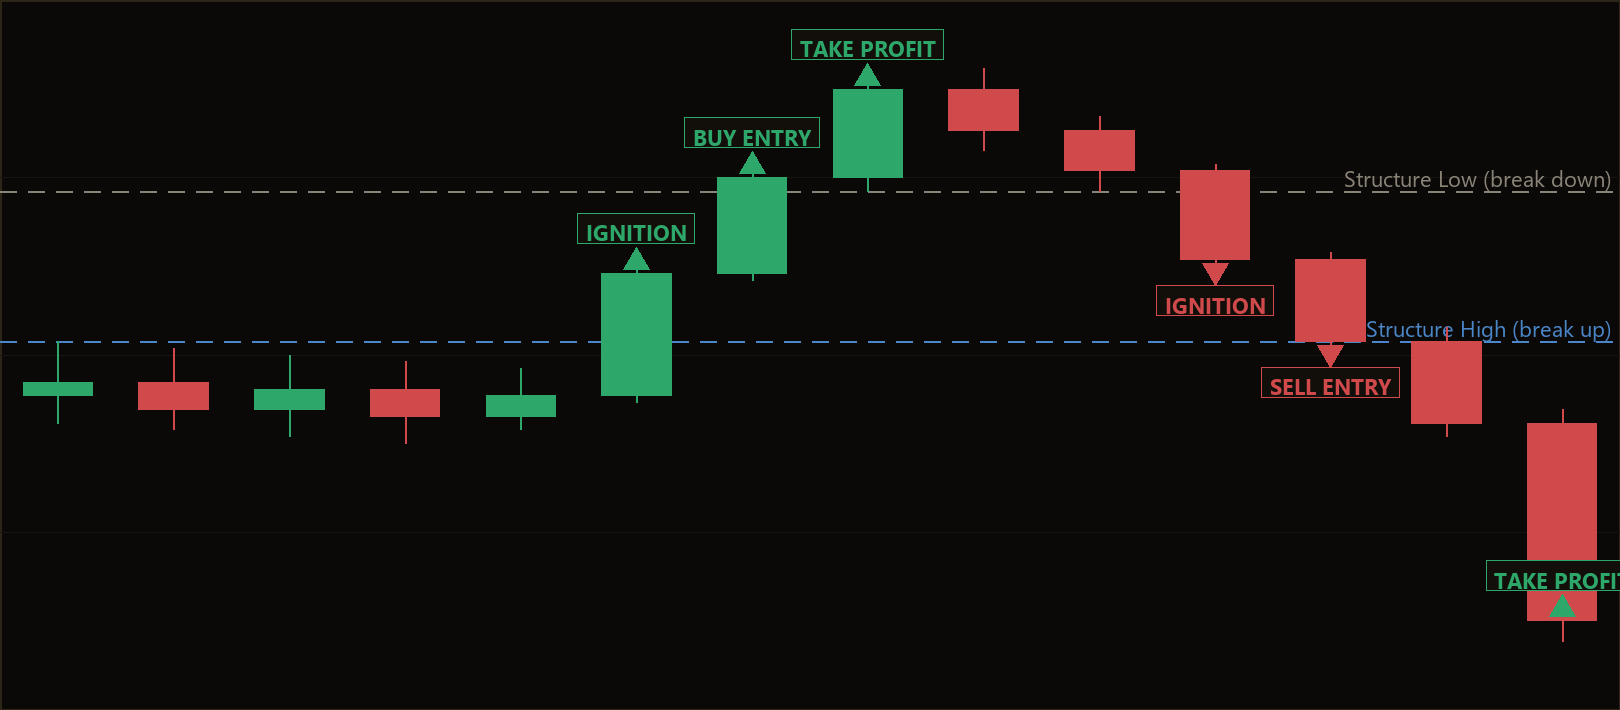
The core idea is what the author calls a two-bar "power sequence." A single candle on the 1-minute chart is noisy and often misleading, so the strategy refuses to act on one bar alone. Instead it waits for two back-to-back candles that both show strong conviction in the same direction — an "ignition" candle that breaks recent structure, followed by a "confirmation" candle that accelerates further. The logic is that genuine, one-sided order flow tends to show itself across more than a single bar, while random pokes usually fade after one candle.
As a learning tool, the Power Candle Scalper is well suited to traders who want to understand breakout continuation and momentum concepts without the abstraction of indicators. Because every rule is expressed in terms of candle bodies, closes, and prior highs and lows, you can study exactly why each trade was or wasn't taken. This article frames the strategy as an analysis of a trading concept, not as a profit opportunity — the goal is to help you understand how the mechanics work and where they may struggle.
How It Works
The strategy evaluates the chart once per freshly closed candle and looks at two specific completed candles: the ignition candle (the older of the two) and the confirmation candle (the most recently closed). It also scans a window of bars before the ignition candle to define recent structure.
Here is what the strategy signals on each closed bar:
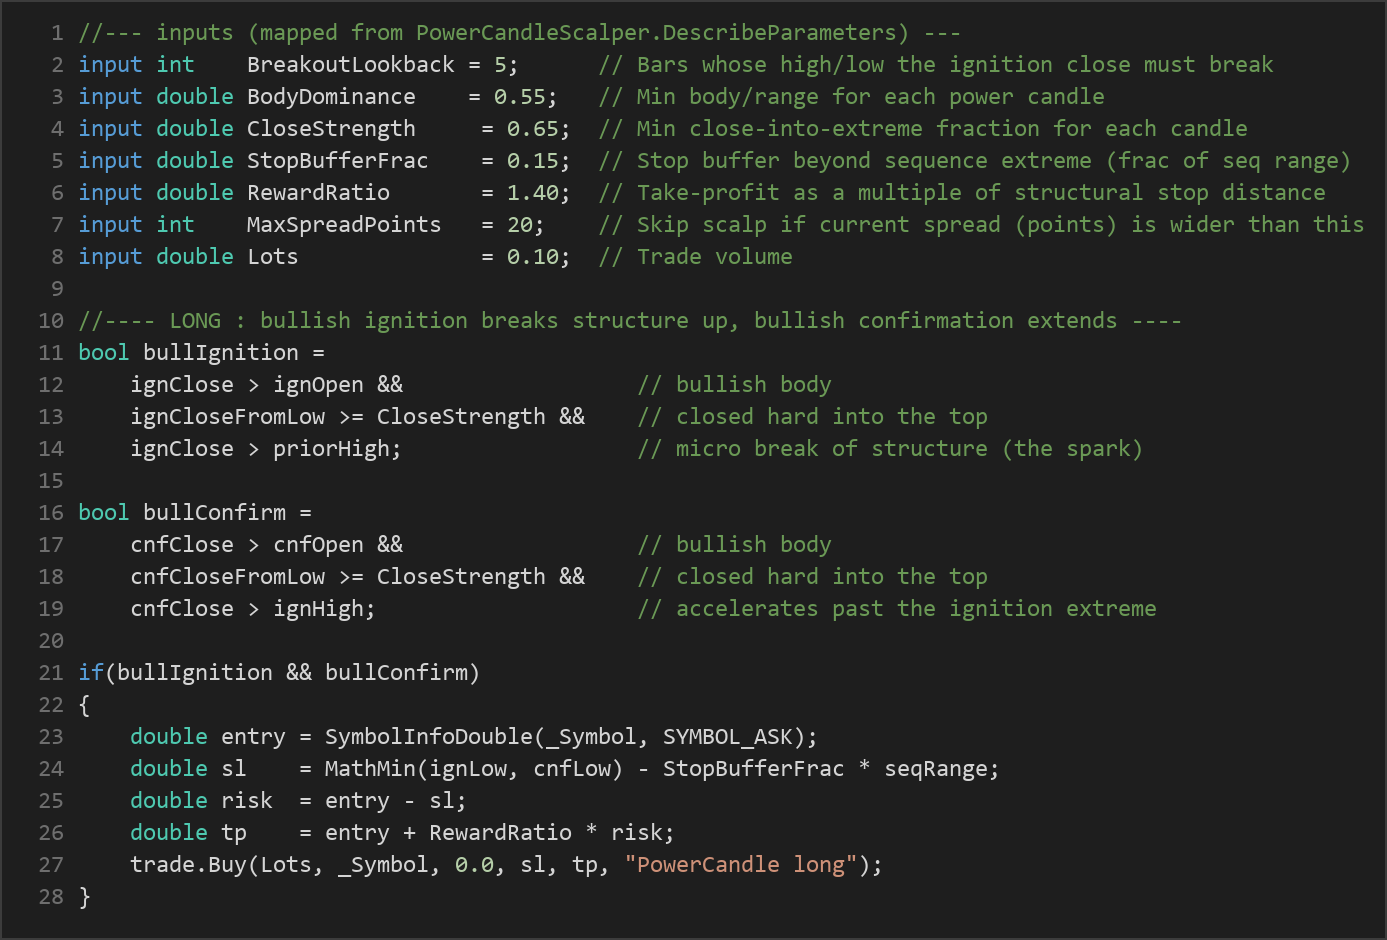
- Decisive candles only. Both the ignition and confirmation candles must be body-dominant — the candle's body (open-to-close distance) must be at least the
BodyDominancefraction of its full high-to-low range. This rejects choppy, wick-heavy "indecision" candles. - Strong closes. Each candle must also close hard into its own extreme. For a long setup, the close must sit within the top
CloseStrengthfraction of the candle's range (closed near the high); for a short, near the low. A candle that closes in the middle of its range does not qualify. - Ignition = micro break of structure. For a long, the ignition candle's close must be above the highest high of the prior
BreakoutLookbackbars — a clean break of recent structure, the "spark." For a short, its close must be below the prior lowest low. - Confirmation = acceleration. The very next candle must point the same way and extend past the ignition candle's extreme. For a long, the confirmation close must be above the ignition candle's high; for a short, below the ignition candle's low. Two power candles in a row, each closing at its tip, with the second pushing through the first, is what the strategy treats as sustained momentum.
- Spread gate. Before any trade, the strategy checks the current spread. If it is wider than
MaxSpreadPoints, the signal is skipped — important on M1, where transaction costs matter relative to the small targets. - One position at a time. Only a single open position per symbol and magic number is allowed; the strategy waits for the existing trade to close before looking for the next setup.
Entry: When both the ignition and confirmation conditions are met, the strategy enters at the close of the confirmation candle — buying at the Ask for longs, selling at the Bid for shorts.
Stop-loss (structural and self-scaling): The stop is placed just beyond the opposite extreme of the two-candle sequence — below the lower of the two lows for a long, above the higher of the two highs for a short — buffered by the StopBufferFrac fraction of the sequence's total range. Because the buffer scales with the size of the move, there is no per-symbol point math to tune.
Take-profit: The target is set at a fixed multiple of the stop distance, defined by RewardRatio. With the default of 1.40, the take-profit sits 1.4 times the structural risk away from entry. Each trade therefore carries a defined, capped risk and a proportional reward, and the position exits when either the stop or the target is reached.
Strategy Parameters
| Parameter | Default | Min | Max | Description |
|---|---|---|---|---|
| BreakoutLookback | 5 | 2 | 25 | Number of bars before the ignition candle whose high/low its close must break to count as a micro break of structure. |
| BodyDominance | 0.55 | 0.30 | 0.85 | Minimum fraction of each candle's range that its body must occupy, ensuring only decisive candles qualify. |
| CloseStrength | 0.65 | 0.50 | 0.95 | Minimum fraction into the candle's extreme that the close must reach (near the high for longs, near the low for shorts). |
| StopBufferFrac | 0.15 | 0.00 | 1.00 | Extra stop buffer beyond the sequence's opposite extreme, expressed as a fraction of the two-candle sequence range. |
| RewardRatio | 1.40 | 0.60 | 4.00 | Take-profit distance as a multiple of the structural stop distance (the reward-to-risk ratio). |
| MaxSpreadPoints | 20 | 1 | 200 | Maximum allowed spread (in points) at entry; wider spreads cause the signal to be skipped. |
| Lots | 0.10 | 0.01 | 1.00 | Fixed trade volume in lots. |
| Magic | 5108 | 0 | 9,999,999 | Magic number used to identify and manage this EA's positions. |
Recommended Chart Settings
The Power Candle Scalper was built for a tight-spread, fast-moving symbol such as EUR/USD on the M1 (1-minute) timeframe. The two-candle power sequence and the spread gate are both tuned to the kind of brief, sharp momentum bursts that appear on lower timeframes in liquid markets.
That said, the rules are generic enough to run on any liquid symbol or timeframe you select for testing. Keep in mind that behavior will vary considerably across instruments and market conditions — spread costs, volatility, and the frequency of clean structure breaks all differ from one symbol to the next. Always test on the exact symbol, timeframe, and broker conditions you intend to use.
How to Install on MetaTrader 5
- Download the
PowerCandleScalper.ex5file from the link below - Copy it to your MT5
MQL5\Expertsfolder - Restart MetaTrader 5 or refresh the Navigator panel
- Drag the EA onto a chart matching the recommended symbol and timeframe
- Configure the input parameters and enable Algo Trading
What to Consider Before Using This EA
Strengths of the approach. Requiring two consecutive power candles is a sensible way to filter out the random single-bar spikes that dominate M1 noise. The structural, self-scaling stop adapts to the size of the move that created the signal, so risk is defined by the market rather than by a fixed point value. The spread gate is a thoughtful touch for a scalping system, where costs can easily erode small targets.
Known limitations. Breakout continuation strategies historically perform best in trending or impulsive conditions and tend to struggle in tight, range-bound, or choppy markets — exactly the environment where a "break" is often a fake-out that reverses. On the 1-minute chart, that whipsaw risk is amplified. Because the strategy demands two strong, aligned candles plus a structure break, valid signals may be relatively infrequent, and the strict close-strength and body-dominance filters can cause it to miss moves that develop more gradually.
Where it may underperform. During low-volatility sessions, news-driven gaps, or periods of erratic spread widening, the edge the strategy relies on may not be present. Entering at the close of an already-extended second candle can also mean buying near a short-term exhaustion point if momentum stalls. None of these are reasons to dismiss the concept — they are simply conditions every momentum trader must understand and account for.
Risk Management Tips
Good risk management matters far more than any single entry signal. As general educational principles:
- Risk a small, fixed fraction per trade. Many educators suggest risking no more than 1–2% of account equity on any single position. Choose a
Lotsvalue consistent with that, given the structural stop distance this strategy produces. - Test on a demo account first. Run the EA on a demo for an extended period to understand how often it trades, how it behaves across sessions, and how it copes with your broker's spreads before committing real capital.
- Understand drawdown. Even a sound strategy goes through losing streaks. Know the maximum drawdown you can tolerate emotionally and financially, and size positions so a string of losses does not threaten your account.
- Account for costs. On M1 scalping, spread and commission can be a large share of each small target. Factor realistic costs into any evaluation.
- Don't over-optimize. Tuning parameters until a backtest looks ideal often produces curve-fitting that fails on live data. Favor robust settings that work across a range of conditions.
Risk Warning
Trading foreign exchange, CFDs, and other leveraged financial instruments involves substantial risk of loss and is not suitable for all investors. The strategies and tools discussed on this page are provided for educational purposes only and do not constitute financial advice, investment recommendations, or solicitation to trade. Always consult a qualified financial adviser before making trading decisions. Past backtest performance is not indicative of future results.
Downloads
- Expert Advisor: PowerCandleScalper.ex5 (0 downloads)
- Source Code: PowerCandleScalper.mq5 (0 downloads)
- Documentation: PowerCandleScalper.pdf (0 downloads)