
Disclaimer: This article is for educational and informational purposes only. It does not constitute financial or investment advice. Trading forex and CFDs carries significant risk of loss. Past performance of any strategy — including backtests — does not guarantee future results. Never trade with money you cannot afford to lose.
What Is This Strategy?
The Hikkake Trap Reversal is a pure price-action / candlestick-pattern strategy that trades the classic Hikkake pattern — an inside-bar false-breakout trap — without using a single indicator. There is no moving average, no RSI, no ATR, and no oscillator anywhere in its logic. Instead, it reads raw bar structure (the open, high, low, and close of recently closed candles) to detect the moment a breakout fails and reverses. "Hikkake" is a Japanese term meaning "to trap" or "to trick," and that is exactly the behaviour this approach is built around.
The thesis behind the strategy is behavioural, not mathematical. When price coils into a tight inside bar — a candle whose range sits entirely within the previous candle — breakout traders watch the edges of that coil for a move. When price pokes the "wrong" way out of the coil, those traders pile into what looks like a clean breakout, only for price to snap back the other direction. Their forced exits (stop-loss orders triggering) then fuel a genuine move in the opposite direction. The Hikkake Trap Reversal aims to be positioned for that snap-back rather than the fake-out that traps everyone else.
As a learning tool, this strategy is well suited to traders who want to study market structure, false breakouts, and momentum confirmation without the noise of lagging indicators. It is designed for whippy, stop-hunt-prone instruments — think GBPJPY or XAUUSD (gold) on intraday timeframes — where coils and false breakouts are common and the reversal is fast. It is best viewed as a structured way to understand trap-and-reverse behaviour, not as a guaranteed path to any particular outcome.
How It Works
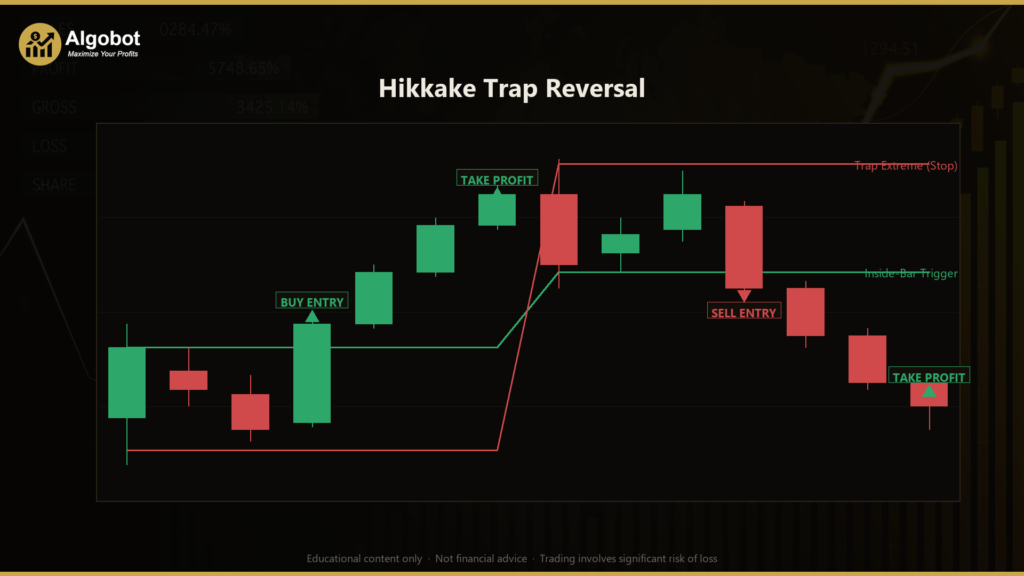
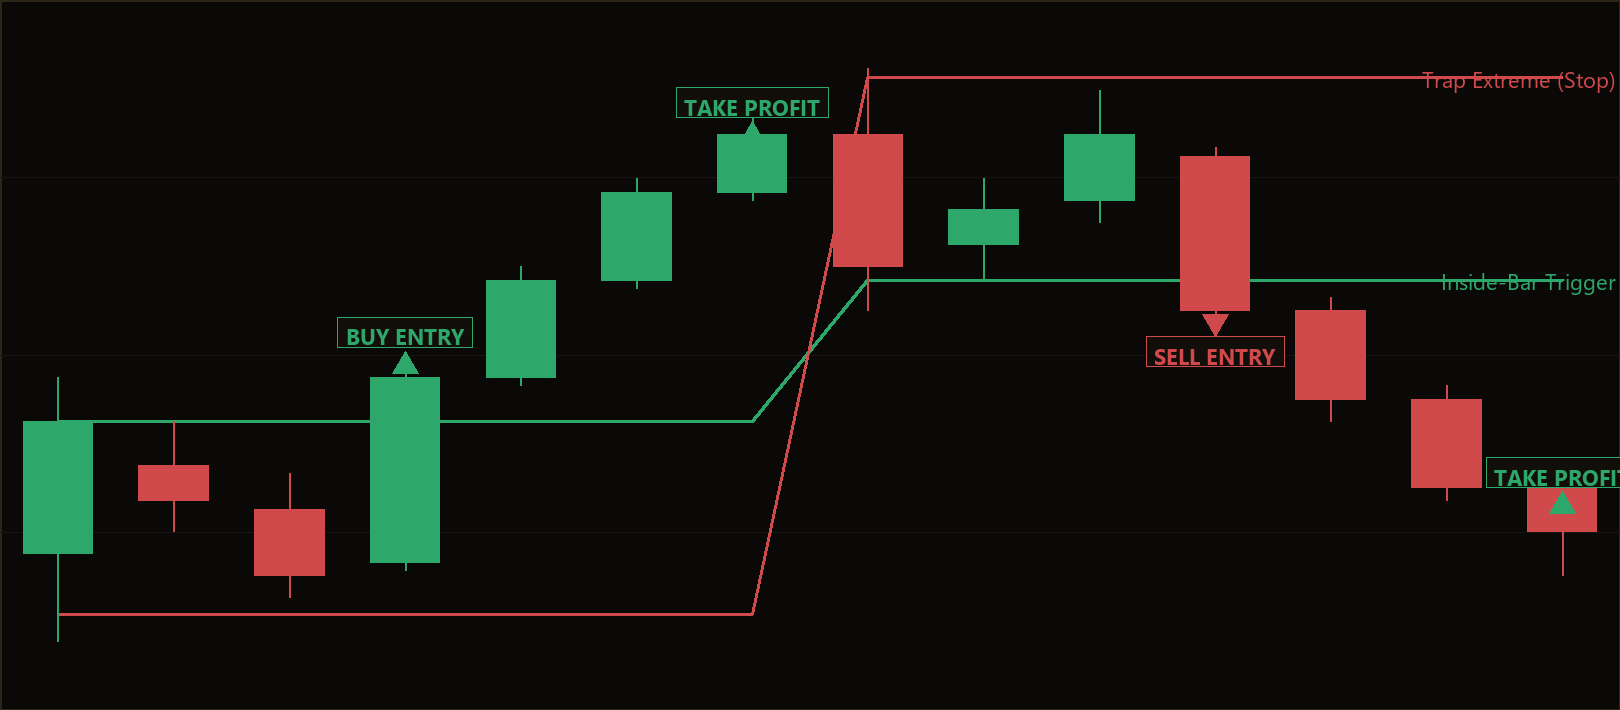
The strategy works exclusively on closed bars and acts once per newly-closed candle. It reads three consecutive bars — labelled Mother → Inside → Fake — to identify a potential trap, then waits for a momentum confirmation before entering.
Setup detection (the trap forms):
- Mother bar — the bar that defines the local support/resistance box. Its high and low frame the structure.
- Inside bar — the next bar, fully contained within the mother bar (its high is below the mother's high and its low is above the mother's low) and tight (its range is no more than
InsideMaxFracof the mother's range). This is the coil everyone is watching. - Fake bar — the following bar, which pokes the wrong way out of the coil:
- Bullish setup: the fake bar makes a lower high and lower low than the inside bar (a downside fake that traps shorts). The strategy arms a long and waits for price to reclaim the inside bar's high.
- Bearish setup: the fake bar makes a higher high and higher low than the inside bar (an upside fake that traps longs). The strategy arms a short and waits for price to lose the inside bar's low.
Trigger (the trap fails and momentum flips):
- Once armed, the strategy gives the reversal a limited window of
ConfirmBarsbars to appear. If no clean trigger arrives in that window, the setup is abandoned. - A trigger requires a later bar to close back through the inside-bar level and be a momentum candle — its body must be at least
MomentumBodyFracof its total range, in the direction of the trade. This filters out weak wick-pokes and demands a conviction candle. - For a long, the close must be above the inside high with a bullish body. For a short, the close must be below the inside low with a bearish body. Only then does the strategy enter at market.
Stop-loss logic:
- The stop is placed a buffer beyond the trap extreme (the "far wall") — the lower of the inside/fake lows for a long, or the higher of the inside/fake highs for a short. This is precisely the level where the trap-reversal thesis would be proven wrong.
- The buffer itself is
BufferFracof the inside bar's own range, so it scales with volatility.
Take-profit logic:
- The take-profit is set as a multiple of the structural stop distance, defined by
RewardRatio. With the default of 2.0, the target sits twice as far from entry as the stop — a 2:1 reward-to-risk structure. - Because every distance is expressed as a fraction of bar range or a reward multiple, the strategy scales to any symbol, timeframe, or volatility without needing the instrument's point size.
Once a position is open, the strategy steps aside and lets the structural stop-loss and take-profit manage the trade. It does not stack new positions while one is live.
Strategy Parameters
| Parameter | Default | Min | Max | Description |
|---|---|---|---|---|
| InsideMaxFrac | 0.80 | 0.30 | 1.00 | Maximum inside-bar range as a fraction of the mother-bar range. Lower values demand a tighter coil before a trap is recognised. |
| ConfirmBars | 3 | 1 | 8 | Number of bars the reversal trigger must arrive within before the armed setup is abandoned. |
| MomentumBodyFrac | 0.50 | 0.20 | 0.90 | The trigger candle's body must be at least this fraction of its total range — a momentum gate that rejects weak wick-only moves. |
| BufferFrac | 0.15 | 0.00 | 0.60 | Stop-loss buffer placed beyond the trap extreme, expressed as a fraction of the inside-bar range. |
| RewardRatio | 2.00 | 0.50 | 5.00 | Take-profit distance as a multiple of the structural stop distance (e.g. 2.00 = a 2:1 reward-to-risk target). |
| Lots | 0.10 | 0.01 | 1.00 | Trade volume in lots for each position. |
| Magic | 7314 | 0 | 9,999,999 | Unique magic number used to identify and manage this EA's trades. |
Recommended Chart Settings
The Hikkake Trap Reversal was designed for whippy, stop-hunt-prone instruments such as GBPJPY or XAUUSD (gold) on the M15 or M30 timeframes. These markets tend to produce frequent coils and false breakouts out of tight inside bars, and their snap-backs are often fast — the conditions this pattern is built to read.
That said, because the logic scales purely from bar structure, you can study it on other symbols and timeframes too. Keep in mind that results will vary considerably across different market conditions: a strategy that reads false breakouts well in a choppy, range-bound market may behave very differently in a strong, sustained trend. Always test any new symbol or timeframe on historical data and a demo account first.
Historical Backtest Results
Note: The figures below are from a historical backtest simulation. Backtests have inherent limitations — they do not account for slippage, requotes, spread widening, or psychological factors. These results should not be interpreted as a prediction of future performance.
No backtest data is available for this strategy at the time of writing. When a historical simulation has been run, the key metrics — such as Net Profit, Profit Factor, Sharpe Ratio, Win Rate, Maximum Drawdown, and Total Trades — would be presented here. Until then, you are encouraged to run your own backtests in the MetaTrader 5 Strategy Tester across a range of market conditions to understand how the strategy behaves historically before considering any live use.
How to Install on MetaTrader 5
- Download the .ex5 file from the link below
- Copy it to your MT5
MQL5\Expertsfolder - Restart MetaTrader 5 or refresh the Navigator panel
- Drag the EA onto a chart matching the recommended symbol and timeframe
- Configure the input parameters and enable Algo Trading
What to Consider Before Using This EA
Like every approach, the Hikkake Trap Reversal has clear strengths and equally clear limitations, and it is worth weighing both honestly.
Strengths of this approach:
- No indicators, no lag. Because it reads raw bar structure, there is no smoothing or averaging delay. The signal forms the moment the trap and confirmation appear.
- Defined, structural risk. The stop sits at the trap's far wall — a logical "I was wrong" level — rather than at an arbitrary distance, and the reward-to-risk is fixed in advance.
- Volatility-agnostic scaling. Expressing everything as fractions of bar range means the same settings can be studied across different symbols and timeframes.
- Momentum confirmation. The body-fraction gate helps avoid acting on weak wick-pokes that never followed through.
Known limitations:
- Range-dependent edge. False-breakout traps are most common in choppy, coiling markets. In a strong directional trend, an apparent "fake" breakout may simply be the start of a real move, leading the strategy to fade momentum at the wrong time.
- Whipsaw exposure. In very noisy conditions, the strategy can be armed and stopped out repeatedly as price chops around the trap extreme.
- No trade-management layer. Once a position is open, it relies entirely on the fixed stop and target — there is no trailing stop, break-even move, or partial profit-taking.
- Spread and slippage sensitivity. Because it trades on instruments like GBPJPY and gold, where spreads can widen quickly, live execution may differ from idealised backtests.
The Hikkake Trap Reversal is best understood as an educational framework for studying false breakouts and reversals — not as a complete, hands-off system.
Risk Management Tips
Sound risk management matters far more than any single entry signal. As you study this strategy, keep these general principles in mind:
- Risk only a small fraction per trade. A common educational guideline is to risk no more than 1–2% of your account on any single position. Adjust the
Lotsparameter so that the distance from entry to stop represents only that small slice of your balance. - Understand position sizing. Because the stop distance varies with each setup's bar range, the same lot size carries different monetary risk on different trades. Size deliberately rather than using a fixed lot blindly.
- Always demo first. Run the strategy on a demo account for an extended period before risking real capital, so you can observe how it behaves through different market conditions.
- Respect drawdown. Every strategy endures losing streaks. Decide in advance how much drawdown you are willing to tolerate, and study how the strategy historically performed during its worst stretches.
- Diversify your study. Do not rely on a single strategy or instrument. Treat this as one tool among many in your trading education.
Risk Warning
Trading foreign exchange, CFDs, and other leveraged financial instruments involves substantial risk of loss and is not suitable for all investors. The strategies and tools discussed on this page are provided for educational purposes only and do not constitute financial advice, investment recommendations, or solicitation to trade. Always consult a qualified financial adviser before making trading decisions. Past backtest performance is not indicative of future results.
Downloads
- Expert Advisor: HikkakeTrapReversal.ex5 (0 downloads)
- Source Code: HikkakeTrapReversal.mq5 (0 downloads)
- Documentation: HikkakeTrapReversal.pdf (1 downloads)