Disclaimer: This article is for educational and informational purposes only. It does not constitute financial or investment advice. Trading forex and CFDs carries significant risk of loss. Past performance of any strategy — including backtests — does not guarantee future results. Never trade with money you cannot afford to lose.
What Is This Strategy?
The Steady Baseline Trend Pullback strategy is a trend-following continuation system built around an inverse-volatility weighted moving average — a custom baseline that treats calm, tightly-ranged bars as the most trustworthy readings of price and heavily down-weights violent spike bars. Where an ordinary moving average is jerked around by news candles, stop-runs, and one-off gaps, this "steady baseline" is designed to stay smooth and anchored to where the market genuinely agreed on value. Each completed bar contributes to the line with a weight of 1 divided by its True Range, so quiet bars dominate while wide, chaotic bars are almost ignored.
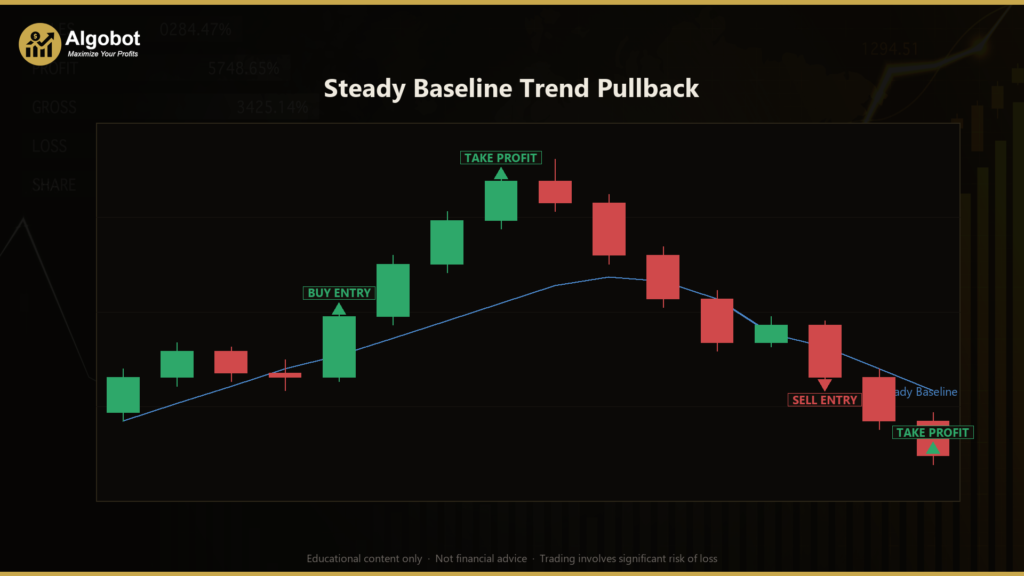
The core idea is that spike bars are the least informative about fair value, not the most. By weighting the baseline toward consensus rather than noise, the strategy aims to produce fewer false pullback signals — and because false signals are what create needless losing trades, a steadier line is meant to translate into lower drawdown. The baseline is used strictly as a with-trend pullback engine: it buys shallow dips that reclaim a rising line and sells shallow rallies that reclaim a falling one. It never fades a trend or trades counter to the prevailing drift.
As a learning tool, this strategy is well suited to traders who want to study how noise-robust averaging, slope filters, and multi-gate entry logic combine to control risk. It is designed for trending conditions on major forex pairs and metals, and it illustrates several concepts worth understanding in isolation: volatility weighting, ATR-normalized slope measurement, shallow-versus-deep pullback classification, and structural stop placement. It is not a "set and forget" money engine — it is a transparent example of disciplined continuation trading.
How It Works
The strategy evaluates its logic once per completed bar and enforces three independent gates before it will act. All measurements are expressed in ATR (Average True Range) units — ATR is a standard volatility gauge — so the rules behave consistently across instruments and timeframes.
The steady baseline and trend gate:
- The strategy computes the inverse-volatility weighted mean of the typical price
(High + Low + Close) / 3over the lastBaselineBarsbars. This is the steady baseline. - It measures the baseline's slope over the last
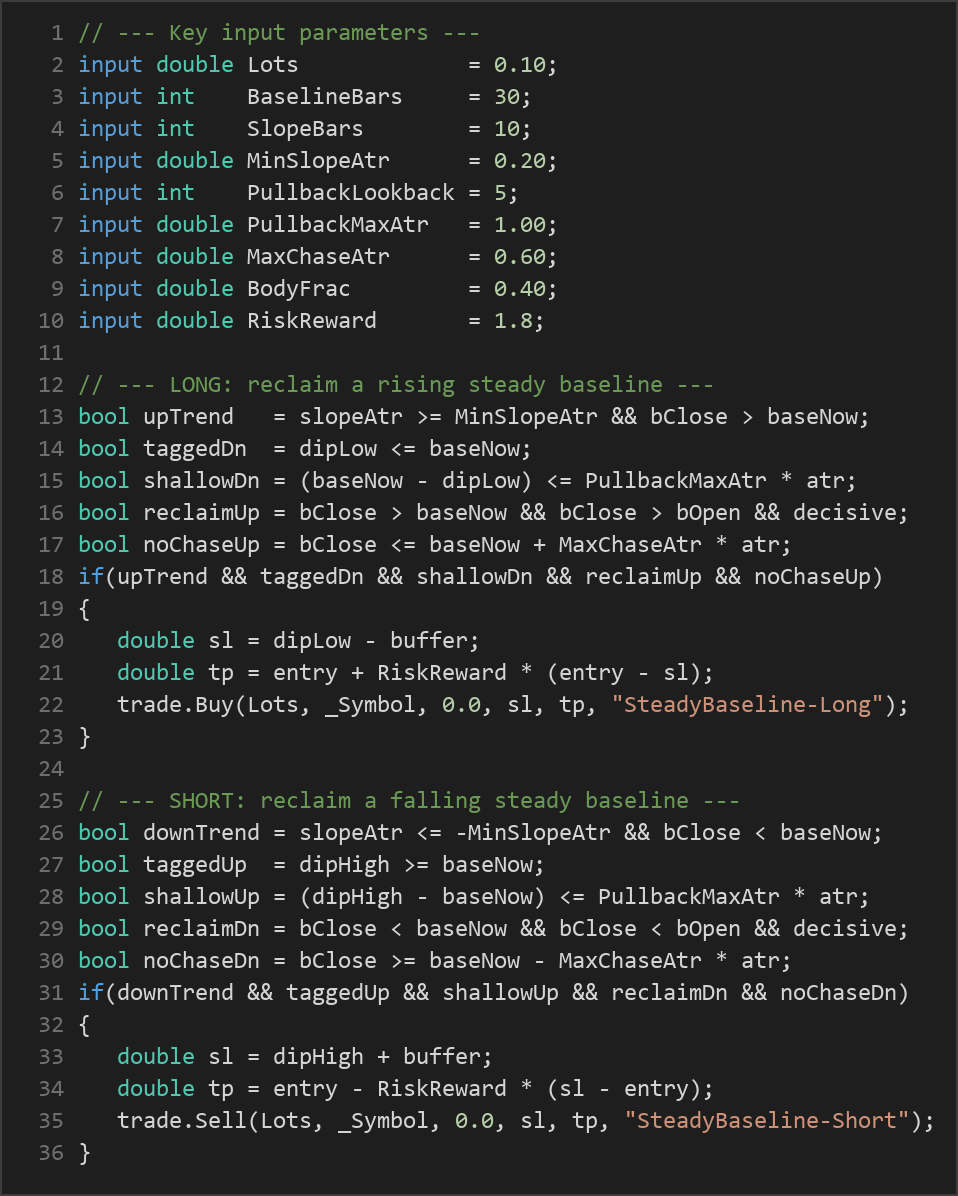
SlopeBarsbars and divides that change by ATR to get a scale-free slope reading. - For a long setup, the baseline must be rising by at least
MinSlopeAtrand price must sit above it. For a short, the mirror must hold. If the slope is too flat, no trade is considered — the strategy will not fight a directionless market.
The shallow-dip gate (pullback geometry):
- Over the last
PullbackLookbackbars, the strategy finds the lowest low (for longs) or highest high (for shorts). - That extreme must have actually tagged the baseline — the dip has to reach the line, confirming a genuine pullback rather than an untested drift.
- But the dip may not sink deeper than
PullbackMaxAtr × ATRbeyond the baseline. A shallow dip signals a strong, healthy trend; a deep dip suggests the trend may be breaking, so that setup is skipped.
The reclaim gate (acceptance, not a wick):
- Entry triggers only when the just-closed bar closes back on the trend side of the baseline.
- That bar must be decisive: its body must be at least
BodyFracof its full range, filtering out indecisive doji-style bars. - A no-chase filter rejects the entry if price has already extended more than
MaxChaseAtr × ATRbeyond the baseline, so the strategy never buys into an over-stretched move.
Exit, stop-loss, and take-profit logic:
- The stop-loss sits just past the pullback extreme, offset by
BufferAtr × ATR. Because the dip was required to be shallow, this stop is structurally tight. - The take-profit is a fixed multiple of the initial risk, set by
RiskReward. - Once price advances by
BreakevenRtimes the initial risk, the stop is pulled to breakeven to protect the trade. - If
TrailAtris greater than zero, an ATR-based trailing stop follows price to lock in gains. - A fast invalidation rule closes the position the moment a completed bar closes back through the baseline — so a failed continuation typically costs only a fraction of the full stop distance.
The strategy holds only one position at a time and manages breakeven and trailing logic on every tick.

Strategy Parameters
| Parameter | Default | Min | Max | Description |
|---|---|---|---|---|
| Lots | 0.10 | 0.01 | 1.00 | Fixed trade size (lot volume) per position. |
| BaselineBars | 30 | 10 | 120 | Number of completed bars used to build the inverse-volatility weighted steady baseline. |
| SlopeBars | 10 | 3 | 40 | Lookback used to measure the baseline's slope for the trend gate. |
| MinSlopeAtr | 0.20 | 0.00 | 2.00 | Minimum baseline slope (in ATR units) required to confirm a trend. Higher values demand a steeper trend. |
| PullbackLookback | 5 | 2 | 15 | How many recent bars are scanned to detect the pullback tag of the baseline. |
| PullbackMaxAtr | 1.00 | 0.20 | 3.00 | Maximum allowed dip depth beyond the baseline (in ATR units). Deeper dips are rejected as trend-breaking. |
| MaxChaseAtr | 0.60 | 0.10 | 2.00 | No-chase filter: maximum distance price may be beyond the baseline at entry (in ATR units). |
| BodyFrac | 0.40 | 0.10 | 0.90 | Minimum candle body size as a fraction of its range for the reclaim bar to count as decisive. |
| AtrPeriod | 14 | 7 | 28 | Averaging period for the ATR volatility measure. |
| BufferAtr | 0.10 | 0.00 | 0.50 | Extra stop-loss cushion beyond the pullback extreme, in ATR units. |
| RiskReward | 1.8 | 0.8 | 4.0 | Take-profit distance as a multiple of the initial risk (reward-to-risk ratio). |
| BreakevenR | 1.0 | 0.0 | 3.0 | Profit (in units of initial risk) at which the stop is moved to breakeven. |
| TrailAtr | 0.0 | 0.0 | 3.0 | ATR-multiple trailing-stop distance. Zero disables trailing. |
Recommended Chart Settings
This strategy was designed for trending major currency pairs and metals — for example EUR/USD, USD/JPY, and XAU/USD (Gold) — on intraday-to-swing timeframes in the M15 to H4 range. Because it reads only the primary chart timeframe, it will run on whatever symbol and timeframe you attach it to, but its logic is tuned for instruments that tend to produce sustained directional moves rather than tight, choppy ranges.
Keep in mind that results will vary considerably across different market conditions. A parameter set that behaves well on one pair or timeframe may behave very differently on another, and the same instrument can shift between trending and ranging regimes over time. Always test any configuration on your own broker's data before drawing conclusions.
How to Install on MetaTrader 5
- Download the .ex5 file from the link below
- Copy it to your MT5
MQL5\Expertsfolder - Restart MetaTrader 5 or refresh the Navigator panel
- Drag the EA onto a chart matching the recommended symbol and timeframe
- Configure the input parameters and enable Algo Trading
What to Consider Before Using This EA
The main strength of this approach is its focus on noise robustness and drawdown control. By weighting the baseline toward calm bars and rejecting deep pullbacks, over-extended entries, and indecisive candles, the strategy is engineered to avoid the low-quality signals that erode a trend-follower's equity. The tight structural stop, breakeven lock, and fast baseline-loss invalidation all work toward keeping individual losses small.
However, every design has trade-offs, and this one is no exception:
- It needs a trend. In flat or choppy markets the slope gate rarely activates, so the strategy may sit idle for long stretches or produce a string of small losses as false starts fail their invalidation check.
- Whipsaw risk at trend turns. The fast invalidation reduces the cost of a failed continuation, but it can also exit trades early during normal noise, then re-enter — sometimes clipping a position just before it would have worked.
- Parameter sensitivity. The gates interact, and settings that suit one instrument's volatility profile may filter out too many (or too few) setups on another. Over-optimizing to past data is a real risk.
- Single-timeframe view. The strategy reads only its attached timeframe, so it has no higher-timeframe context to warn it when it is trading against a larger structure.
Treat this EA as a study in disciplined continuation logic, not as a guaranteed outcome. Historically, trend-pullback systems tend to have a moderate win rate with occasional extended flat periods, and this one is no different.
Risk Management Tips
Sound risk management matters more than any single indicator setting. As a general education-focused guideline:
- Risk only a small fraction per trade. Many educational sources suggest risking no more than 1–2% of account equity on any single position. Size your
Lotsso that the distance to your stop-loss respects that limit. - Start on a demo account. Run the strategy on a demo or a very small live account first, long enough to see it trade through both trending and ranging conditions before committing meaningful capital.
- Understand drawdown. Even a well-designed system will string together losing trades. Know the largest peak-to-trough decline you are willing to tolerate, and stop trading if it is reached.
- Do not over-leverage. Leverage amplifies losses as readily as it amplifies gains. Keep total exposure conservative.
- Review, don't blindly trust. Periodically check that the strategy is behaving as intended on your broker's spreads and execution, and be prepared to disable it when market conditions no longer match its design.
Risk management is the part of trading that is fully within your control — treat it as the priority.
Risk Warning
Trading foreign exchange, CFDs, and other leveraged financial instruments involves substantial risk of loss and is not suitable for all investors. The strategies and tools discussed on this page are provided for educational purposes only and do not constitute financial advice, investment recommendations, or solicitation to trade. Always consult a qualified financial adviser before making trading decisions. Past backtest performance is not indicative of future results.
Downloads
- Expert Advisor: SteadyBaselineTrendPullback.ex5 (40 downloads)
- Source Code: SteadyBaselineTrendPullback.mq5 (40 downloads)
- Documentation: SteadyBaselineTrendPullback.pdf (40 downloads)