Disclaimer: This article is for educational and informational purposes only. It does not constitute financial or investment advice. Trading forex and CFDs carries significant risk of loss. Past performance of any strategy — including backtests — does not guarantee future results. Never trade with money you cannot afford to lose.
What Is This Strategy?
The Anchored Momentum Trend Shift strategy is a trend-continuation trading system built around the Anchored Momentum oscillator, a lesser-known momentum tool developed by Rudy Stefenel. Momentum indicators measure how fast price is moving and in which direction. Where a classic momentum reading compares today's price to a single price a fixed number of bars ago, Anchored Momentum smooths both ends of that comparison — it divides a short exponential moving average (EMA) by a longer, centred simple moving average (SMA) and expresses the result as a percentage. This produces a steadier, near-zero-lag oscillator that is far less sensitive to a single noisy bar in the reference window.
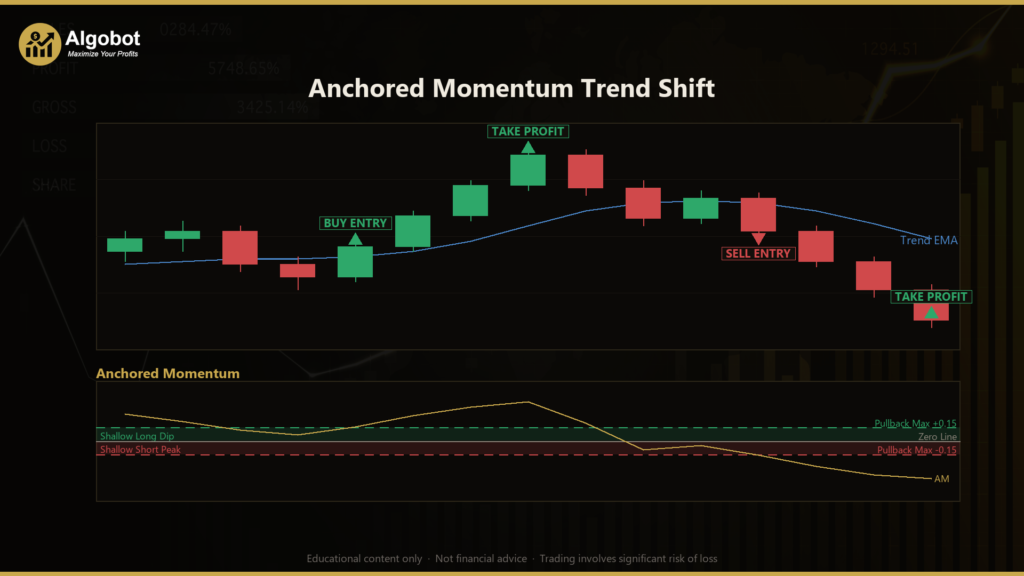
Rather than trying to call tops and bottoms, this strategy is designed to trade the breather that happens inside an already-established trend. It looks for a shallow pullback in momentum that never fully reverses, then re-enters in the direction the trend is already travelling. In practical terms, it is a pullback continuation approach — it waits for a live trend, waits for a small dip, and joins the move as it resumes.
As an educational tool, this strategy suits traders who want to study how oscillators can be combined with a trend filter to time entries, and who are interested in the difference between trading a zero-line crossover (a reversal signal) versus trading a with-trend continuation. It was designed with liquid, trending markets in mind — such as major forex pairs, gold (XAUUSD), and stock indices — on intraday-to-swing timeframes. It is not intended as a "set and forget" money maker, and no strategy can promise favourable outcomes.
How It Works
The strategy processes each newly closed bar, calculates its indicators, and then checks whether a set of conditions line up. It manages any open position on every price tick. Here is the logic in plain English:
The core indicator — Anchored Momentum (AM):
- AM = 100 × ( EMA(Close, EmaPeriod) ÷ SMA(Close, 2×MomentumPeriod+1) − 1 )
- The numerator is a fast EMA, so the "now" end of the comparison is smoothed rather than a raw price.
- The denominator is an SMA whose length is always odd (2×q+1), centred q bars back — this centred average is the "anchor."
- When AM is above zero, the fast EMA sits above the anchored average, indicating net upward drift. Below zero indicates downward drift. The sign describes the regime; the slope describes the impulse.
Trend filter (the gate):
- A long-period trend EMA must be rising, and price must be above it, to allow long trades.
- The mirror applies for shorts: the trend EMA falling and price below it.
- "Rising" or "falling" is judged by comparing the EMA now to its value
SlopeBarsbars ago.
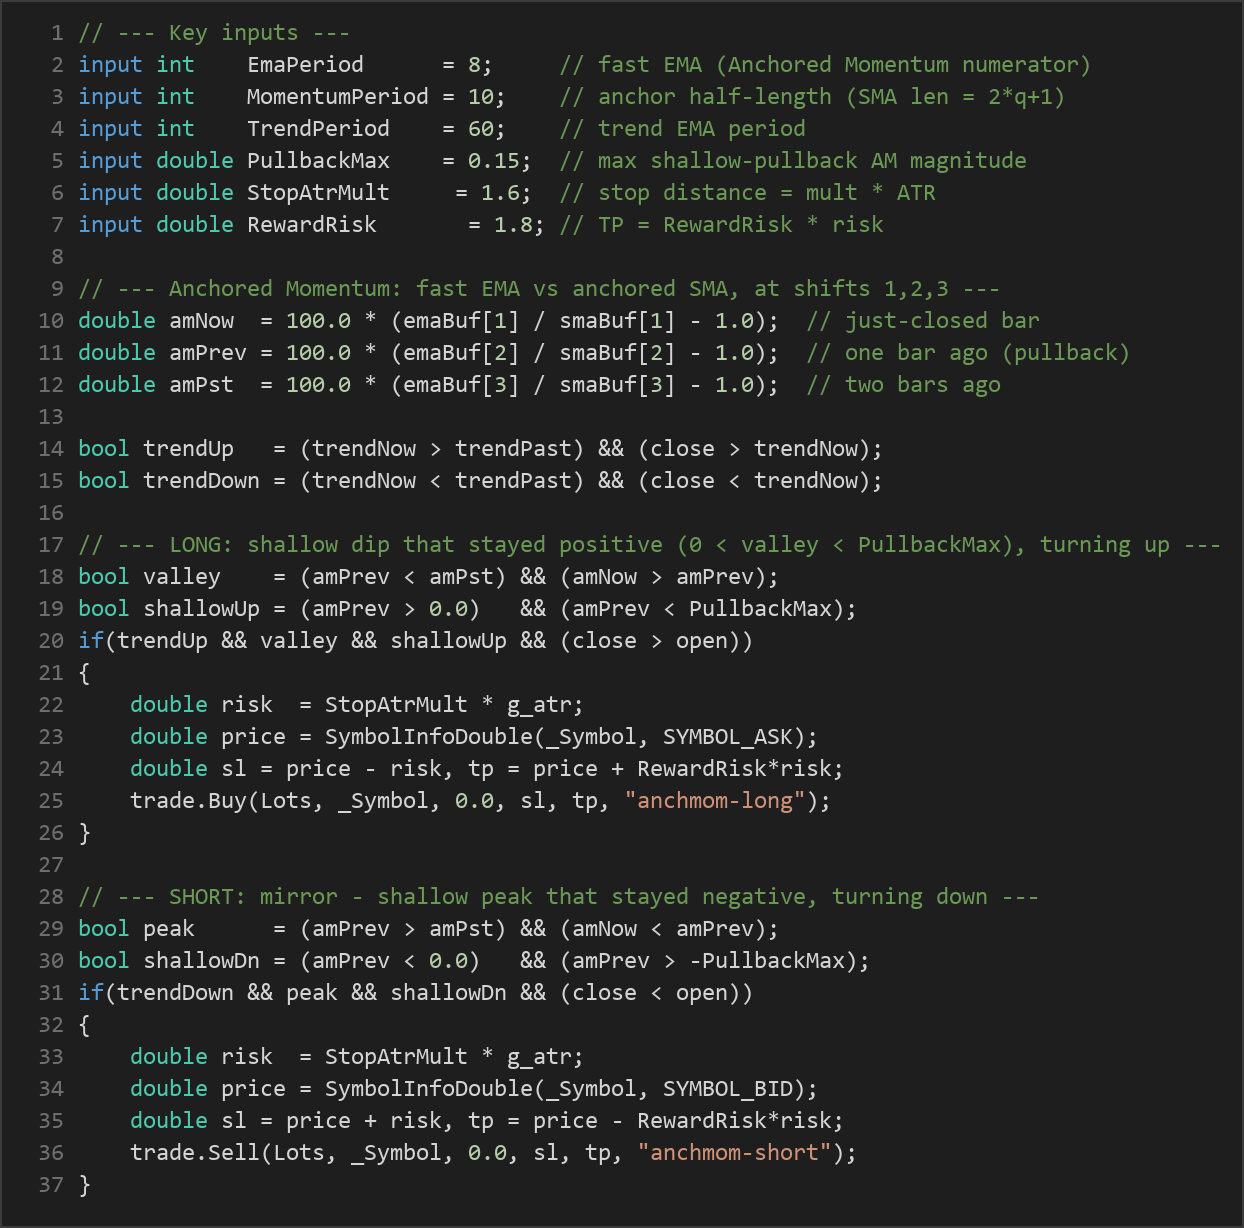
Long entry — the strategy signals a long when all of these are true:
- The trend filter is up (trend EMA rising and price above it).
- Anchored Momentum made a shallow pullback that stayed positive — its valley value one bar ago sat between 0 and
PullbackMaxand never flipped negative. - AM has now turned back up (a local valley one bar ago, higher this bar).
- The just-closed bar is bullish (close above open).
Short entry — the exact mirror:
- Trend filter down, AM made a shallow valley-in-negative peak (between −
PullbackMaxand 0) without flipping positive, AM now turning back down, and the just-closed bar is bearish.
Because momentum never crosses zero, the entry is a continuation inside a live trend, not an attempt to catch a reversal. Deep pullbacks that puncture the zero line are deliberately rejected as possible regime changes, which filters for fewer, higher-quality re-entries.
Stop-loss logic:
- The initial stop is placed at
StopAtrMult× ATR away from entry. ATR (Average True Range) measures recent volatility, so the stop adapts to current market conditions.
Take-profit logic:
- The target is set at
RewardRisk× the risk distance. With defaults, that means a reward roughly 1.8 times the initial risk.
Trade management (designed to reduce drawdown):
- Once price moves
BreakevenRrisk-multiples in your favour, the stop jumps to break-even. - From there, the stop trails by
TrailAtrMult× ATR and is never loosened. - Only one position per magic number is allowed at a time, and a spread guard blocks entries when the spread is wider than
MaxSpreadPoints.
Strategy Parameters
| Parameter | Default | Min | Max | Description |
|---|---|---|---|---|
| EmaPeriod | 8 | 3 | 25 | Fast EMA length used as the Anchored Momentum numerator (the "now" end). |
| MomentumPeriod | 10 | 4 | 40 | Anchor half-length; the anchored SMA length is 2×this+1 (always odd). |
| TrendPeriod | 60 | 20 | 200 | Length of the long trend EMA used as the directional filter. |
| SlopeBars | 5 | 2 | 20 | How many bars back the trend EMA is compared to, to judge its slope. |
| PullbackMax | 0.15 | 0.02 | 0.60 | Maximum allowed depth of the shallow AM pullback (in AM units). |
| AtrPeriod | 14 | 5 | 40 | Period for the ATR used in stop, target, and trailing calculations. |
| StopAtrMult | 1.6 | 0.5 | 4.0 | Stop-loss distance as a multiple of ATR. |
| RewardRisk | 1.8 | 1.0 | 5.0 | Take-profit distance as a multiple of the initial risk. |
| BreakevenR | 1.0 | 0.3 | 2.0 | Profit (in risk multiples) required before the stop moves to break-even. |
| TrailAtrMult | 1.5 | 0.5 | 4.0 | Trailing-stop distance as a multiple of ATR after break-even is reached. |
| MaxSpreadPoints | 80 | 5 | 300 | Maximum spread (in points) allowed for a new entry; a poor-conditions guard. |
| Lots | 0.05 | 0.01 | 1.0 | Fixed position size in lots. |
Recommended Chart Settings
This strategy was designed with liquid, trending markets in mind — major forex pairs (such as EUR/USD, GBP/USD, USD/JPY), gold (XAUUSD), and major stock indices. The intended timeframes are M15 through H4, which balance signal frequency against noise.
Nothing about the symbol or timeframe is hardcoded — the strategy reads everything from the chart's primary timeframe — so you are free to test it elsewhere. That said, momentum-continuation logic tends to struggle in choppy, directionless conditions, and results will vary considerably across different symbols, timeframes, and market regimes. Always study its behaviour on your chosen instrument before drawing conclusions.
How to Install on MetaTrader 5
- Download the .ex5 file from the link below
- Copy it to your MT5
MQL5\Expertsfolder - Restart MetaTrader 5 or refresh the Navigator panel
- Drag the EA onto a chart matching the recommended symbol and timeframe
- Configure the input parameters and enable Algo Trading
What to Consider Before Using This EA
Strengths of this approach. By requiring an established trend and a momentum pullback that never crosses zero, the strategy filters out many low-quality signals. Trading the dip-and-resume within a trend — rather than a zero-line crossover — historically tends to avoid the whipsaws that reversal signals suffer near turning points. The break-even lock and ATR trail are engineered to protect capital and cap drawdown once a trade moves onside.
Known limitations. No indicator eliminates false signals. The Anchored Momentum oscillator, like all momentum tools, can produce shallow "valleys" during broad sideways ranges that look like pullbacks but never develop into real continuations. The trend filter reduces this but cannot remove it entirely. Because the strategy waits for confirmation (a turn in momentum plus a with-trend bar), entries arrive slightly after the exact pullback low — a deliberate trade-off of precision for reliability.
Where it may underperform. Range-bound, low-volatility, or news-driven erratic markets are the hardest environment for any trend-continuation system. Sharp V-shaped reversals may trigger the stop before the trail engages. Wide-spread symbols or illiquid sessions can also erode the modest edge the logic aims for, which is why the spread guard exists. Treat this EA as a framework for learning about momentum and trend filtering, not as a guaranteed outcome.
Risk Management Tips
Sound risk management matters more than any single entry signal. Consider these general principles:
- Position sizing: Size trades so that a single loss represents only a small fraction of your account. A common educational guideline is risking no more than 1–2% of account equity per trade.
- Understand your drawdown: Even a well-designed strategy will endure losing streaks. Study the maximum historical drawdown before committing real capital, and ask whether you could tolerate it emotionally.
- Use a demo account first: Test the EA on a demo account across different market conditions to understand how it behaves before risking live funds.
- Respect the spread and session: Trade during liquid hours and keep the spread guard active to avoid entering in poor conditions.
- Never over-leverage: Leverage amplifies both gains and losses. Keep it conservative, especially while learning.
- Keep a trading journal: Record why each trade was taken and how it was managed so you can review and improve your process.
Risk Warning
Trading foreign exchange, CFDs, and other leveraged financial instruments involves substantial risk of loss and is not suitable for all investors. The strategies and tools discussed on this page are provided for educational purposes only and do not constitute financial advice, investment recommendations, or solicitation to trade. Always consult a qualified financial adviser before making trading decisions. Past backtest performance is not indicative of future results.
Downloads
- Expert Advisor: AnchoredMomentumTrendShift.ex5 (25 downloads)
- Source Code: AnchoredMomentumTrendShift.mq5 (22 downloads)
- Documentation: AnchoredMomentumTrendShift.pdf (33 downloads)