
Disclaimer: This article is for educational and informational purposes only. It does not constitute financial or investment advice. Trading forex and CFDs carries significant risk of loss. Past performance of any strategy — including backtests — does not guarantee future results. Never trade with money you cannot afford to lose.
What Is This Strategy?
The Return Concentration Breakout is a momentum-emergence strategy that uses a normalized Herfindahl-Hirschman Index (HHI) — a concentration measure borrowed from economics — applied to the distribution of recent price movement. Rather than reacting to how far price has travelled, this trading approach studies how that travel is distributed across the most recent bars. It is designed for markets transitioning out of quiet, balanced ranges into a fresh directional impulse, and it is best understood as a study in momentum microstructure rather than a shortcut to results.
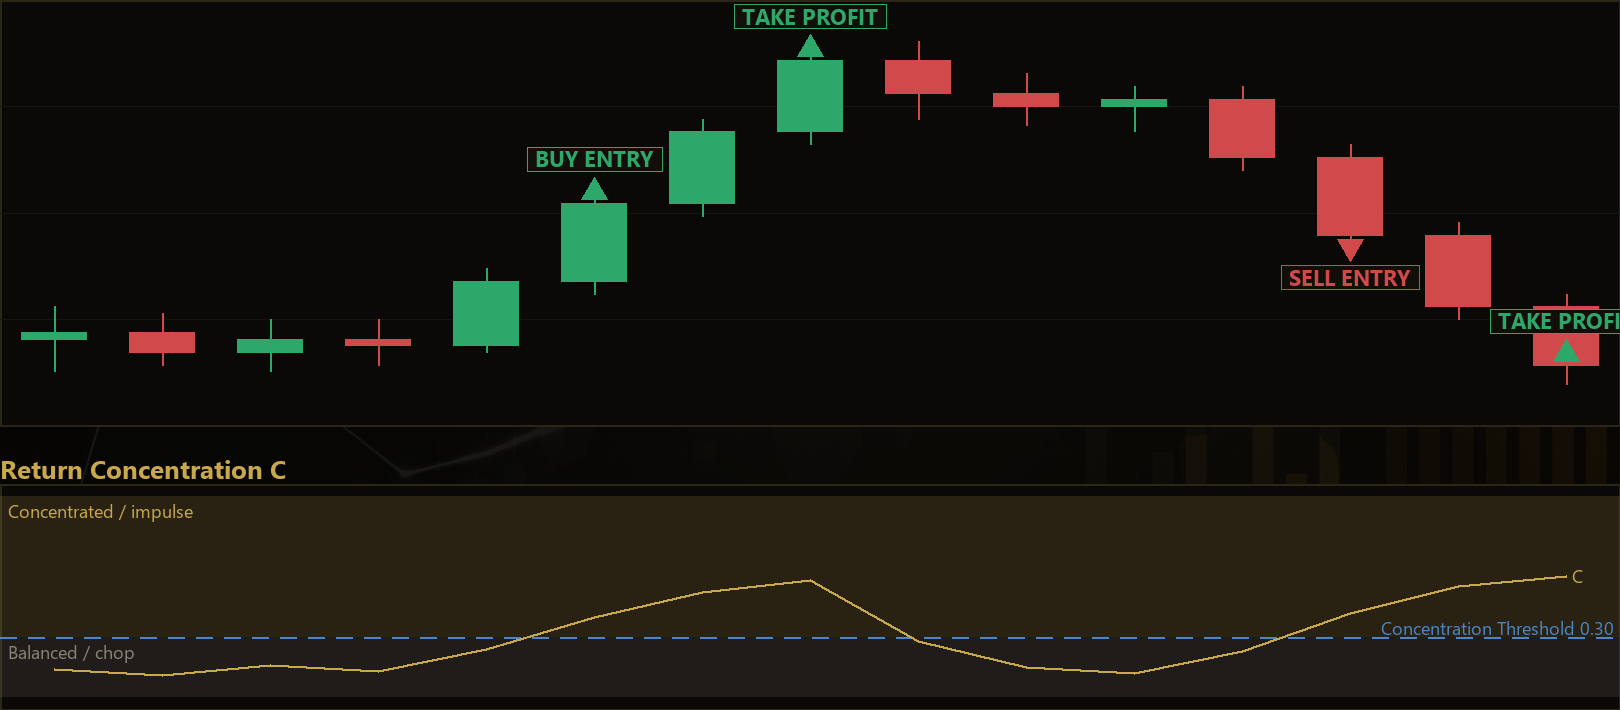
The core idea is intuitive once you see the analogy. In economics, the HHI measures how concentrated market share is among competing firms: if one firm dominates, the index is high; if share is spread evenly, it is low. Here, the "firms" are the last several bars, and each bar's "share" is its fraction of the total absolute movement over the window. When that movement is spread evenly across all bars, concentration is low — a sign of chop and noise. When a handful of dominant bars begin carrying almost all the travel, concentration rises, which may indicate that an impulse is igniting. The strategy acts on the emergence of that concentration, not just its presence.
This EA is suitable as a learning tool for traders who want to understand how statistical concentration measures can be repurposed as breakout filters, and who are curious about the difference between the size of a move and its shape. It is a single-symbol, single-timeframe system with fully symmetric long and short logic and ATR-based risk control. Treat it as a framework for studying momentum emergence — not as a finished, hands-off solution.
How It Works
The strategy evaluates its logic once per closed bar, acts on only one position at a time, and manages every trade with an ATR-based stop and a reward-multiple target. Here is the step-by-step flow:
- Building the return window: For a window of
Windowbars, the strategy computes each bar's absolute returnr = |close − previous close|. Each bar's "share" is its return divided by the sum of all returns in the window. - Measuring concentration: It squares and sums those shares to form the raw HHI, then normalizes it to a clean
[0, 1]scale called C. A value near 0 means movement is spread evenly (chop); a value near 1 means one or two bars dominate the window (impulse). - Requiring emergence, not just presence: The strategy compares C on the last closed bar against C one bar earlier. It signals only when concentration crosses up through the
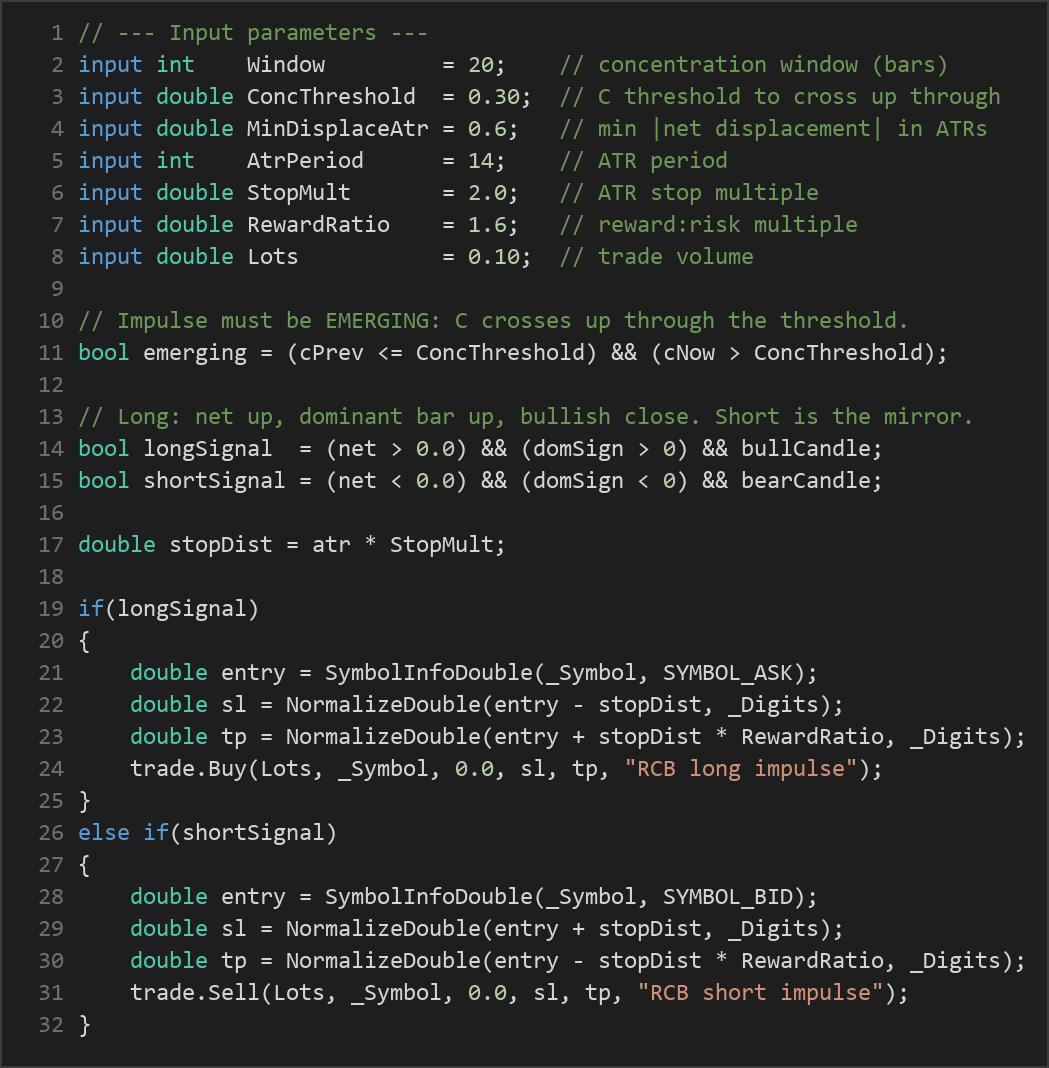
ConcThreshold— meaning the previous reading was at or below the threshold and the current reading is above it. This "crossing from below" is what catches a trend igniting out of a balanced range rather than one already in full view. - Confirming direction three ways: Direction is taken from the signed net displacement over the window (where price actually ended up). The strategy additionally requires that the single largest-return bar in the window points the same way as the net move — so the concentration is being driven by the move, not against it — plus a confirming close on the trigger bar (bullish close for longs, bearish close for shorts).
- Requiring a material move: The absolute net displacement must exceed
MinDisplaceAtrmultiplied by the current ATR. This filters out concentration spikes that are statistically sharp but too small to matter. - Long entry: The strategy signals a long when net displacement is positive, the dominant bar points up, and the trigger bar closes bullish. Entry is at the ask price.
- Short entry: The mirror image — negative net displacement, a downward dominant bar, and a bearish trigger close. Entry is at the bid price.
- Stop-loss logic: The stop is placed at a distance of
ATR × StopMultfrom entry — below entry for longs, above for shorts — so risk scales automatically with current volatility. - Take-profit logic: The target is set at
stop distance × RewardRatiofrom entry, giving a fixed reward-to-risk relationship on every trade. - One trade at a time: While a position tagged with the strategy's magic number is open, no new signals are taken. The ATR stop and target manage the trade to completion.
Strategy Parameters
| Parameter | Default | Min | Max | Description |
|---|---|---|---|---|
| Window | 20 | 8 | 60 | Number of bars in the concentration window over which per-bar returns are measured. |
| ConcThreshold | 0.30 | 0.10 | 0.70 | The normalized concentration level (C) that must be crossed upward from below to arm a signal. |
| MinDisplaceAtr | 0.6 | 0.0 | 3.0 | Minimum absolute net displacement over the window, expressed in ATR units, required for a trade. |
| AtrPeriod | 14 | 5 | 40 | Lookback period for the Average True Range used as the volatility risk unit. |
| StopMult | 2.0 | 0.5 | 5.0 | Multiplier applied to ATR to set the stop-loss distance from entry. |
| RewardRatio | 1.6 | 0.5 | 5.0 | Reward-to-risk multiple; the take-profit distance is the stop distance times this value. |
| Lots | 0.10 | 0.01 | 1.0 | Fixed trade volume in lots for each position. |
Recommended Chart Settings
The Return Concentration Breakout was designed as a single-timeframe system operating on the primary chart it is attached to. A common starting point for study is a major forex pair such as EUR/USD on an H1 (1-hour) timeframe, which offers enough bars for the concentration window to be meaningful while keeping signals reasonably frequent. Because the strategy uses ATR for both its displacement filter and its risk sizing, it adapts naturally to instruments with different volatility profiles.
That said, the concentration threshold and window size interact strongly with the character of each market. A shorter window reacts faster but is noisier; a longer window is smoother but slower to detect emergence. You should expect results to vary considerably across different symbols, timeframes, and market conditions, and you should test any configuration thoroughly in the Strategy Tester before considering it on a live or demo chart.
How to Install on MetaTrader 5
- Download the .ex5 file from the link below
- Copy it to your MT5
MQL5\Expertsfolder - Restart MetaTrader 5 or refresh the Navigator panel
- Drag the EA onto a chart matching the recommended symbol and timeframe
- Configure the input parameters and enable Algo Trading
What to Consider Before Using This EA
Every strategy has a character, and understanding it honestly matters more than any single setting.
Strengths of this approach. The concentration measure captures something that raw price change and simple moving averages miss: the shape of a move. Two windows can travel the same net distance, but if one did it in a single decisive bar and the other drifted there evenly, they represent very different market states. By requiring the crossing to emerge from below the threshold, and by demanding that the dominant bar, net displacement, and trigger candle all agree on direction, the strategy filters for internally consistent impulses rather than isolated spikes. ATR-based stops and targets keep risk proportional to prevailing volatility.
Known limitations. This is a breakout-style system, and breakout logic characteristically underperforms in tight, mean-reverting ranges where concentration spikes appear and then fail. False emergence — a burst of concentration that fizzles before follow-through — is the natural failure mode here, and the fixed reward-to-risk exit means some trades will be stopped out even after a valid signal. The strategy also takes only one position at a time and waits for a full bar to close before acting, so it will not react intrabar and may miss fast moves that complete within a single candle. Because signals depend on a threshold crossing, long quiet periods can produce no trades at all.
Where it may underperform. Choppy, low-volatility conditions, news-driven whipsaws, and instruments with erratic spreads can all degrade the quality of the concentration signal. As with any single-indicator framework, the strategy has no awareness of higher-timeframe context, correlation, or macro events. Use it as one lens among several, not as a complete decision system.
Risk Management Tips
Sound risk management is the foundation of any trading education, and it matters far more than any individual parameter choice:
- Size positions conservatively. A widely taught guideline is to risk no more than 1–2% of account equity on any single trade. The fixed
Lotsinput does not scale to your account automatically, so calculate what that lot size means for your balance and the ATR-based stop distance before trading. - Understand your drawdown tolerance. Even a well-behaved strategy will experience losing streaks. Know in advance how large a peak-to-trough decline you can accept, both financially and emotionally.
- Start on a demo account. Test the EA in the MT5 Strategy Tester and then on a demo account across varied market conditions before risking real capital. This is where you learn how the strategy behaves, not where you expect it to perform.
- Respect the stop. The ATR-based stop exists to define your risk. Widening or removing it during a losing trade defeats the entire risk framework.
- Diversify your study. Avoid concentrating your learning — or your capital — in a single strategy, symbol, or idea.
Risk Warning
Trading foreign exchange, CFDs, and other leveraged financial instruments involves substantial risk of loss and is not suitable for all investors. The strategies and tools discussed on this page are provided for educational purposes only and do not constitute financial advice, investment recommendations, or solicitation to trade. Always consult a qualified financial adviser before making trading decisions. Past backtest performance is not indicative of future results.
Downloads
- Expert Advisor: ReturnConcentrationBreakout.ex5 (40 downloads)
- Source Code: ReturnConcentrationBreakout.mq5 (50 downloads)
- Documentation: ReturnConcentrationBreakout.pdf (54 downloads)