
Disclaimer: This article is for educational and informational purposes only. It does not constitute financial or investment advice. Trading forex and CFDs carries significant risk of loss. Past performance of any strategy — including backtests — does not guarantee future results. Never trade with money you cannot afford to lose.
What Is This Strategy?
The Weighted Rate Of Change Momentum Cross is a trend-following momentum strategy built around a composite Rate of Change (ROC) oscillator — a measure of how fast price is moving relative to a past bar, expressed as a percentage. Instead of relying on a single ROC reading, this strategy blends four ROC series over increasing lookback horizons, smooths each one, and combines them into a single momentum line. That composite line is then traded against its own signal line in a classic crossover style, with an added "zero-line" gate that keeps entries on the correct side of momentum. The design is inspired by Martin Pring's "summed rate-of-change" family of indicators (often associated with the KST, or Know Sure Thing).
The core idea is that any single momentum reading is a compromise. A short ROC reacts quickly but whipsaws constantly; a long ROC is smoother but lags. By averaging four horizons and weighting the slower ones more heavily (1-2-3-4), the strategy aims to build a momentum line that leans on longer, more reliable trends while still turning early thanks to the faster inputs. This makes it best suited to markets that trend and pull back rather than markets stuck in tight, directionless ranges.
As a learning tool, this strategy is well suited to intermediate traders who want to understand how composite momentum oscillators are constructed and how crossover logic can be filtered to reduce noise. It is designed with H1 and H4 charts on majors, gold (XAUUSD), and index CFDs in mind, though the timeframe is never hardcoded — it uses whatever chart it is attached to. Treat it as a framework for studying momentum-based entries and ATR-driven risk management, not as a shortcut to any particular outcome.
How It Works
The strategy processes only closed bars to avoid repainting (signals changing after the fact). The currently forming bar is used solely to detect when a new bar has opened. Here is the full logic in plain English:
- Build four ROC readings. On each new closed bar, the strategy calculates the rate of change of price over four different lookbacks (default 10, 15, 20, and 30 bars). Each measures percentage momentum over its own horizon.
- Smooth each ROC into an RCMA. Every ROC series is averaged with a simple moving average (the
SmoothPeriod, default 10), turning a noisy reading into a smoothed rate-of-change moving average (RCMA). - Combine into a weighted composite. The four smoothed readings are summed with rising weights:
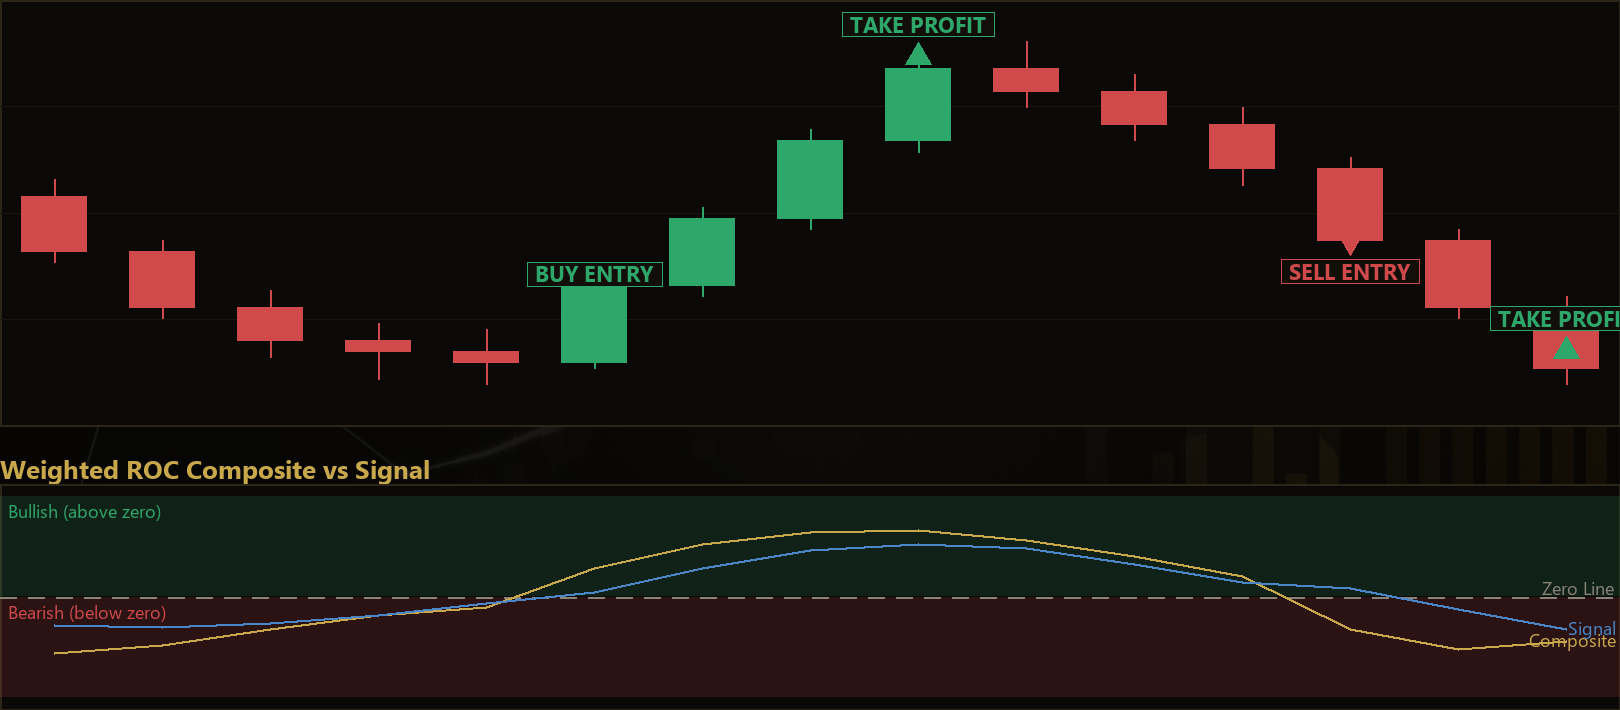
composite = 1×RCMA1 + 2×RCMA2 + 3×RCMA3 + 4×RCMA4. Slower horizons carry more authority, producing one well-behaved momentum line. - Create a signal line. The signal line is a simple moving average of the composite over
SignalPeriodbars (default 9), used as the reference for crossovers. - Entry — long: the strategy signals a long when the composite crosses up through its signal line and the composite sits above the positive
ZeroBufferthreshold (bullish side of momentum). - Entry — short: the strategy signals a short when the composite crosses down through its signal line and the composite sits below the negative
ZeroBufferthreshold (bearish side of momentum). - Zero-line gate. Requiring the cross to happen on the correct side of zero filters out low-conviction crosses that cluster near the flat line during choppy conditions — a common weak spot in naive MACD or KST crossover systems.
- One trade at a time. Only one position per magic number is allowed, and a configurable
CooldownBarsdelay prevents rapid re-entries. - Stop-loss: placed at
SlAtrMult × ATRaway from entry, so the stop distance adapts to current volatility rather than a fixed pip value. - Take-profit: placed at
TpAtrMult × ATRaway from entry, giving a fixed risk-to-reward ratio defined by the two multipliers. - ATR trailing stop: once price moves
TrailStartMultATRs in the trade's favor, the stop is pulled toTrailAtrMultATRs behind price. The stop only ever tightens — it never loosens — helping lock in progress as a trend extends.
Strategy Parameters
| Parameter | Default | Min | Max | Description |
|---|---|---|---|---|
| Roc1Period | 10 | 3 | 30 | Lookback for the fastest rate-of-change series |
| Roc2Period | 15 | 5 | 45 | Lookback for the second rate-of-change series |
| Roc3Period | 20 | 8 | 60 | Lookback for the third rate-of-change series |
| Roc4Period | 30 | 12 | 90 | Lookback for the slowest rate-of-change series |
| SmoothPeriod | 10 | 2 | 30 | SMA length used to smooth each ROC into an RCMA |
| SignalPeriod | 9 | 3 | 30 | SMA length of the composite that forms the signal line |
| ZeroBuffer | 0.0 | 0.0 | 5.0 | Zero-line gate; distance from zero required to allow an entry |
| AtrPeriod | 14 | 7 | 40 | ATR period used for stop and target sizing |
| SlAtrMult | 2.0 | 0.8 | 5.0 | Stop-loss distance as a multiple of ATR |
| TpAtrMult | 3.0 | 1.0 | 8.0 | Take-profit distance as a multiple of ATR |
| TrailStartMult | 1.0 | 0.0 | 4.0 | ATRs of favorable movement before trailing begins |
| TrailAtrMult | 1.5 | 0.5 | 4.0 | Trailing-stop distance as a multiple of ATR |
| CooldownBars | 1 | 0 | 20 | Bars to wait between consecutive entries |
| Lots | 0.10 | 0.01 | 2.0 | Fixed trade volume in lots |

Recommended Chart Settings
This strategy was designed with H1 and H4 timeframes in mind, applied to liquid instruments such as major forex pairs, gold (XAUUSD), and index CFDs. These markets tend to produce the sustained directional moves that a composite momentum oscillator is built to follow. The timeframe is not hardcoded, so you can attach the EA to any chart and test other combinations.
Because momentum behavior differs across symbols and sessions, results will vary considerably across different market conditions. A setting that looks reasonable on gold may behave very differently on a low-volatility currency cross. Always test any configuration on historical data and a demo account before considering it on a live chart, and re-check parameters periodically as market volatility regimes shift.
How to Install on MetaTrader 5
- Download the .ex5 file from the link below
- Copy it to your MT5
MQL5\Expertsfolder - Restart MetaTrader 5 or refresh the Navigator panel
- Drag the EA onto a chart matching the recommended symbol and timeframe
- Configure the input parameters and enable Algo Trading
What to Consider Before Using This EA
Strengths. The strategy's main advantage is its layered filtering. By blending four ROC horizons and weighting the slower ones more heavily, it produces a smoother, less erratic momentum line than a single oscillator. The zero-line gate adds a second filter that historically helps avoid the low-conviction crosses that occur near the flat line during ranging markets. On top of that, ATR-based stops and a ratcheting trailing stop mean the risk framework adapts to volatility rather than using rigid pip distances.
Limitations. Like all momentum-crossover systems, this approach is inherently reactive — it confirms that momentum has already shifted rather than predicting a turn. In sideways or choppy markets, the composite line can hover near its signal line and produce a cluster of crosses; the zero-line gate reduces but does not eliminate these. Because it uses several long lookbacks and smoothing layers, the composite can also lag at sharp reversals, occasionally entering late or after much of a move has passed. Sudden gaps or news-driven spikes can push price through an ATR stop with slippage.
Where it may underperform. Tight, low-volatility ranges and prolonged consolidations are the hardest environment for this design, since momentum readings stay compressed near zero. Very fast, mean-reverting instruments may also trigger frequent whipsaws. This EA is best understood as a study in trend-continuation momentum, not a tool for every market state.
Risk Management Tips
Sound risk management matters more than any single indicator setting. Consider these general principles as part of your education:
- Risk a small, fixed fraction per trade. Many educational sources suggest risking no more than 1–2% of account equity on any single position, so that a string of losses does not threaten your capital.
- Size positions to your stop, not to your ambition. Because this strategy uses ATR-based stops, the distance to your stop changes with volatility. Calculate your lot size from that stop distance rather than trading a fixed lot blindly.
- Start on a demo account. Test any configuration in the MT5 Strategy Tester and on a demo account across different market conditions before risking real capital.
- Understand drawdown. Every strategy has losing streaks. Review the maximum historical drawdown so you know the kind of equity dips that are normal, and decide in advance what level would prompt you to stop and reassess.
- Avoid over-optimization. Tuning parameters until they fit past data perfectly ("curve fitting") often produces settings that fail going forward. Favor robust, moderate settings that work across a range of conditions.
- Keep leverage modest. Leverage amplifies both gains and losses; using less than the maximum available can help you survive volatile periods.
Risk Warning
Trading foreign exchange, CFDs, and other leveraged financial instruments involves substantial risk of loss and is not suitable for all investors. The strategies and tools discussed on this page are provided for educational purposes only and do not constitute financial advice, investment recommendations, or solicitation to trade. Always consult a qualified financial adviser before making trading decisions. Past backtest performance is not indicative of future results.
Downloads
- Expert Advisor: WeightedRateOfChangeMomentumCross.ex5 (48 downloads)
- Source Code: WeightedRateOfChangeMomentumCross.mq5 (44 downloads)
- Documentation: WeightedRateOfChangeMomentumCross.pdf (49 downloads)