Disclaimer: This article is for educational and informational purposes only. It does not constitute financial or investment advice. Trading forex and CFDs carries significant risk of loss. Past performance of any strategy — including backtests — does not guarantee future results. Never trade with money you cannot afford to lose.
What Is This Strategy?
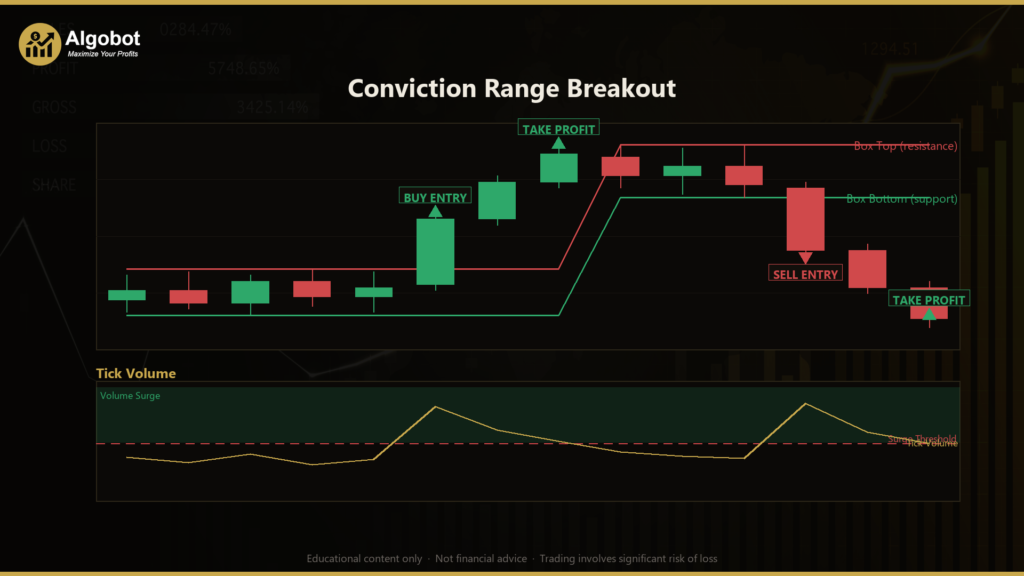
Conviction Range Breakout is a pure price-action range breakout strategy for MetaTrader 5 that trades the moment a quiet consolidation gives way to a decisive move. Unlike many breakout systems, it uses no technical indicators at all — no moving averages, no oscillators, no momentum studies. Every decision is derived directly from raw OHLC data (the open, high, low, and close of each candle) and tick volume (the number of price changes recorded in a bar, a rough proxy for activity). The "conviction" in its name refers to a triple filter that demands a breakout candle prove genuine intent before any trade is taken.
The strategy is designed for markets that spend long stretches range-bound — drifting sideways inside a horizontal price band — before eventually erupting into a directional move. Most range edges are tested and rejected many times, and naive breakout systems bleed capital chasing thin, low-participation pokes through those edges that quickly snap back. Conviction Range Breakout tries to sidestep that problem by first confirming that a range is genuinely tight and settled, then waiting for a single closed candle that breaks the edge with a large body, a close near its own extreme, and a surge in tick volume.
As a learning tool, this strategy suits traders who want to study how breakout confirmation can be built entirely from candlestick structure. It is a clear, readable example of multi-condition filtering and structural risk placement. It is not a guaranteed system and is best explored on a demo account first. Treat it as a framework for understanding why certain breakouts are worth acting on and others are noise.
How It Works
The strategy evaluates the market once per completed candle. When a new bar opens, the bar that just closed becomes the "trigger" candidate and is tested against a sequence of gates. Only one position is held at a time per magic number.
Building the consolidation box
- The strategy looks back over the last
RangeBarscandles immediately preceding the trigger candle. - It records the highest high (the box top) and the lowest low (the box bottom), forming a horizontal range, or "box."
- It also averages the tick volume of those box candles to establish a baseline level of participation.
Confirming the range is genuinely tight
- It calculates
avgRange, the average candle range (high minus low) over the lastVolPeriodcandles, as a volatility proxy. - If the box height is taller than
MaxBoxMult×avgRange, the setup is rejected — the "box" is too wide and likely already trending rather than consolidating.
The three conviction gates (direction-independent)
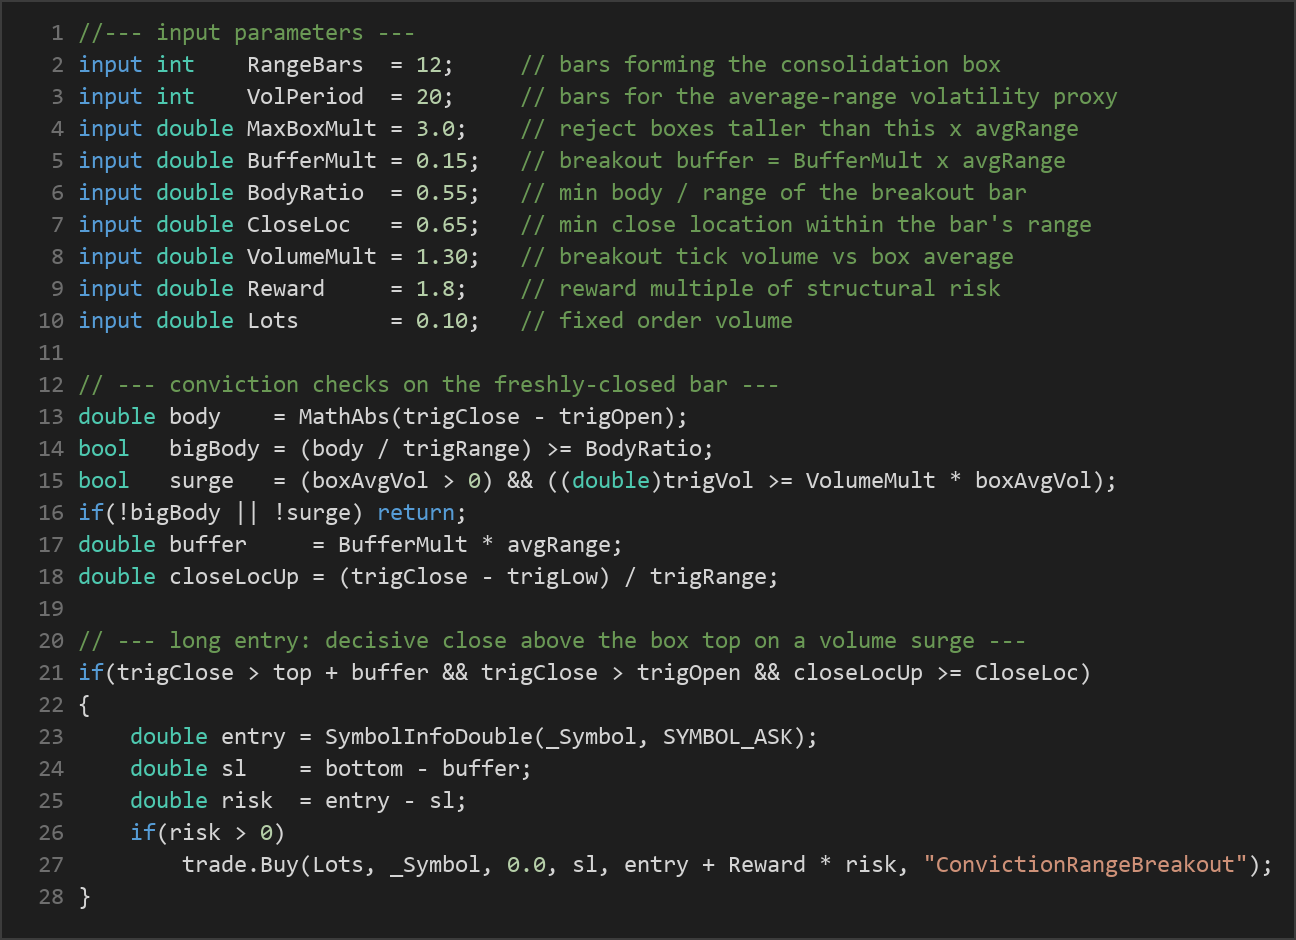
- Body dominance: the trigger candle's body (the distance between its open and close) must fill at least
BodyRatioof its full high-to-low range. This filters out indecision candles such as dojis. - Participation: the trigger candle's tick volume must be at least
VolumeMult× the average volume of the box candles — evidence that real supply or demand stepped in, not a vacuum. - Close location: the close must sit in the leading fraction of the candle's own range (at least
CloseLoc), confirming the candle closed near its extreme rather than fading back.
The entry signals
- The strategy signals a long when the trigger candle closes above the box top by a buffer (
BufferMult×avgRange), closes above its open, and closes near its high — all three conviction gates passing. - It signals a short when the trigger candle closes below the box bottom by the same buffer, closes below its open, and closes near its low.
Stop-loss and take-profit logic
- For a long, the stop-loss is placed structurally just below the box bottom (
bottom − buffer); for a short, just above the box top (top + buffer). The far side of the range defines the risk. - The take-profit is a fixed multiple of that structural risk, set by the
Rewardparameter. If risk is one box-width, the target sitsReward× that distance away. - Once a trade is open, the structural stop and target manage it; no new position is taken until the current one closes.
Strategy Parameters
| Parameter | Default | Min | Max | Description |
|---|---|---|---|---|
| RangeBars | 12 | 6 | 40 | Number of candles used to build the consolidation box (its top, bottom, and volume baseline). |
| VolPeriod | 20 | 8 | 60 | Number of candles used to compute the average-range volatility proxy. |
| MaxBoxMult | 3.0 | 1.5 | 7.0 | Maximum allowed box height as a multiple of average range; taller boxes are rejected as too wide. |
| BufferMult | 0.15 | 0.0 | 1.0 | Breakout buffer beyond the box edge, expressed as a multiple of average range. |
| BodyRatio | 0.55 | 0.30 | 0.90 | Minimum body-to-range ratio for the breakout candle (decisiveness filter). |
| CloseLoc | 0.65 | 0.50 | 0.95 | Minimum close location within the breakout candle's range (1.0 = at the extreme). |
| VolumeMult | 1.30 | 1.00 | 3.00 | Required breakout tick volume as a multiple of the box average volume. |
| Reward | 1.8 | 0.5 | 5.0 | Take-profit distance as a multiple of the structural stop risk. |
| Lots | 0.10 | 0.01 | 1.0 | Fixed order volume (lot size) used for each trade. |
Recommended Chart Settings
Because every input is derived from OHLC and tick volume, Conviction Range Breakout is timeframe-agnostic — it runs on whichever single timeframe your chart or backtest selects. Many price-action breakout students prefer intraday timeframes such as M15, M30, or H1 on liquid instruments like major forex pairs (for example EUR/USD or GBP/USD) or popular index CFDs, where consolidation-then-expansion behavior is common and tick volume is meaningful.
Keep in mind that the optimal symbol, timeframe, and parameter set are not fixed. Different instruments have different volatility profiles and ranging tendencies, and results will vary across changing market conditions. Always test any configuration on historical data and a demo account before considering live use.
How to Install on MetaTrader 5
- Download the .ex5 file from the link below
- Copy it to your MT5
MQL5\Expertsfolder - Restart MetaTrader 5 or refresh the Navigator panel
- Drag the EA onto a chart matching the recommended symbol and timeframe
- Configure the input parameters and enable Algo Trading
What to Consider Before Using This EA
Strengths of this approach. The triple-confirmation design directly targets the biggest weakness of simple breakout systems: false breaks. By demanding a large body, a strong close location, and a volume surge all at once, the strategy historically ignores many of the listless pokes that trap trend-followers. Its risk placement is logical and structural — the stop sits on the opposite side of the range that defined the setup — and its rules are fully transparent, making it an excellent study piece for understanding breakout quality.
Known limitations. No filter is perfect. Tick volume in MetaTrader is tick count, not true traded volume, so its reliability varies by broker and instrument. The fixed reward multiple means the strategy does not adapt its target to evolving momentum, and a structural stop on the far side of a wide box can represent a meaningful distance, affecting position risk. In strongly trending markets the "tight box" filter may reject most setups, producing long quiet periods.
Where it may underperform. Choppy, low-volatility conditions can produce frequent small breaks that fail the conviction gates — or worse, occasionally pass them and reverse. News-driven spikes can trigger a volume surge and large body that does not follow through. As with any single-strategy approach, performance may degrade when market character shifts from ranging to trending or vice versa. Demo testing across varied conditions is essential.
Risk Management Tips
Sound risk management matters far more than any single entry rule. Consider these general principles as you study this strategy:
- Position sizing: Size each trade so that a stop-out costs only a small, predefined slice of your account. A common educational guideline is to risk no more than 1–2% of account equity per trade.
- Respect the structural stop: This EA's stop is set by the far side of the range. Confirm that the resulting lot size keeps your per-trade risk within your comfort zone rather than fixing lots blindly.
- Use a demo account first: Test the strategy on historical data and in a demo environment across different symbols and market conditions before risking real capital.
- Understand drawdown: Even well-designed strategies experience losing streaks. Know the maximum historical drawdown you are willing to tolerate and how it would feel in practice.
- Avoid over-leverage: Leverage magnifies both gains and losses. Keep total exposure modest and never trade with funds you cannot afford to lose.
- Keep expectations realistic: No strategy wins every trade. Focus on consistent process and disciplined risk control rather than any individual outcome.
Risk Warning
Trading foreign exchange, CFDs, and other leveraged financial instruments involves substantial risk of loss and is not suitable for all investors. The strategies and tools discussed on this page are provided for educational purposes only and do not constitute financial advice, investment recommendations, or solicitation to trade. Always consult a qualified financial adviser before making trading decisions. Past backtest performance is not indicative of future results.
Downloads
- Expert Advisor: ConvictionRangeBreakout.ex5 (2 downloads)
- Source Code: ConvictionRangeBreakout.mq5 (1 downloads)
- Documentation: ConvictionRangeBreakout.pdf (1 downloads)