
Disclaimer: This article is for educational and informational purposes only. It does not constitute financial or investment advice. Trading forex and CFDs carries significant risk of loss. Past performance of any strategy — including backtests — does not guarantee future results. Never trade with money you cannot afford to lose.
What Is This Strategy?
The Breaker Block Reversal is a pure price-action strategy built around the ICT (Inner Circle Trader) concept of a "breaker block," and it uses no technical indicators whatsoever — every decision comes from raw candle geometry such as swing structure, liquidity sweeps, and order-block candle bodies. In trading terms, an order block is the candle that sits at the origin of a strong impulsive move. A breaker block is an order block that failed: price reached past a prior swing to grab liquidity (the resting stop orders), that push could not continue, and the market then shifted direction. The candle that should have extended the failed move is now violated and "flips polarity" — old supply becomes demand, or old demand becomes supply.
This is a reversal trading style, which makes it deliberately different from continuation systems that simply re-enter an existing trend. The Breaker Block Reversal is designed for ranging or turning markets where a clear liquidity grab (a stop-run beyond a recent high or low) is followed by a market-structure shift (MSS) — a close back through the swing that preceded the sweep. In plain English, the strategy looks for moments where one side of the market gets trapped, then trades the snap-back in the opposite direction.
As a learning tool, this EA (Expert Advisor — an automated trading program for MetaTrader 5) is well suited to traders who want to study modern price-action and ICT concepts in a fully mechanical, rule-based form. Because the logic is transparent and indicator-free, you can watch each step — sweep, shift, zone, retest — play out on the chart and understand exactly why a signal did or did not fire. It is framed here as a strategy analysis for study, not as a profit opportunity.
How It Works
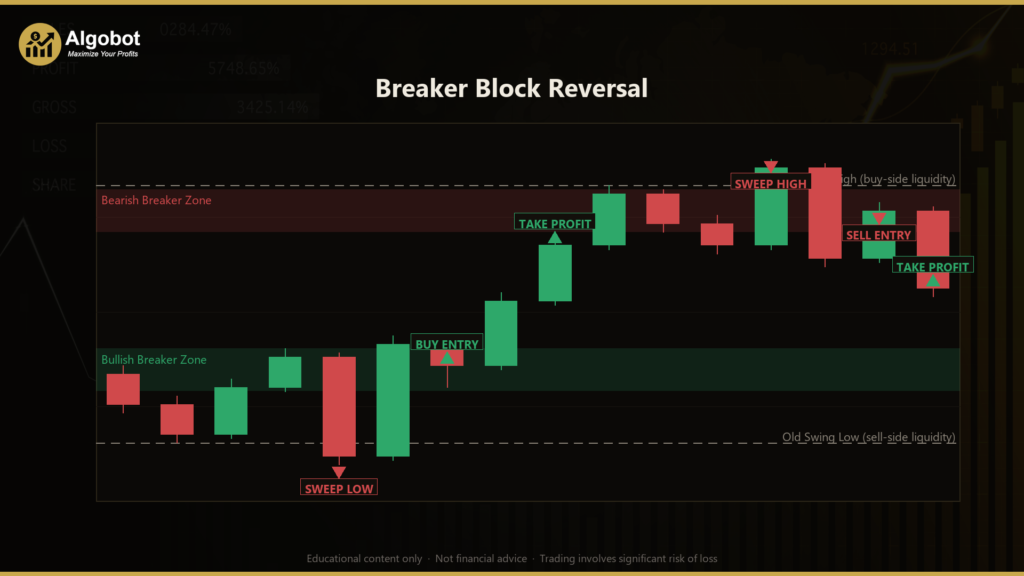
The strategy walks through a small state machine for both bullish and bearish setups. The bullish (bottom-reversal) case works like this; the bearish case is the exact mirror.
- Swing detection: The strategy continuously marks swing highs and swing lows using a fractal pivot. A pivot is confirmed only when a candle's high (or low) is more extreme than the
Pivotcandles on both sides of it, which is why signals are evaluated on closed bars a few candles back. - Step 1 — Sweep (liquidity grab): A fresh swing low prints below the prior swing low. This means sell-side liquidity (stop orders resting under the old low) has been taken. The strategy "arms" a bullish setup.
- Step 2 — Identify the breaker zone: The strategy searches backward (up to
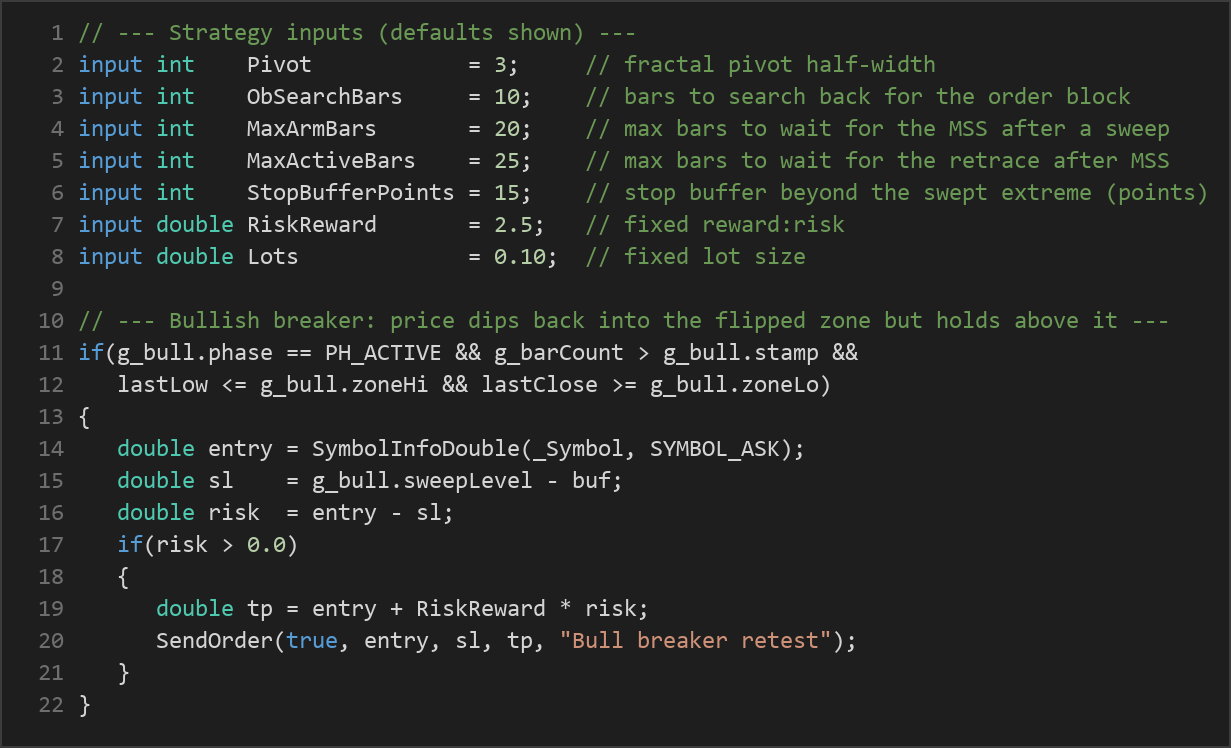
ObSearchBarscandles) for the last up candle before the drop into the swept low. That candle is the failed bearish order block; its high and low become the bullish breaker zone[zoneLo, zoneHi]. - Step 3 — Shift (market-structure shift): A candle must then close above the swing high that preceded the sweep. This MSS confirms the reversal and moves the setup from "Armed" to "Active." If price instead closes back below the swept low, or too many bars pass (
MaxArmBars), the setup is discarded. - Step 4 — Entry (the retest): Once active, the strategy waits for price to retrace down into the flipped breaker zone but hold above it — specifically, the latest candle's low dips into the zone while its close stays at or above the zone bottom. When that retest occurs, the strategy signals a BUY.
- Stop-loss logic: The stop is placed just beyond the swept extreme — for a long, that is the swept low minus a buffer of
StopBufferPoints. This gives a tight, structure-defined risk anchored to the level that would invalidate the reversal idea. - Take-profit logic: The target is a fixed reward-to-risk multiple. The distance from entry to stop (the risk) is multiplied by
RiskRewardand projected in the trade's direction to set the take-profit. - Trade management: Only one position per symbol is held at a time (tracked by the EA's magic number). If an active setup never gets its retest within
MaxActiveBars, it expires and the strategy stands aside.
A bearish breaker mirrors all of the above: a swing high sweeps the prior high, a candle closes below the preceding swing low (MSS down), the last down candle before the rally becomes the bearish breaker, and a rally back into that zone signals a SELL with the stop just above the swept high.
Strategy Parameters
| Parameter | Default | Min | Max | Description |
|---|---|---|---|---|
| Pivot | 3 | 2 | 8 | Fractal pivot half-width — how many candles on each side define a confirmed swing high or low. Higher values mark larger, less frequent swings. |
| ObSearchBars | 10 | 3 | 30 | How many bars to search backward from the swept pivot to locate the order-block candle that becomes the breaker zone. |
| MaxArmBars | 20 | 3 | 60 | Maximum bars to wait for the market-structure shift after a sweep is detected. If the shift does not come in time, the armed setup is discarded. |
| MaxActiveBars | 25 | 3 | 80 | Maximum bars to wait for price to retrace into the breaker zone after the shift confirms. If no retest occurs, the active setup expires. |
| StopBufferPoints | 15 | 0 | 150 | Extra distance (in points) placed beyond the swept extreme when setting the stop-loss, giving the level a small cushion. |
| RiskReward | 2.5 | 1.0 | 6.0 | Fixed reward-to-risk ratio. The take-profit distance equals this multiple of the entry-to-stop distance. |
| Lots | 0.10 | 0.01 | 1.0 | Fixed trade volume in lots for each position. |
Recommended Chart Settings
The Breaker Block Reversal is a structure-based strategy, so it tends to be studied on intraday timeframes such as the M15, M30, or H1 charts of liquid instruments like major forex pairs (for example EUR/USD or GBP/USD) or major indices, where swing structure and liquidity sweeps are well defined. Lower timeframes generate more setups but more noise; higher timeframes produce fewer, cleaner structures. There is no single "correct" setting — the default Pivot of 3 is a balanced starting point, and you should expect results to vary considerably across different symbols, sessions, and market conditions. Always test a configuration on the specific instrument and timeframe you intend to study before drawing any conclusions.
How to Install on MetaTrader 5
- Download the
.ex5file from the link below - Copy it to your MT5
MQL5\Expertsfolder - Restart MetaTrader 5 or refresh the Navigator panel
- Drag the EA onto a chart matching the recommended symbol and timeframe
- Configure the input parameters and enable Algo Trading
What to Consider Before Using This EA
Every strategy has strengths and limitations, and an honest assessment matters more than enthusiasm.
Strengths. Because the logic is pure price action, it does not lag the way indicator-based systems can, and its risk is tightly defined — the stop sits just beyond a structural level that, if broken, genuinely invalidates the idea. The multi-step filter (sweep, then shift, then retest) is selective by design, which historically helps avoid acting on a single ambiguous candle. The breaker-retest concept also targets a recognizable "trapped trader" condition, which is one of the more intuitive reasons a reversal can develop.
Limitations. Reversal systems are, by nature, trading against the immediate prior move, so in strong, persistent trends the breaker zone can be overrun and the stop hit — a failed liquidity grab sometimes simply becomes the start of a larger trend, not a reversal. The strategy depends on clean swing structure; in choppy, low-volatility conditions, pivots and sweeps become unreliable and signals may indicate setups that do not follow through. The fixed reward-to-risk target means winners are capped at a preset multiple, so the strategy will sometimes exit before a larger move completes, and it does not include a trailing stop or breakeven feature. Finally, like any mechanical system, its behavior is sensitive to parameter choices and to the spread and execution quality of your broker.
This EA should be viewed as a framework for studying ICT breaker-block mechanics, not as a finished, hands-off solution.
Risk Management Tips
Sound risk management is what separates disciplined study from gambling. Consider these general principles:
- Risk a small, fixed fraction per trade. Many educators suggest risking no more than 1–2% of account equity on any single position. Note that the
Lotsparameter is a fixed size and does not automatically scale to your account, so size it deliberately for your balance. - Understand your drawdown. Even a well-designed reversal strategy will experience losing streaks. Know the maximum string of losses you are emotionally and financially prepared to sit through before you ever go live.
- Always start on a demo account. Run the EA in a risk-free demo environment first to learn how it behaves across different sessions and market conditions before committing real capital.
- Account for costs. Spread, commission, and slippage all eat into tight, structure-based stops. Test on conditions that resemble your real broker.
- Keep one variable at a time. When you adjust parameters, change them individually so you can understand the effect of each, rather than chasing a curve-fit configuration.
Risk Warning
Trading foreign exchange, CFDs, and other leveraged financial instruments involves substantial risk of loss and is not suitable for all investors. The strategies and tools discussed on this page are provided for educational purposes only and do not constitute financial advice, investment recommendations, or solicitation to trade. Always consult a qualified financial adviser before making trading decisions. Past backtest performance is not indicative of future results.
Downloads
- Expert Advisor: BreakerBlockReversal.ex5 (0 downloads)
- Source Code: BreakerBlockReversal.mq5 (0 downloads)
- Documentation: BreakerBlockReversal.pdf (0 downloads)