Disclaimer: This article is for educational and informational purposes only. It does not constitute financial or investment advice. Trading forex and CFDs carries significant risk of loss. Past performance of any strategy — including backtests — does not guarantee future results. Never trade with money you cannot afford to lose.
What Is This Strategy?
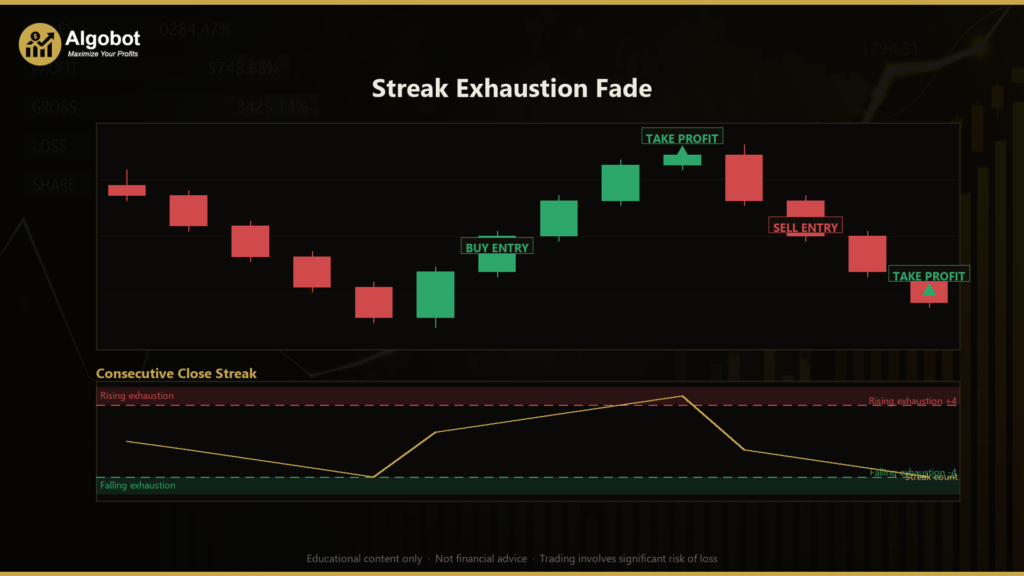
The Streak Exhaustion Fade is a pure price-action mean-reversion strategy for MetaTrader 5 that uses no indicators at all — no moving averages, oscillators, or volume. Instead, it reads raw candle data (open, high, low, and close) to count "streaks" of consecutive same-direction closes and then trades against an over-extended move once momentum visibly turns. "Mean reversion" simply means the idea that price, after stretching far in one direction, tends to snap back toward an average; "fading" means taking a position opposite to the recent move. This is a counter-trend approach, the conceptual opposite of trend-following.
The core observation behind the strategy is intuitive. When a market prints a long run of lower closes (a falling streak) or higher closes (a rising streak), each additional bar in that direction recruits the last marginal buyers or sellers. Historically, when that supply of fresh participants thins out, price can reverse sharply. Rather than guessing the top or bottom, the Streak Exhaustion Fade waits for the market itself to signal exhaustion with a clear rejection bar — a candle that closes back against the streak and parks near its own extreme. Only then does it act.
This EA is best understood as a learning tool for traders who want to study counter-trend logic, candlestick rejection patterns, and structure-based risk placement without the noise of indicator settings. It is suitable for those comfortable reading raw OHLC geometry and who want a transparent, fully rules-based example of how a fade system can be constructed. It is not designed as a hands-off solution, and it is presented here for analysis and education, not as a profit opportunity.
How It Works
The strategy evaluates the market once per newly closed bar — it ignores the still-forming candle so that signals are based only on completed data. On each fresh bar, it checks for one of two mirror-image setups.
Counting the streak:
- The EA counts consecutive lower closes (each close below the one before it) to measure a falling streak, or consecutive higher closes to measure a rising streak.
- The run must contain at least
StreakThresholdcloses to qualify as "exhausted." The scan is capped at 60 bars to keep bar reads bounded.
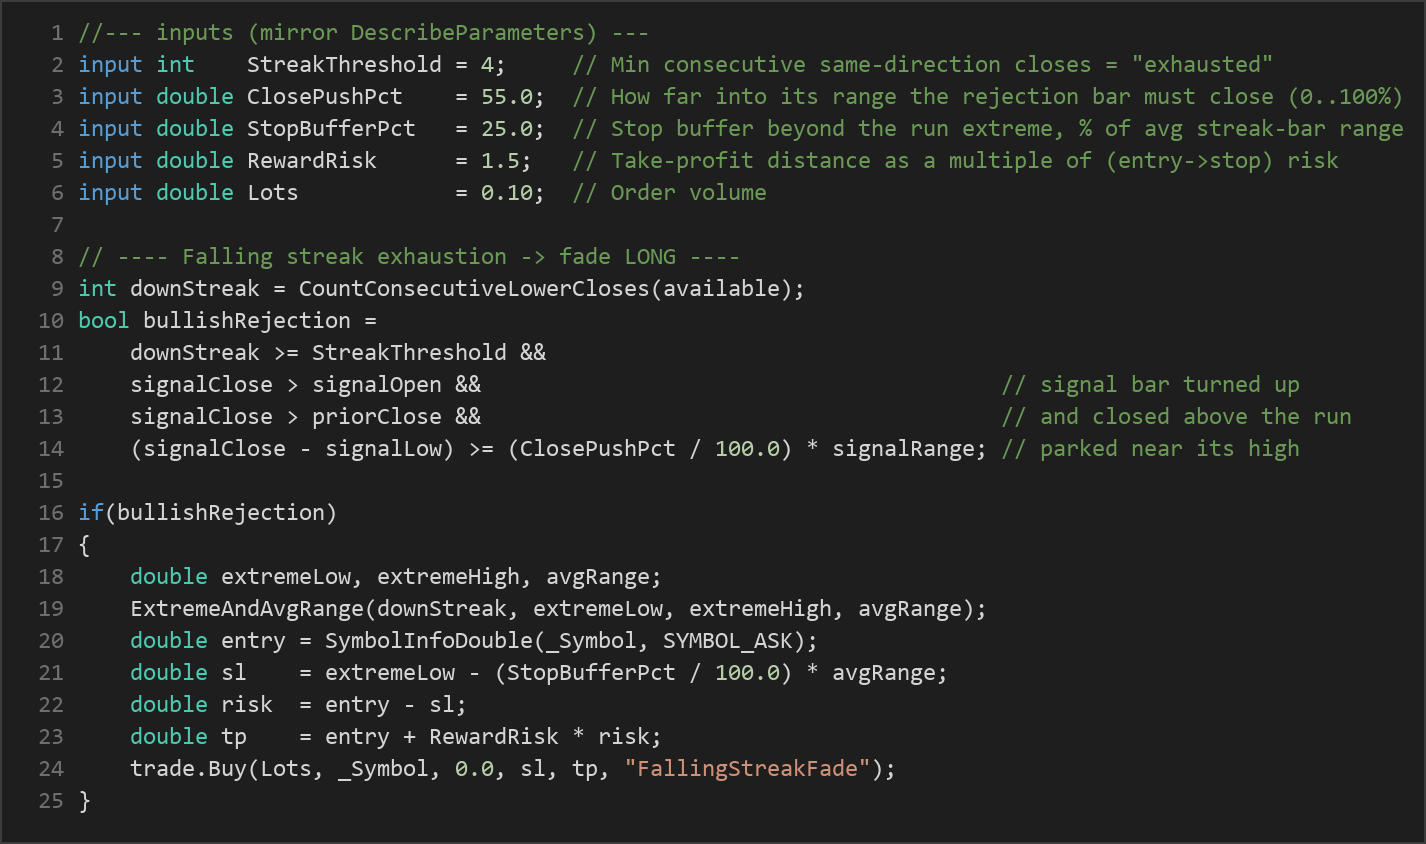
Long (buy) entry — fading a falling streak:
- A qualifying falling streak must be in place.
- The most recently closed bar (the "rejection bar") must close higher than it opened — a bullish candle.
- That bar must close above the last bar of the run, signalling momentum has turned up.
- The bar must close in the upper portion of its own range: the distance from its low to its close must be at least
ClosePushPctof the bar's total range. This proves price was pushed back up and parked near the high. - When all conditions align, the strategy signals a buy at the current ask price.
Short (sell) entry — fading a rising streak:
- A qualifying rising streak must be in place.
- The rejection bar must close lower than it opened — a bearish candle.
- That bar must close below the last bar of the run.
- The bar must close in the lower portion of its range: the distance from its high to its close must be at least
ClosePushPctof the range, parking near the low. - When all conditions align, the strategy signals a sell at the current bid price.
Stop-loss logic:
- For a long, the stop sits just below the lowest low of the entire run (the structural extreme), buffered downward by
StopBufferPctof the average bar range across the streak. - For a short, the stop sits just above the highest high of the run, buffered upward by the same fraction.
- Placing the stop beyond the structural extreme means the trade is invalidated only if price breaks past the very point the fade was betting against.
Take-profit logic:
- The risk is measured as the distance from entry to the stop.
- The take-profit is placed at
RewardRiskmultiplied by that risk distance, in the direction of the trade. - For example, with the default 1.5 reward-to-risk, a target sits 1.5 times the stop distance away.
The EA holds only one position at a time (tracked by its magic number) and relies entirely on the attached stop-loss and take-profit to manage the exit — there is no trailing stop or manual close logic.
Strategy Parameters
| Parameter | Default | Min | Max | Description |
|---|---|---|---|---|
| StreakThreshold | 4 | 3 | 10 | Minimum number of consecutive same-direction closes required to define an "exhausted" run before a fade is considered. |
| ClosePushPct | 55.0 | 0.0 | 100.0 | How far into its own range the rejection bar must close (as a percentage) to confirm the turn. Higher values demand a stronger rejection. |
| StopBufferPct | 25.0 | 0.0 | 150.0 | Extra stop-loss buffer beyond the run's structural extreme, expressed as a percentage of the average streak-bar range. |
| RewardRisk | 1.5 | 0.5 | 5.0 | Take-profit distance as a multiple of the entry-to-stop risk. A value of 1.5 targets 1.5× the risk. |
| Lots | 0.10 | 0.01 | 1.0 | Order volume (position size) in lots. |
Recommended Chart Settings
The Streak Exhaustion Fade is a general-purpose price-action system and is not hard-wired to a single instrument. As a learning starting point, study it on a major forex pair such as EUR/USD on the H1 (1-hour) timeframe, where streaks and rejection bars are reasonably well-defined and spreads are typically tight. Counter-trend logic of this kind also behaves differently on faster timeframes, where noise produces more frequent but lower-quality signals, and on slower timeframes, where signals are rarer but each carries more weight.
Because the strategy reacts to market structure rather than fixed price levels, its behaviour will vary considerably across instruments, sessions, and volatility regimes. Always test any symbol-and-timeframe combination thoroughly on historical data and a demo account before drawing conclusions about how it behaves.
How to Install on MetaTrader 5
- Download the .ex5 file from the link below.
- Copy it to your MT5
MQL5\Expertsfolder. - Restart MetaTrader 5 or refresh the Navigator panel.
- Drag the EA onto a chart matching the recommended symbol and timeframe.
- Configure the input parameters and enable Algo Trading.
What to Consider Before Using This EA
The main strength of the Streak Exhaustion Fade is its transparency. With no indicators to lag or repaint, every decision traces directly to candle geometry you can verify by eye, which makes it an excellent teaching example of how a fade system reasons about exhaustion, rejection, and structural stops. Requiring a confirming rejection bar — rather than blindly fading every long run — is a thoughtful filter that historically helps avoid stepping in front of momentum too early.
That said, counter-trend strategies carry well-known limitations. The biggest is the strong, persistent trend: a market can stay "stretched" far longer than expected, and fading it repeatedly may produce a series of stops as price keeps running. A streak of four lower closes is not rare, so the StreakThreshold and ClosePushPct settings matter a great deal — loose values generate frequent, marginal signals, while strict values may produce very few trades. The strategy also assumes the rejection bar marks a genuine turn; in choppy, low-volatility conditions, a single bullish or bearish candle can be misleading noise. Finally, with a fixed reward-to-risk target and no trailing logic, the system gives back open profit if price reverses before reaching the take-profit. None of these are fatal flaws — they are simply the trade-offs inherent in any mean-reversion approach, and understanding them is part of studying the method.
Risk Management Tips
Sound risk management matters more than any single entry rule. Consider these general principles as you study this or any strategy:
- Risk a small, fixed fraction per trade. Many educational sources suggest risking no more than 1–2% of account equity on any single position, so that a string of losses does not threaten the account.
- Size positions to your stop, not the other way around. The
Lotsdefault of 0.10 is arbitrary; choose volume based on the distance to your stop-loss and your per-trade risk limit. - Test on a demo account first. Run the EA on a demo or backtest for an extended period across different market conditions before considering any live use.
- Understand drawdown. Counter-trend systems can experience clusters of losses during strong trends. Know the historical drawdown of any configuration and ask whether you could tolerate it.
- Keep records and review. Logging every signal and outcome turns the EA into a learning instrument rather than a black box.
Risk Warning
Trading foreign exchange, CFDs, and other leveraged financial instruments involves substantial risk of loss and is not suitable for all investors. The strategies and tools discussed on this page are provided for educational purposes only and do not constitute financial advice, investment recommendations, or solicitation to trade. Always consult a qualified financial adviser before making trading decisions. Past backtest performance is not indicative of future results.
Downloads
- Expert Advisor: StreakExhaustionFade.ex5 (43 downloads)
- Source Code: StreakExhaustionFade.mq5 (44 downloads)
- Documentation: StreakExhaustionFade.pdf (44 downloads)